In this assignment, you will wire three sensors to your Raspberry Pi, to sense light, motion and temperature. You will write code to collect this data, visualise it and trigger actions based on basic data processing.
- Step 1 Organise the Development and Test Workflow
- Step 2 Set up the Sensors
- Step 3 Structure data Collection into a Class
- Step 4 Send Sensor Data to Bucket
- Step 5 Events and Actions
In this assignment, we will make our prototype more aware of its context, with the use of sensor data, Bucket, and some simple data processing.
Step 1 Organise the Development and Test Workflow
Throughout the course, we use the Raspberry Pi as a home hub. We execute our Python scripts on it. In contrast with our personal computer, we can leave it run the whole week so that we can experience the functionality that we developed.
However, there are some functionalities that we can only test on the Raspberry Pi. Collecting data from sensors is one of them, as we need to connect the wires. In this step, we suggest a workflow to continuously code on your machine (where it is convenient) and test on the Raspberry Pi (where the sensors are). The cycle goes like this:
- Edit the code in VS Code, on your machine
- Commit and push the code on GitHub
- Pull the code on the Raspberry Pi
- Execute the code on the Raspberry Pi
Task 1.1 Create a Branch
Back to your repository in VS Code, do not forget to pull the latest version and start up your python virtual environment.
First, we create a Git branch. In VS Code, click on your Git branch in the bottom left corner. Then, select Create a new branch from . It will prompt you for the name of your new branch (e.g. explore-sensor-jacky ) as well as the branch you want to start (e.g. master ).
Alternatively, you can open the Terminal and type in the following git checkout command in which ‘-b’ stand for ‘new branch’.
git checkout -b explore-sensor-jacky master
Task 1.2 Get the code on Raspberry Pi
Open a second Terminal, so that you can use the Terminal on your machine as well as on the Raspberry Pi.
In the new Terminal, use ssh to connect to you Raspberry Pi.
As we use Git for the first time, we can set the basic user information. For this, type in the three following commands, replacing with your name and email address. The third one allows you to store your credential so that you do not need to type then every time you pull or push.
git config --global user.name "Jon Doe"
git config --global user.email "jon@example.com"
git config --global credential.helper store
Then, we want to get our code from GitHub. We use the command git clone with the URL of our repository. We find the URL of our repository on its first page, on GitHub, when we click on the green button ‘Code’.
git clone https://github.com/id5415/id5415-project-demo-team.git
It should create a folder with the name of our repository. We can enter this repository with cd . By default, we are on the master branch. we can confirm this with the command git status As we want to use the code from our new branch, we switch with checkout. Replace the name of the branch by yours. Note this time there is no ‘-b’. We do not want to create a new branch, simply switch to an existing one.
git checkout explore-sensor-jacky
Task 1.3 Set up the Python env
Before executing our code, we need to set up the element which we do not get from GitHub: the virtual environment and the environment variables.
For the virtual environment, you are now used to the following 2 commands to create and activate it.
virtualenv venv
source ./venv/bin/activate
Now, because our lightbulb Thing on Bucket is secured with a private key, we need to copy the private key of the lightbulb from our laptop to the Raspberry Pi. We can do that with the scp command we used in the first lab experiment. This command is copying files remotely, from our project directory where private.pem is stored to the Raspberry Pi directory:
Windows To use the
scpcommand in Windows you first need to download & install the SCP client software SCP Client for Windows x64.
scp private.pem [username]@[hostname].local:~/PATH_TO_YOUR_PROJECT_FOLDER/ #It will copy the file to your project directory on Pi
Then, we need to specify the thing id and private key of our Raspberry Pi, like we did for the light bulb in the previous lab experiment. For this, we create a file .env , using the command line text editor nano (think of it like TextEdit on Mac or NotePad on Windows).
nano .env
Enter the following two lines, replacing the thing id by the thing id our your Raspberry Pi (on both lines).
LIGHTBULB_THING_ID=YOUR_LIGHTBULB_THING_ID
PRIVATE_KEY_PATH=PATH_TO_YOUR_PROJECT_FOLDER/private.pem
LIGHTBULB_IP_ADDRESS=IP_ADDRESS_OF_BULB
LOG_LEVEL=INFO
Note You can also copy the .env file from your machine to the pi as similarly we did with private.pem. However, you need to change the private_key_path. To exit, press CTRL + x . It prompts you to save, type in y and ENTER to say ‘yes’.
We are now set up: we have a branch on which we can continuously push from our machine and pull from the Raspberry Pi to execute.
Once we are happy with our code, the development and test cycle is completed. We will merge this branch into the master branch and delete it. We will walk through these steps at the end of this assignment.
Step 2 Set up the Sensors
Starting on the hardware side, we want to connect sensors to the Raspberry Pi. The Raspberry Pi can interact with peripherals (such as our sensors) through its General Purpose Input/Output pins (GPIO). Here is an overview of these pins:
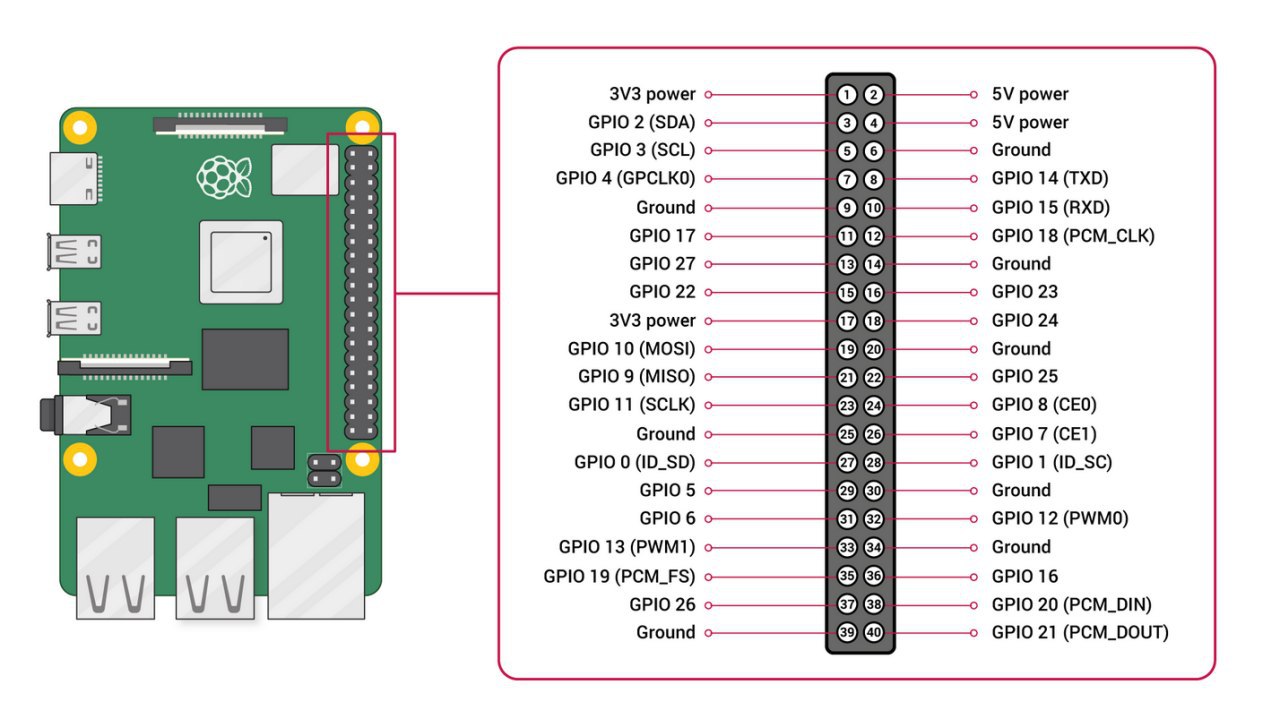
Careful, the number of each physical pin on the Raspberry Pi is different from the GPIO number in the code. For example, the physical pin 15 is GPIO22 in the code. As you use different libraries, be careful which nomenclature you are using. For now:
GPIOzerouses GPIO numberRPi.GPIOcan use either one.
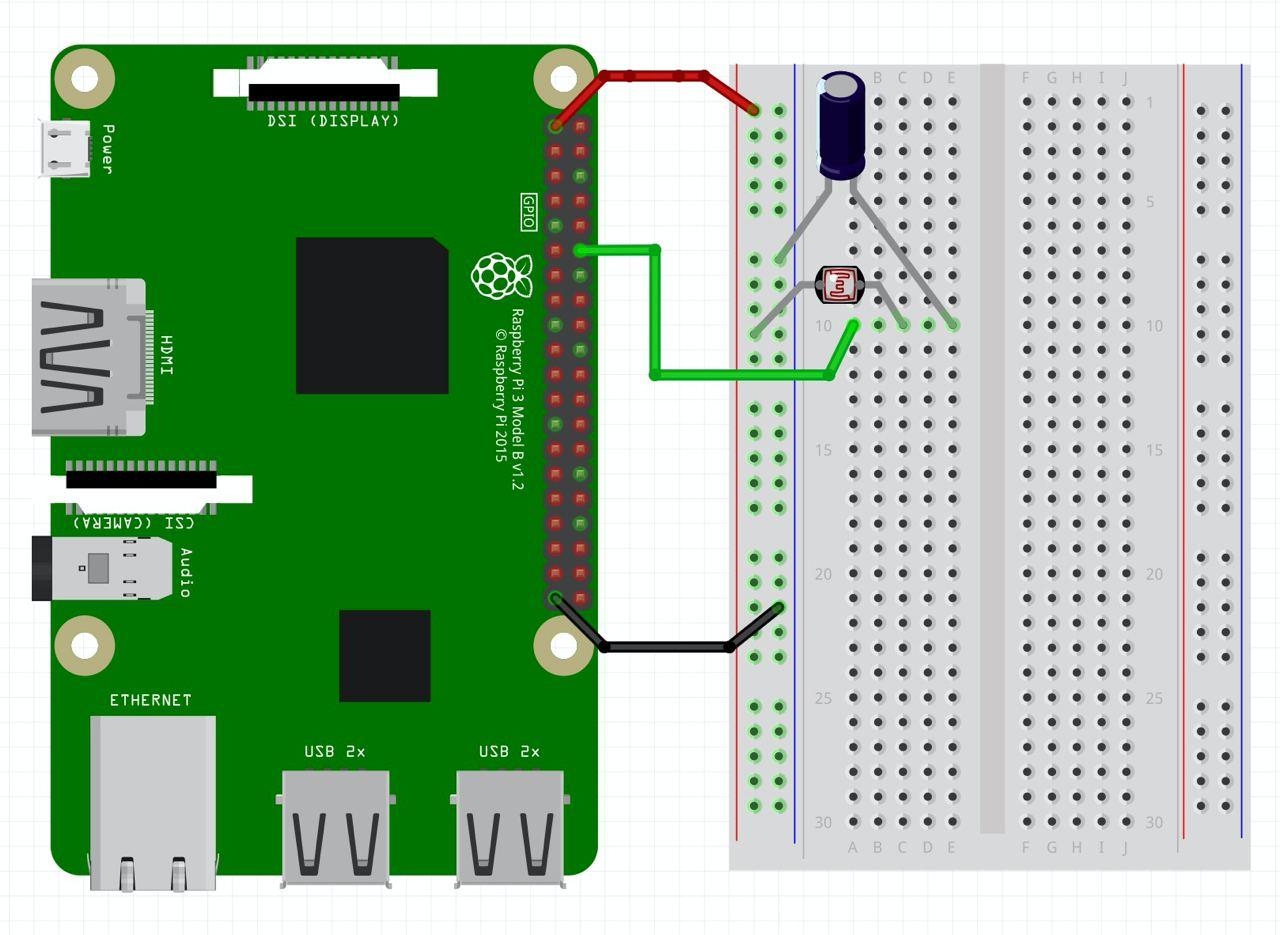
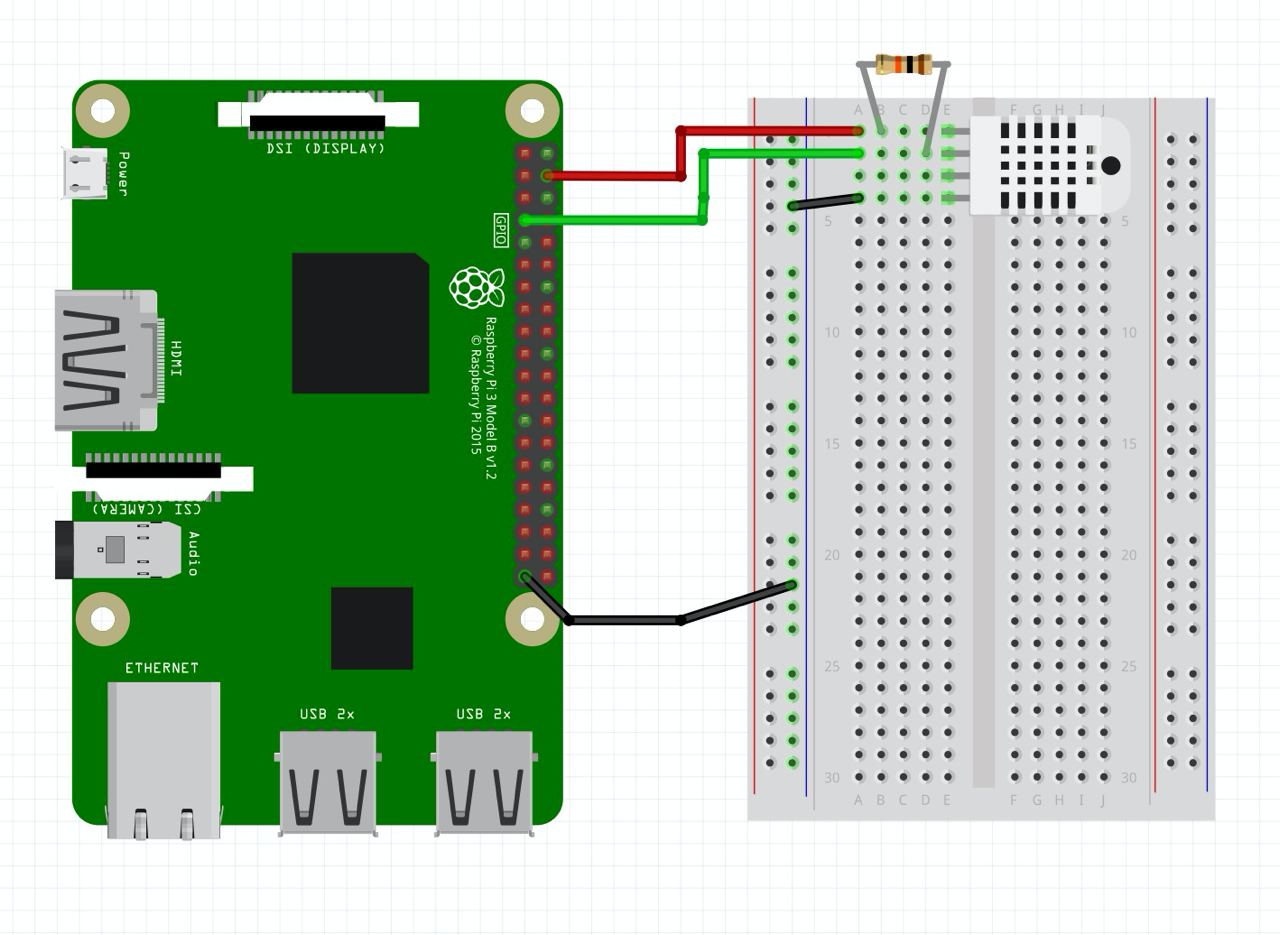
Task 2.1 Wire the Sensor to the Raspberry Pi
As part of the prototyping kit, we have two sensors:
- DHT11 (for Digital Humidity and Temperature) - this will be our temperature and relative humidity sensor;
- LDR (for Light Dependent Resistor) - this will be our light sensor!
Here we show you a way to wire these sensors to the Raspberry Pi. However, you can use any general GPIO pin for these connections.
For the LDR, you will need a 1uF capacitor and some wires (both provided in the kit). You can connect the circuit to the Raspberry Pi as follows (GPIO 18):
For the DHT11, you will need a 10kΩ resistor and some wires (both provided in the kit). You can connect the circuit to the Raspberry Pi as follows (GPIO 4):
Task 2.2 Install Python packages for GPIO
Once we have our wiring, we can switch back to the code! There is a list of packages that we need to install to use the GPIO from Python. On the Raspberry Pi with virtual environment activated, type in the following commands:
# GPIO library
pip install RPI.GPIO

# GPIO zero library for LDR
pip install gpiozero

# major library to interface with circuit python libraries
pip install adafruit-blinka

# library for our dht sensor
pip install adafruit-circuitpython-dht

pip install dcd-sdk

# necessary system dependency
sudo apt-get install libgpiod2
Note: we install the last dependency with apt-get instead of pip . apt-get is the package manager (like pip ) of the Raspberry Pi operating system. We install a library for the Raspberry Pi which is required to use the GPIO with Python. The sudo command tells the Raspberry Pi to execute the script with administrator privilege. It will prompt you to enter the password of your Raspberry Pi.
Task 2.3 Import Sensor Packages
Back on our machine, we create a new Python file src/sensing.py . In this script, we write Python code to explore the sensor data collection without disturbing light.py .
We must first import the packages we installed:
import board # for our board pins
# import DHT sensor library
from adafruit_dht import DHT11
# import light sensor from GPIO 0
from gpiozero import LightSensor # class for ldr connection
Note: Here you will probably see an ‘import error’ withe libraries DHT11, board… ignore this error for now. The reason for this error is that the libraries are installed in pi and not in the machine.
Task 2.4 Initialise a Sensor Object for each Sensor
Each sensor will have a sensor object (as defined in the self-study material) through which you can collect data and control the sensor specifications. Let’s create one for each of these:
- DHT11
# suing gpio pin 4
dht_sensor = DHT11(board.D4)
- LDR
# defining our Light sensor object using GPIO 18
LDR_PIN = 18
ldr_sensor = LightSensor(LDR_PIN)
We are now ready to collect some data! We will be using these classes to retrieve data and visualize it.
Task 2.5 Read raw test sensor data in your script
As a test, let’s read the values of our sensors (after we have set our sensor objects) and print them out in the Terminal. To do this, we use print() three times, together with each of the three following statements for the measurements.
- to get the light value (from 0 to 1) , you can use:
ldr_sensor.value - to get the relative humidity (from 0 to 100%), you can use:
dht_sensor.humidity - to get the temperature in ˚C, you can use:
dht_sensor.temperatureOur script is ready for testing. Let’s commit and push on GitHub, so that we can pull on the Raspberry Pi and execute.
python src/sensing.py
Step 3 Structure data Collection into a Class
At this stage, we should have working sensors: an output of all three values every time we execute our Python script. Now we need to structure our data collection, do some basic processing, and send this data to Bucket.
Task 3.1 Class Structure
Let’s use this opportunity to define a class , as presented in the self-study material. This class will handle the data collection for our three sensors, send the data to Bucket and get us ready to trigger action.
Copy and paste the following structure in a new file src/sensor_data_collector.py .
# import DHT sensor library
from adafruit_dht import DHT11
# import light sensor from GPIO 0
from gpiozero import LightSensor  # class for ldr connection
import threading # so we can collect data every x seconds

class SensorDataCollector:

  def __init__(self, dht_pin, ldr_pin, thing, collection_frequency=10):

  def collect(self):


  def update_temperature(self):


  def update_humidity(self):


  def update_light(self):
In this structure, you can recognise our package imports at the top. We add the new package threading which will enable you to collect data at regular interval.
Then we have the skeleton of our class:
- the init() method is the constructor of the class. It is called to build a new object of class ‘SensorDataCollector’.
- three update methods will respectively collect temperature, humidity and light data.
- a
collect()function will call the three update methods at regular interval.
Note the self keywords is a parameter of each method, which points to the instance of the class itself. We can use it to access any variable we store inside the class: the so-called attributes .
Task 3.2 Construct the Object
The constructor of the class is initialising the object. Thus, we provide the pin of our two sensors, as well as the collection_frequence (how often we will read the sensors).
def __init__(self, dht_pin, ldr_pin,  collection_frequency=10):
  # Store the collection frequency as attribute
  self.collection_frequency = collection_frequency
  # Store the access to the 2 sensors
  self.dht_sensor = DHT11(dht_pin)
  self.ldr_sensor = LightSensor(ldr_pin)
  # Store the last value of each sensor (currently 'None' as we do not know there values yet)
  self.temperature = None
  self.humidity = None
  self.light = None
Note we use self , referring to the object itself, to initialise the attribute of this object.
Task 3.3 Collect the Light
def collect(self):
  # Set a timer to automatically call this function again
  threading.Timer(self.collection_frequency, self.collect).start()
  # Call the three sensor methods
  self.update_temperature()
  self.update_humidity()
  self.update_light()
Task 3.4 Define the Light Method
Each of the three methods which collect data from sensors will looks similar. In essence: collecting the value as we did in Step 2. However, Input/output function are prone to errors (e.g. a sensor not available, failing to respond). We will use the try-catch statement introduced in the self-study material to handle these cases when the reading data fails. Let’s use update_light() as an example:
def update_light(self):
  try:
    # A value between 0 (dark) and 1 (light)
    self.light = self.ldr_sensor.value
    print(self.light)
    sleep(1)
  except RuntimeError as error:
    # LDR Errors
    print(error.args[0]) # specify the problem
  except Exception as error:
    # this means there is a problem with the actual sensor
    raise error
Task 3.5 Write the Humidity and Light Functions
Repeat the same process to create the methods update_temperature() and update_humidity() .
Task 3.6 Main
The final step is a function main that create an object of the class SensorDataCollector to collect data. Let’s create a file src/main.py as follows.
import board  # for our board pins
from sensor_data_collector import SensorDataCollector

LDR_PIN = 18
DHT_PIN = board.D4

COLLECTION_FREQUENCY = 5  # in seconds

def main():
    collector = SensorDataCollector(DHT_PIN, LDR_PIN, COLLECTION_FREQUENCY)
    collector.collect()

main()
You will recognise the import of our class at the top, followed by the specification of our sensor pin and collection frequency.
main() is building an object of our class SensorDataCollector and call the collect() method on this object (initiating the data collection). We do not forget to call main() at the bottom of our script.
Our script is ready for testing. Let’s commit and push on GitHub, so that we can pull on the Raspberry Pi and execute.
python src/main.py
Step 4 Send Sensor Data to Bucket
In this step, we want to upgrade our class to automatically send data to Bucket.
Task 4.1 Initialise the Thing and Properties
We want to create a Thing object like we did in the previous lab experiment. In src/main.py , we can import the definition of a Thing and call its constructor Thing() in main() . Then, we pass this object to the constructor of SensorDataCollector()
from dcd.bucket.thing import Thing

def main():
  rpi_thing = Thing()
  collector = SensorDataCollector(DHT_PIN, LDR_PIN, rpi_thing, COLLECTION_FREQUENCY)
  collector.collect()
Then, we update the constructor of SensorDataCollector to take a new parameter (our thing)
def __init__(self, dht_pin, ldr_pin, thing, collection_frequency=10):
Inside the constructor, we can now store the thing and ‘find or create’ three property: one for each of our sensors.
  self.rpi_thing = thing
  # Find or create a property to store light
  self.light_property = self.rpi_thing.find_or_create_property(
      "LDR sensor", "LIGHT")
  # Find or create a property to store temperature
  self.temp_property = self.rpi_thing.find_or_create_property(
      "DHT Temperature", "TEMPERATURE")
  # Find or create a property to store humidity
  self.humidity_property = self.rpi_thing.find_or_create_property(
      "DHT Humidity", "RELATIVE_HUMIDITY")
Task 4.2 Send property data
At this stage, sending data to Bucket is only a step away: Our Thing is initialised, we have a property got each sensor. We now use these properties to send data each time we collect a new value.
Here is an example for the in update_light() . You note the extra line? This is where we update the values of our light property. Note the double parenthesis and the trailing comma, both important to tell Python that we have only one value, but we still want it to be part of a list (of 1 element).
def update_light(self):
  try:
      self.light = self.ldr_sensor.value  # between 0 (dark) and 1 (light)
      print(self.light)
      self.light_property.update_values((self.light,))
      sleep(1)
  except RuntimeError as error:
      print(error.args[0])
  except Exception as error:
      raise error
Go ahead and add a similar line in update_temperature() and update_humidity() to send all 3 values to Bucket.
Our script is ready for testing. Let’s commit and push on GitHub, so that we can pull on the Raspberry Pi and execute.
python src/main.py
Step 5 Events and Actions
As the last step, we want to trigger actions based on the data we collect. For now, we define the most basic action: showing the data in the Terminal. This action looks like this:
def action(values):
    print('ready for action')
    print(values)
The parameter values gives us the last values of our three sensors as they have just been collected.
Task 5.1 Define a Handler
We do not want to mix collection and actions. It is important to separate these two aspects so that we can reuse our code. Thus, we paste the actions() in the main.py and we tell our collector to use it as a ‘handler’. A handler is a method that we define to ‘handle’ something. In our case, to handle the action based on the new data.
def main():
  rpi_thing = Thing()
  collector = SensorDataCollector(DHT_PIN, LDR_PIN, rpi_thing, COLLECTION_FREQUENCY)
  collector.collect()
  collector.setHandler(actions)

def actions(values):
  print('ready for actions')
  print(values)
Task 5.2 Set a Handler
What is this setHandler() about? This is on us to define it. What we want is to store this function, so that we can call it whenever there is new data. Thus, we add the method setHandler() to our class SensorDataCollector .
def setHandler(self, handler):
  self.handler = handler
Because all attributes of an object need to be define in the constructor, we add the following at the bottom of the constructor: there might be a handler, but for now there is none!
self.handler = None
Task 5.3 Call a Handler
Finally, we want to trigger our actions() function each time we collect new data. The collect() function seem to be the right place for this, as it is call ‘every time we collect new data’. Note that we check first if a handler has been set before trying to call it.
if self.handler != None:
  self.handler({
      'temperature': self.temperature,
      'humidity': self.humidity,
      'light': self.light
  })
Task 5.4 An example of Action
Let’s define a simple event and action pair: we want to detect when the room lights gets turned ON/OFF.
- For our action, let’s just print to the console “Light Switch has been flipped”
- For our event, we need to set a particular threshold for our light value (between 0 and 1) and trigger this action.
So what do we have to do? Every time we get a new time value, we need to see if its value has crossed the threshold.
Lets make a is_light_on() function that we call in actions() . We get our new light value (to check our threshold, you should make a global variable (maybe after the sensor pin definition) to hold the previous light value:
def is_light_on(values, threshold = 0.1):
  new_value = values["light"] # get the light value
  # our threshold by default is 0.1 but you may need to adjust this
  global prev_value # you need this to
  if(new_value > threshold  and  prev_value < threshold): # we crossed threshold
    print("Light switch has been flipped on")

  prev_value = new_value # updating our previous value at the end
Note that you can call is_light_on like so: is_light_on(values) because the threshold by default is 0.1. If you want to specify it, you can do so as well: is_light_on(values, new_threshold).
Task 5.5 Your turn
From this, can you create another action function
- to trigger when it’s off?
- to involve the temperature?
- to involve the humidity?
In the following lab experiment, we will connect these actions to the lightbulb and test them.
Merge and Push Once you are done with your development and test cycle, do not forget to merge your branch into your master branch.
Updating the CHANGELOG file In this assignment you have made significant additions to your prototype. Edit the file
CHANGELOG.mdand add what you have achieved in this assignment.
![]()
![]()
![]()
The European Commission's support for the production of this publication does not constitute an endorsement of the contents, which reflect the views only of the authors, and the Commission cannot be held responsible for any use which may be made of the information contained therein.