Assignments are where the prototyping happens. In this first assignment, you will set up a Raspberry Pi as a connected home hub to control connected light bulbs. We will walk you through the steps while exploring the purpose of each component, incrementally drawing a product architecture.
We have prepared 5 steps for this assignment (each again divided into specific tasks you have to perform).
- Step 1: Set up your cloud and prepare a configuration for your Raspberry Pi
- Step 2: Set up the 4 key tools for Prototyping Connected Product
- Step 3: Set up your connected light bulb
- Step 4: Set up a Raspberry Pi as Home Hub
Step 1: Set up your cloud and prepare a configuration for your Raspberry Pi
A core component of the technology stack of IoT is the `cloud’: the location somewhere on the internet where we keep the data we want to use and the tools that determine how we will use this data. It will not be until module 5 before we start using could data and tools in the assignments. However, in this first assignment, we will prepare for that by setting up the cloud.
Task 1.1 Activate your space in ‘Bucket”.
Our Data-Centric Design Lab (DCD Lab) has prepared a space online where it is easy for the students in this course to create their cloud. It is called Bucket. The following video gives you a little tour to familiarize yourself with Bucket. To access and use it, you will create your DCD Lab account.
Task 1.2 Setup your Raspberry Pi as a Thing in your cloud and create a Disk Image
Once you log into Bucket, the dashboard shows an empty page with a form to create a `Thing’. In the terminology of IoT a ‘Thing’ refers to any physical or virtual entity that is connected to the internet and is involved in the exchange of data. To be able to do something with data using our Raspberry Pi, we need it to show up here as a thing and therefore we will create its digital twin here. Type in a name and a description, and select the type ‘Raspberry Pi’.
You will notice many settings will appear. We will now go through the correct settings and gather these settings into a disk image, that you will later blend into your Raspberry Pi through a USB stick for it to be configured properly (so that you can start working with it). Keep in mind that we do not store any of this information. Only you, the owner of the Thing can create and download the settings through a secured connection.
The first section of settings is about restricting access to your Raspberry Pi. As you will store network information on your Raspberry Pi, it is essential to set it up in a way that prevent others to access it.
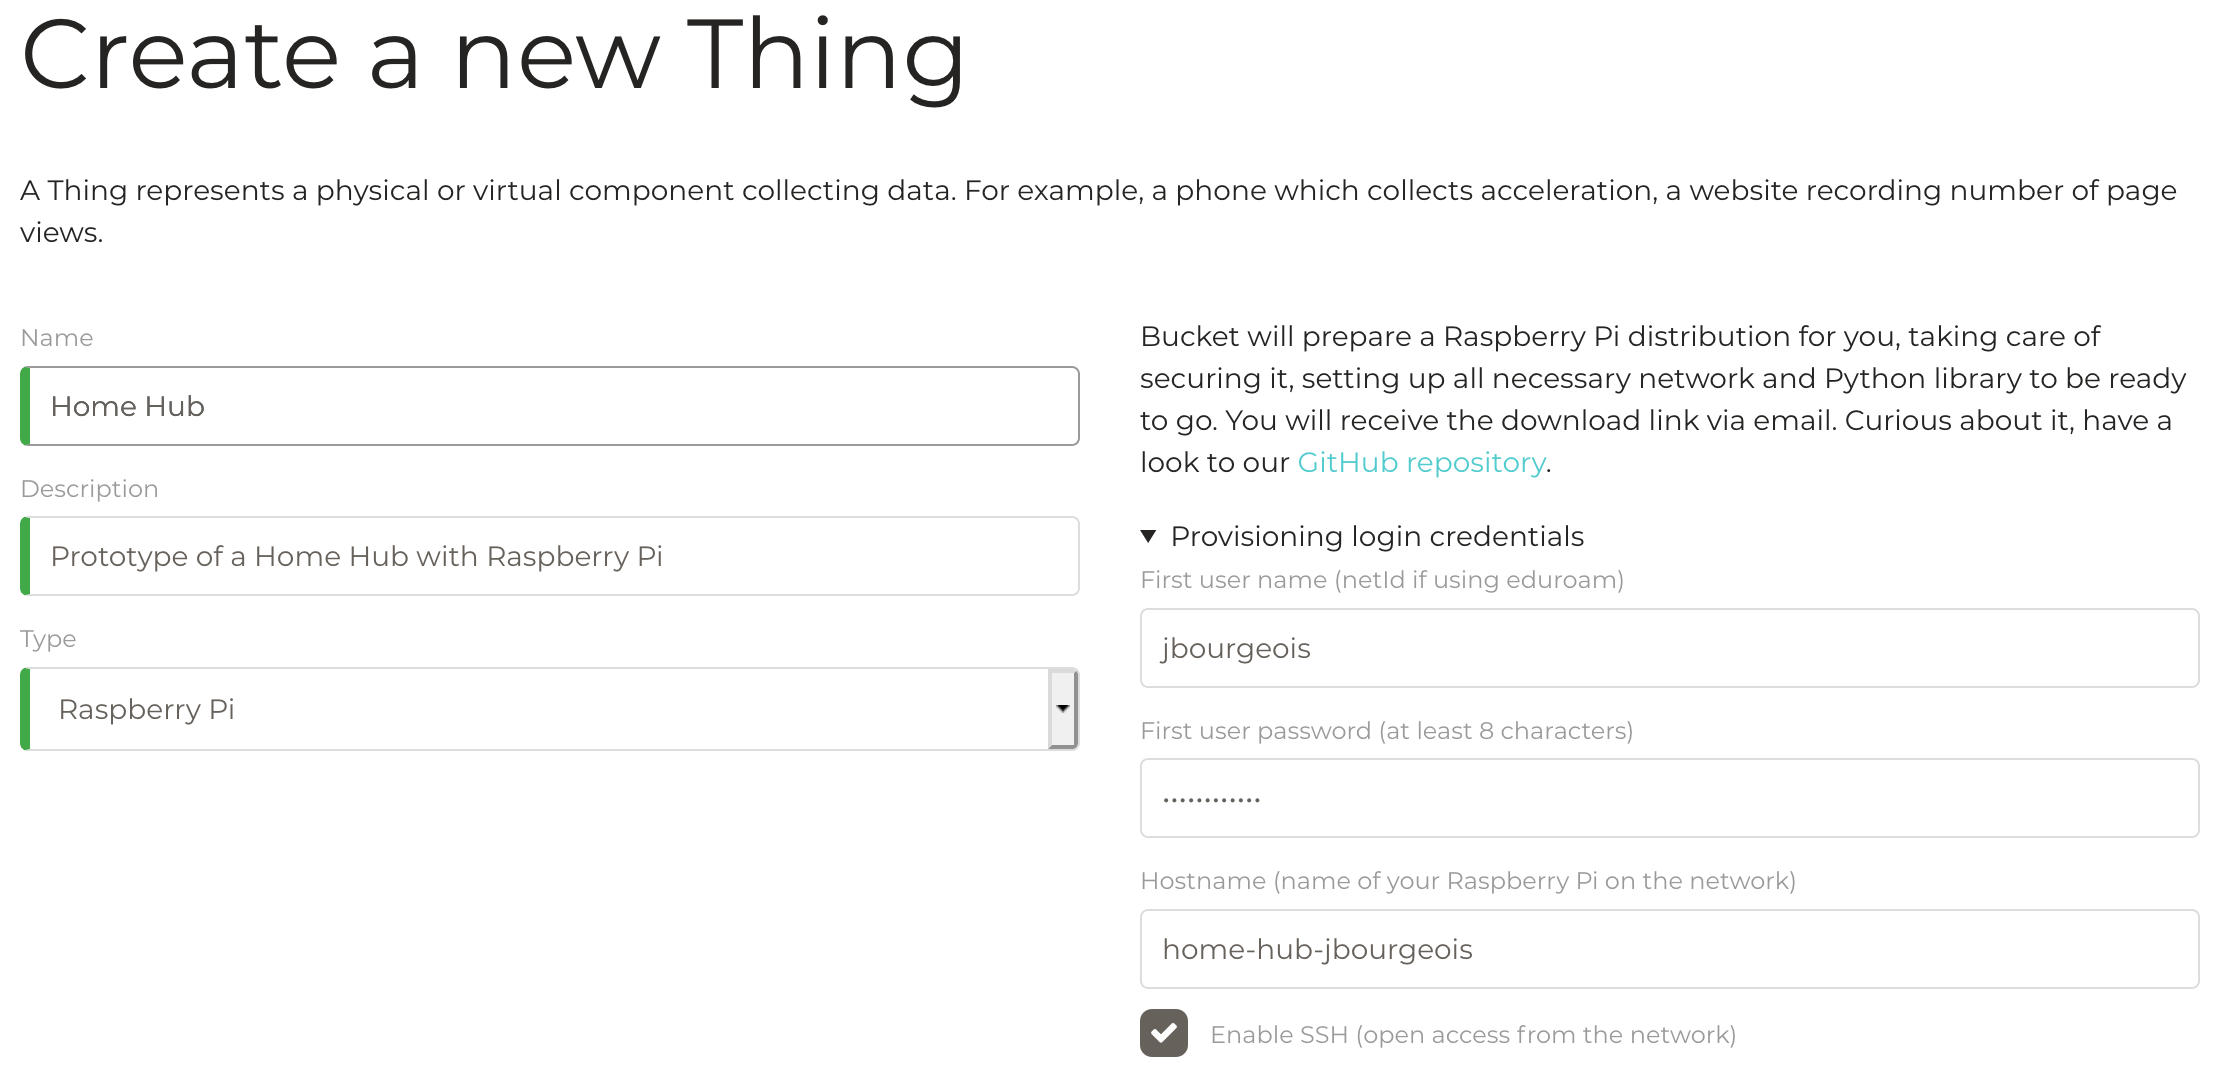
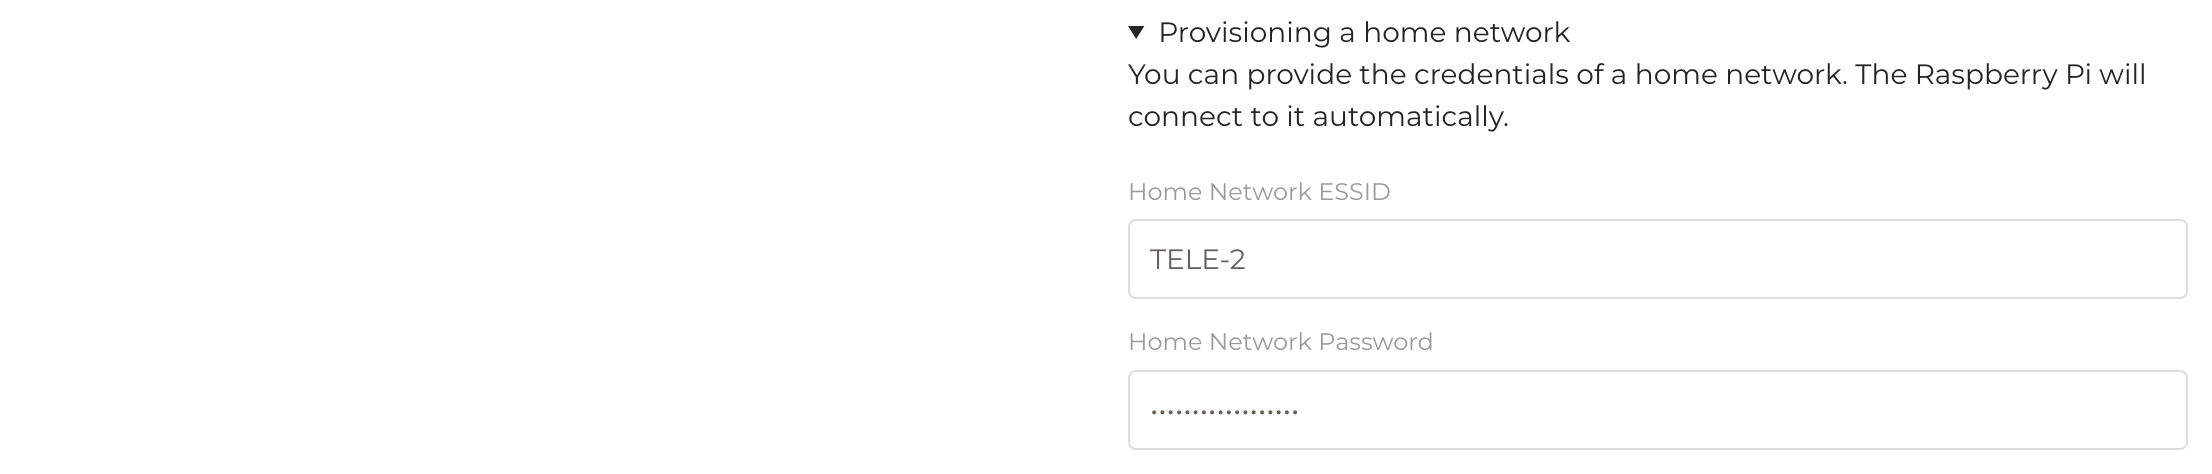
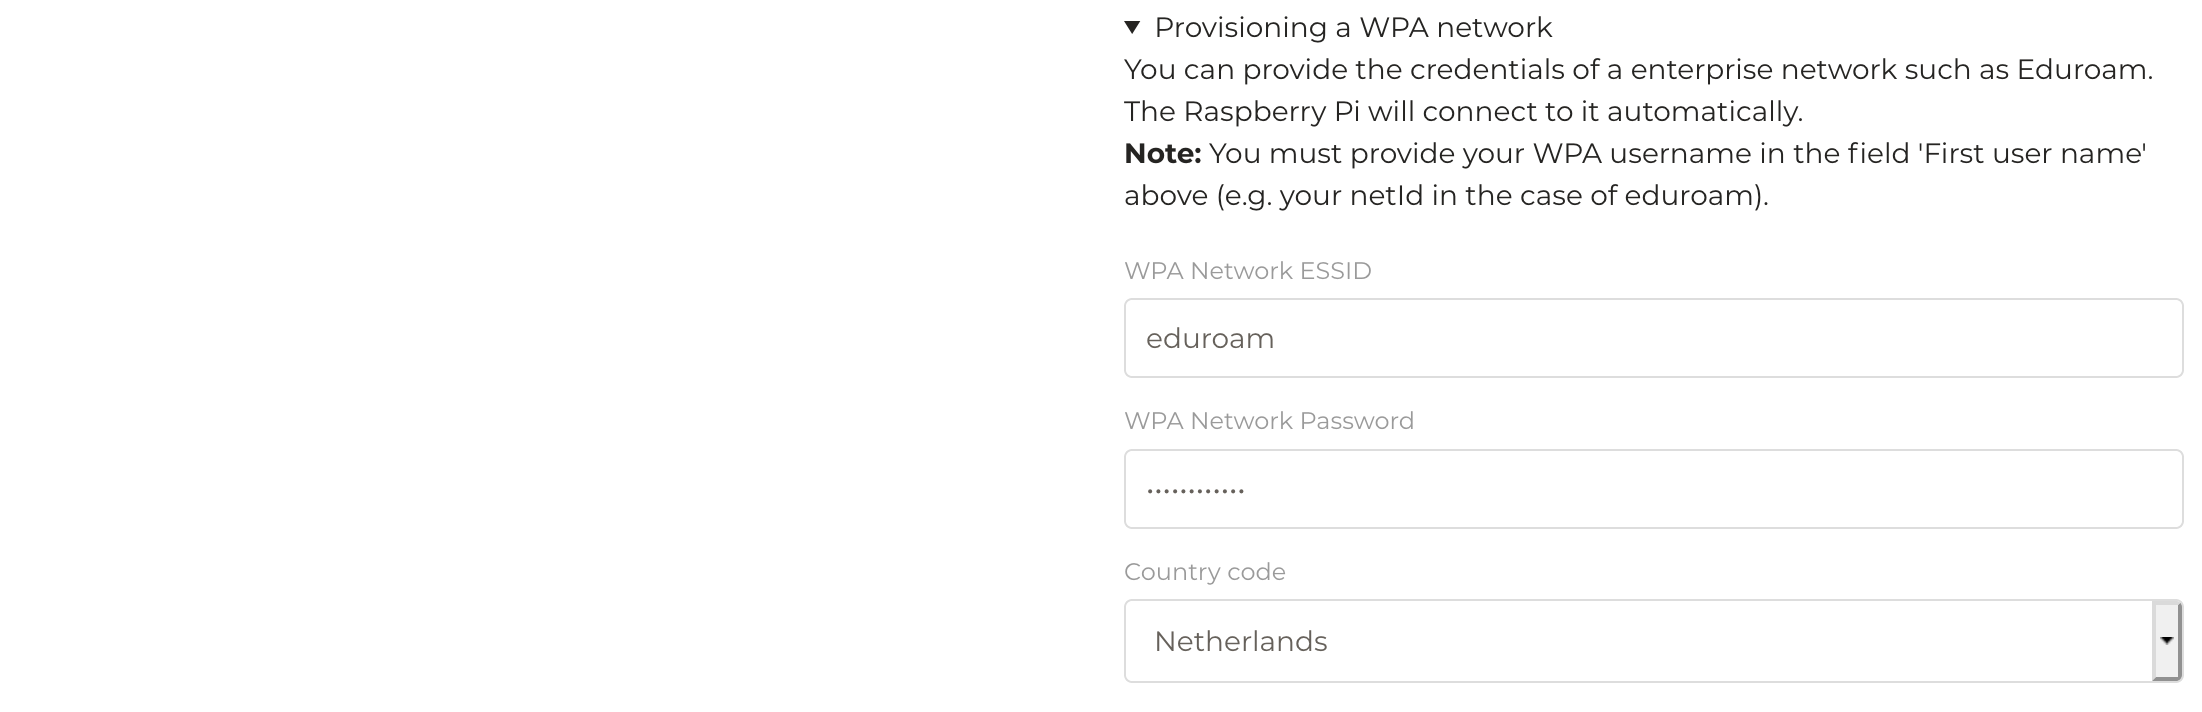
The second section is about connecting to the network. Eduroam is an enterprise-grade network which requires several challenging interventions on the Raspberry Pi system. Filling in your NetId and password, we make sure that your Raspberry Pi can automatically connect to Eduroam and manage your credential properly. We conveniently provide a similar function for your home network.
Once you have filled in all the information in section 1 and 2, click the ‘Create’ button. The page should update with your newly created Thing. However, it will take a ‘long’ time to generate your disk image. You can see a status indicator which will turn into a ‘Download’ button when your disk image is ready.
You can proceed to the next step while waiting for your Raspberry Pi image to be ready.
Step 2: Set up the 4 key tools for Prototyping Connected Product
To be able to do any programming through coding in the next module(s), we need to set up several tools that are able to interact with the connected light bulb of the prototyping kit. Let’s take this opportunity to introduce and install the tools we will use throughout the course.
Task 2.1: Installing a Version Control System (VCS)
{is this what you mean to point out: To be able to work as a team on coding, we need to have a collaborative environment suitable to manage that, called a VCS version Control System . We will use a VCS called Git} The first tool is Git, a Version Control System (VCS). A VCS facilitate the management of and the collaboration around a piece of code. We will cover Git and its purpose for prototyping connected products in the next module. For now, its installation (especially on Windows) helps us automatically set up a development environment.
Download and install Git from the official website. On Mac you might go for the Binary installer option.
Task 2.2: Installing an Integrated Development Environment (IDE)
Editing and executing code is done in an Integrated Development Environment (IDE), which simply is a text editor customised to code editing and execution. For this course, we will choose Visual Studio Code (or VS Code) which brings all the necessary functionalities without being overly complicated.
Download and install Visual Studio Code from the official website.
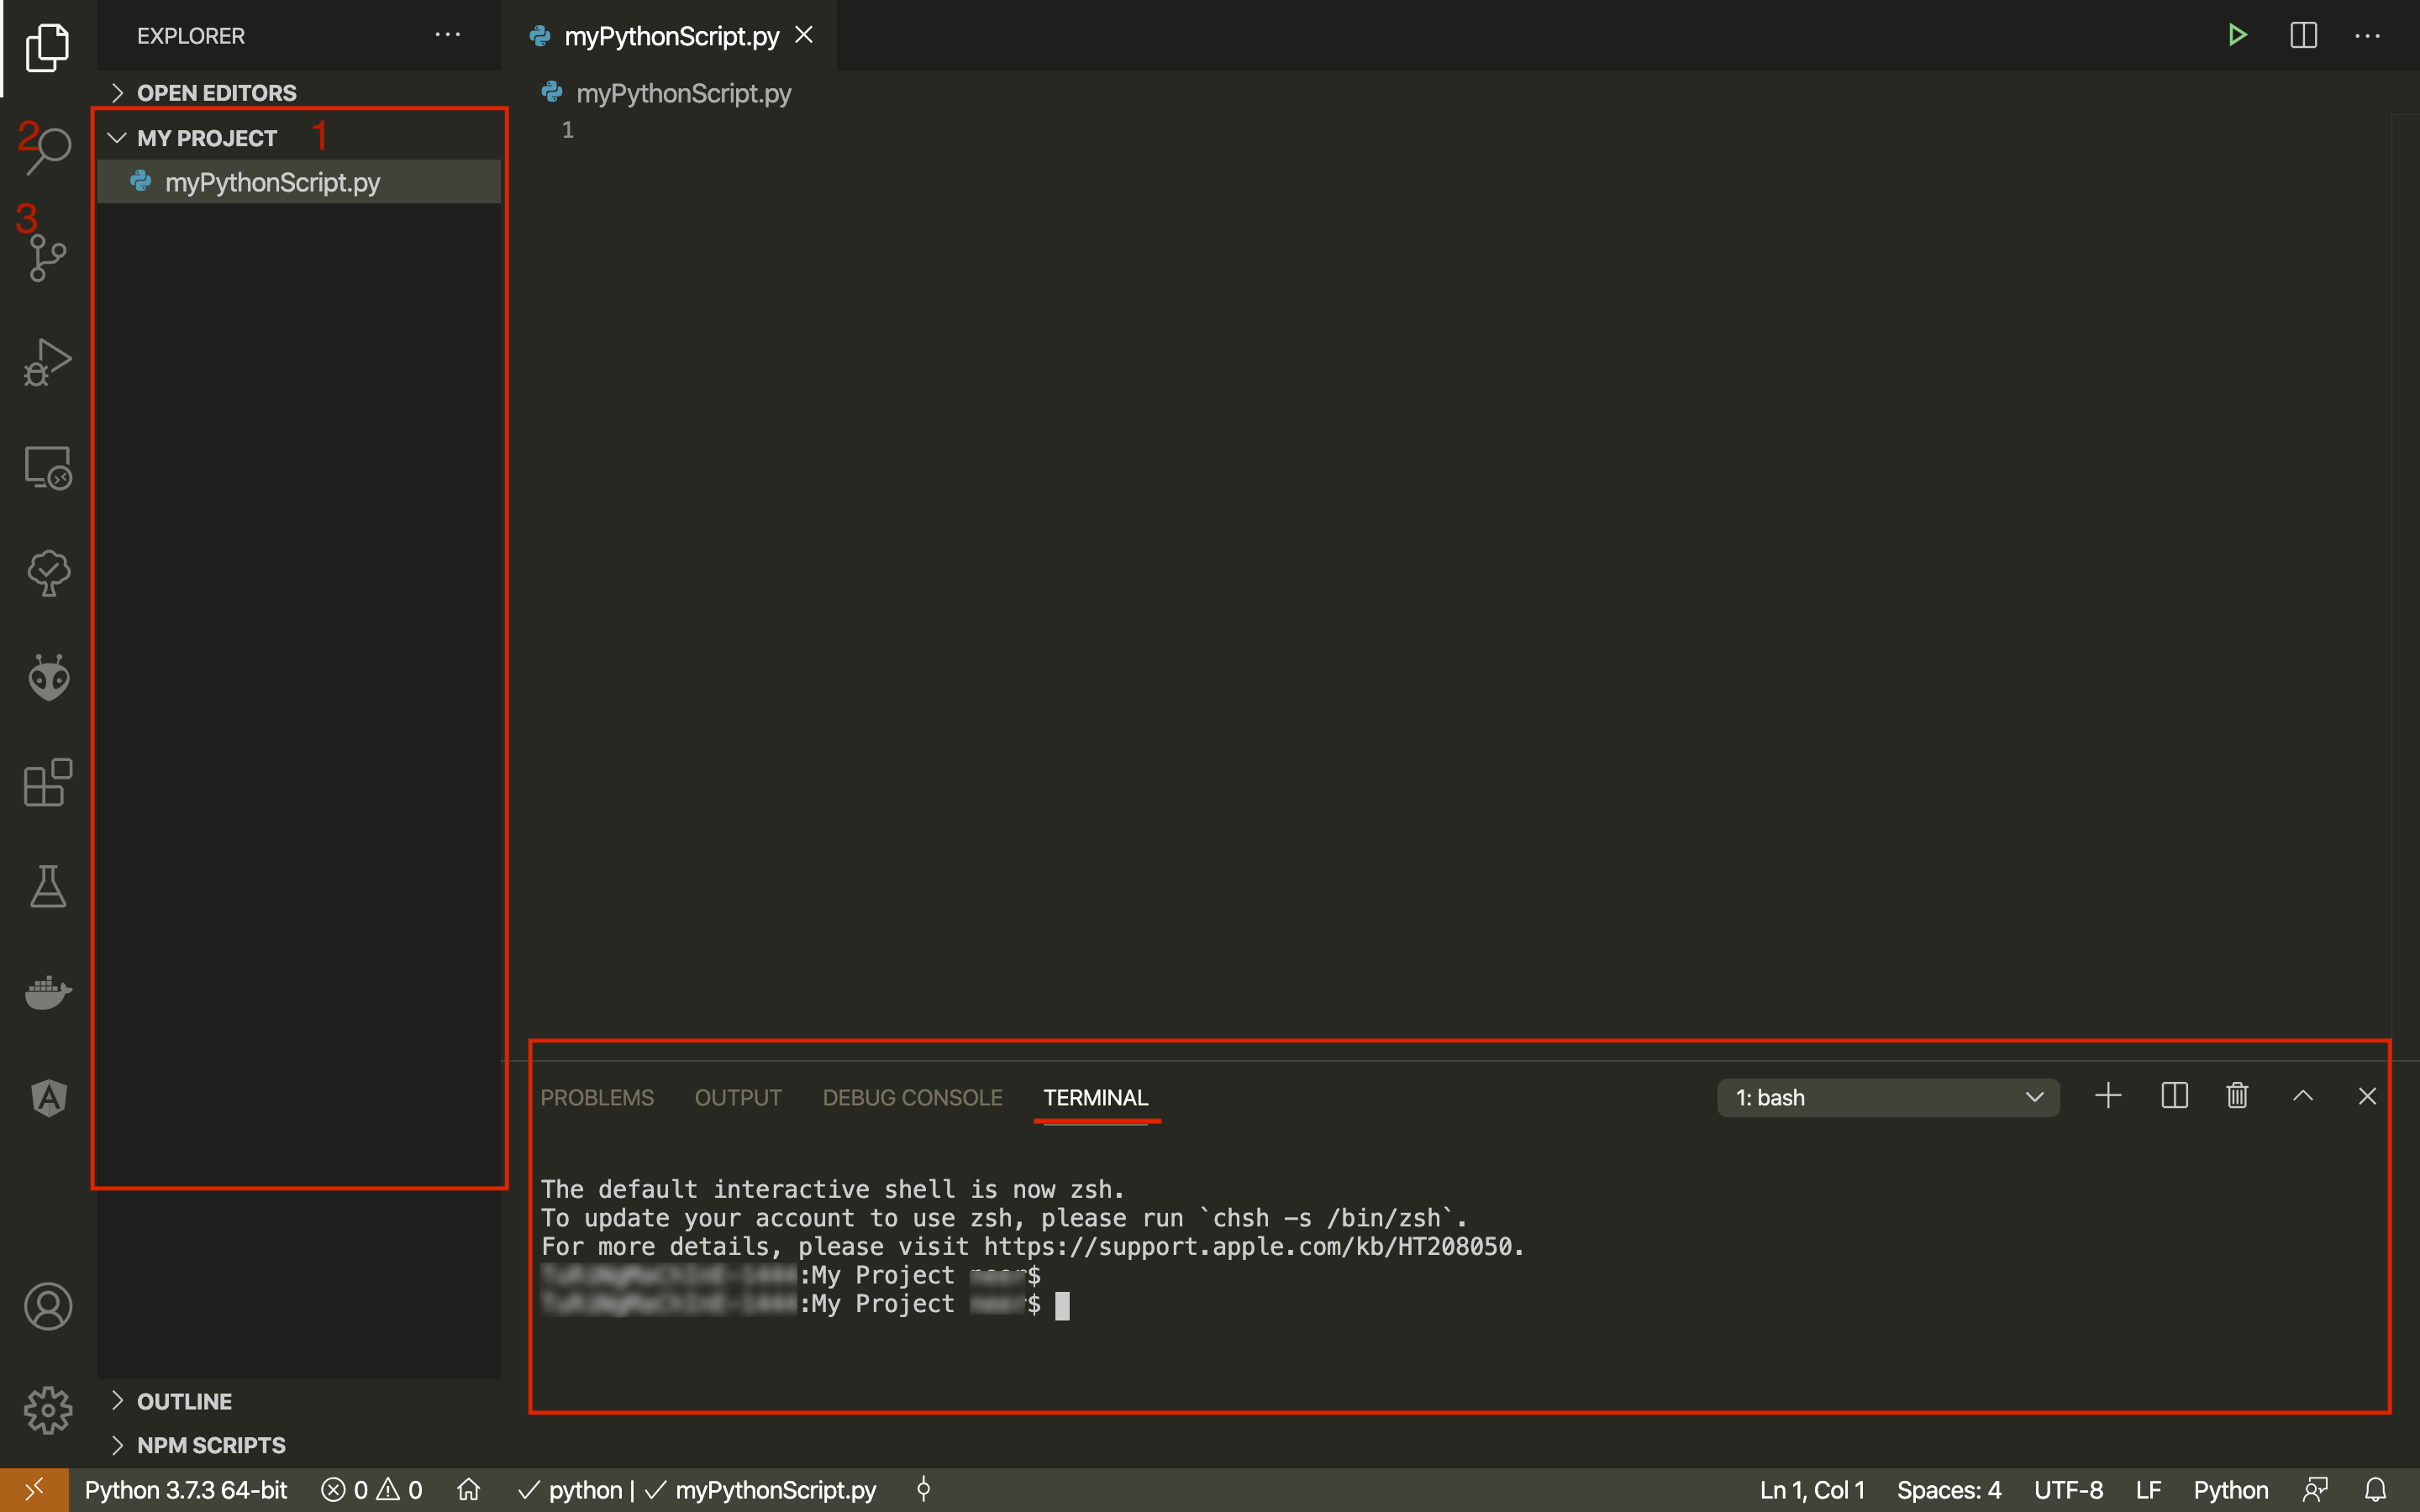
Create a folder on your computer (i.e Desktop) to store the files for this course. Open VS Code and click the top menu File > Open … to open your course folder. Let’s take a little tour of the IDE.
- The left panel relates to the management of your files with from the top: 1. the tree of your project files 2. searching into your project files 3. managing your file with Git. This is the whole menu of Module 2;
- The bottom panel relates to the execution of programs. We will especially look at the Terminal tab in the next task.
Task 2.3: Get familiar with the Command-line Interpreter (CLI)
A CLI interprets the text you have entered into a command (e.g. create a directory, open an application, …) - that’s it! “What is the point?” you may wonder, as today we have many Graphical User Interfaces (GUI’s) available that allow you to achieve many things as well, but without the cumbersome process of typing. Well, when prototyping you are developing technologies and playing with cutting edge ones, many of which simply do not have GUI. Skill in a Command-Line Interpreter (CLI) is therefore not something you acquire just for one project but rather for your entire digital prototyping life!
In software engineering a number of varieties exists: ‘Unix shell’, ‘Console’, ‘Terminal’ or ‘Command Prompt’. All of them refer to this black window full lines of text. Find it in VS Code: go to View > Terminal. It opens a tab in the bottom panel. In this course, we will use Unix shell as a command-line language, which comes in different flavours, the most common being bash and zsh. On the top right corner of the Terminal, a drop-down menu give you several options.
On Windows: The installation of Git should have install bash. However if it wont appear automatically in VS Code, you must choose ‘select the default shell’ from the language interpreter dropdown window and then restart the VS Code
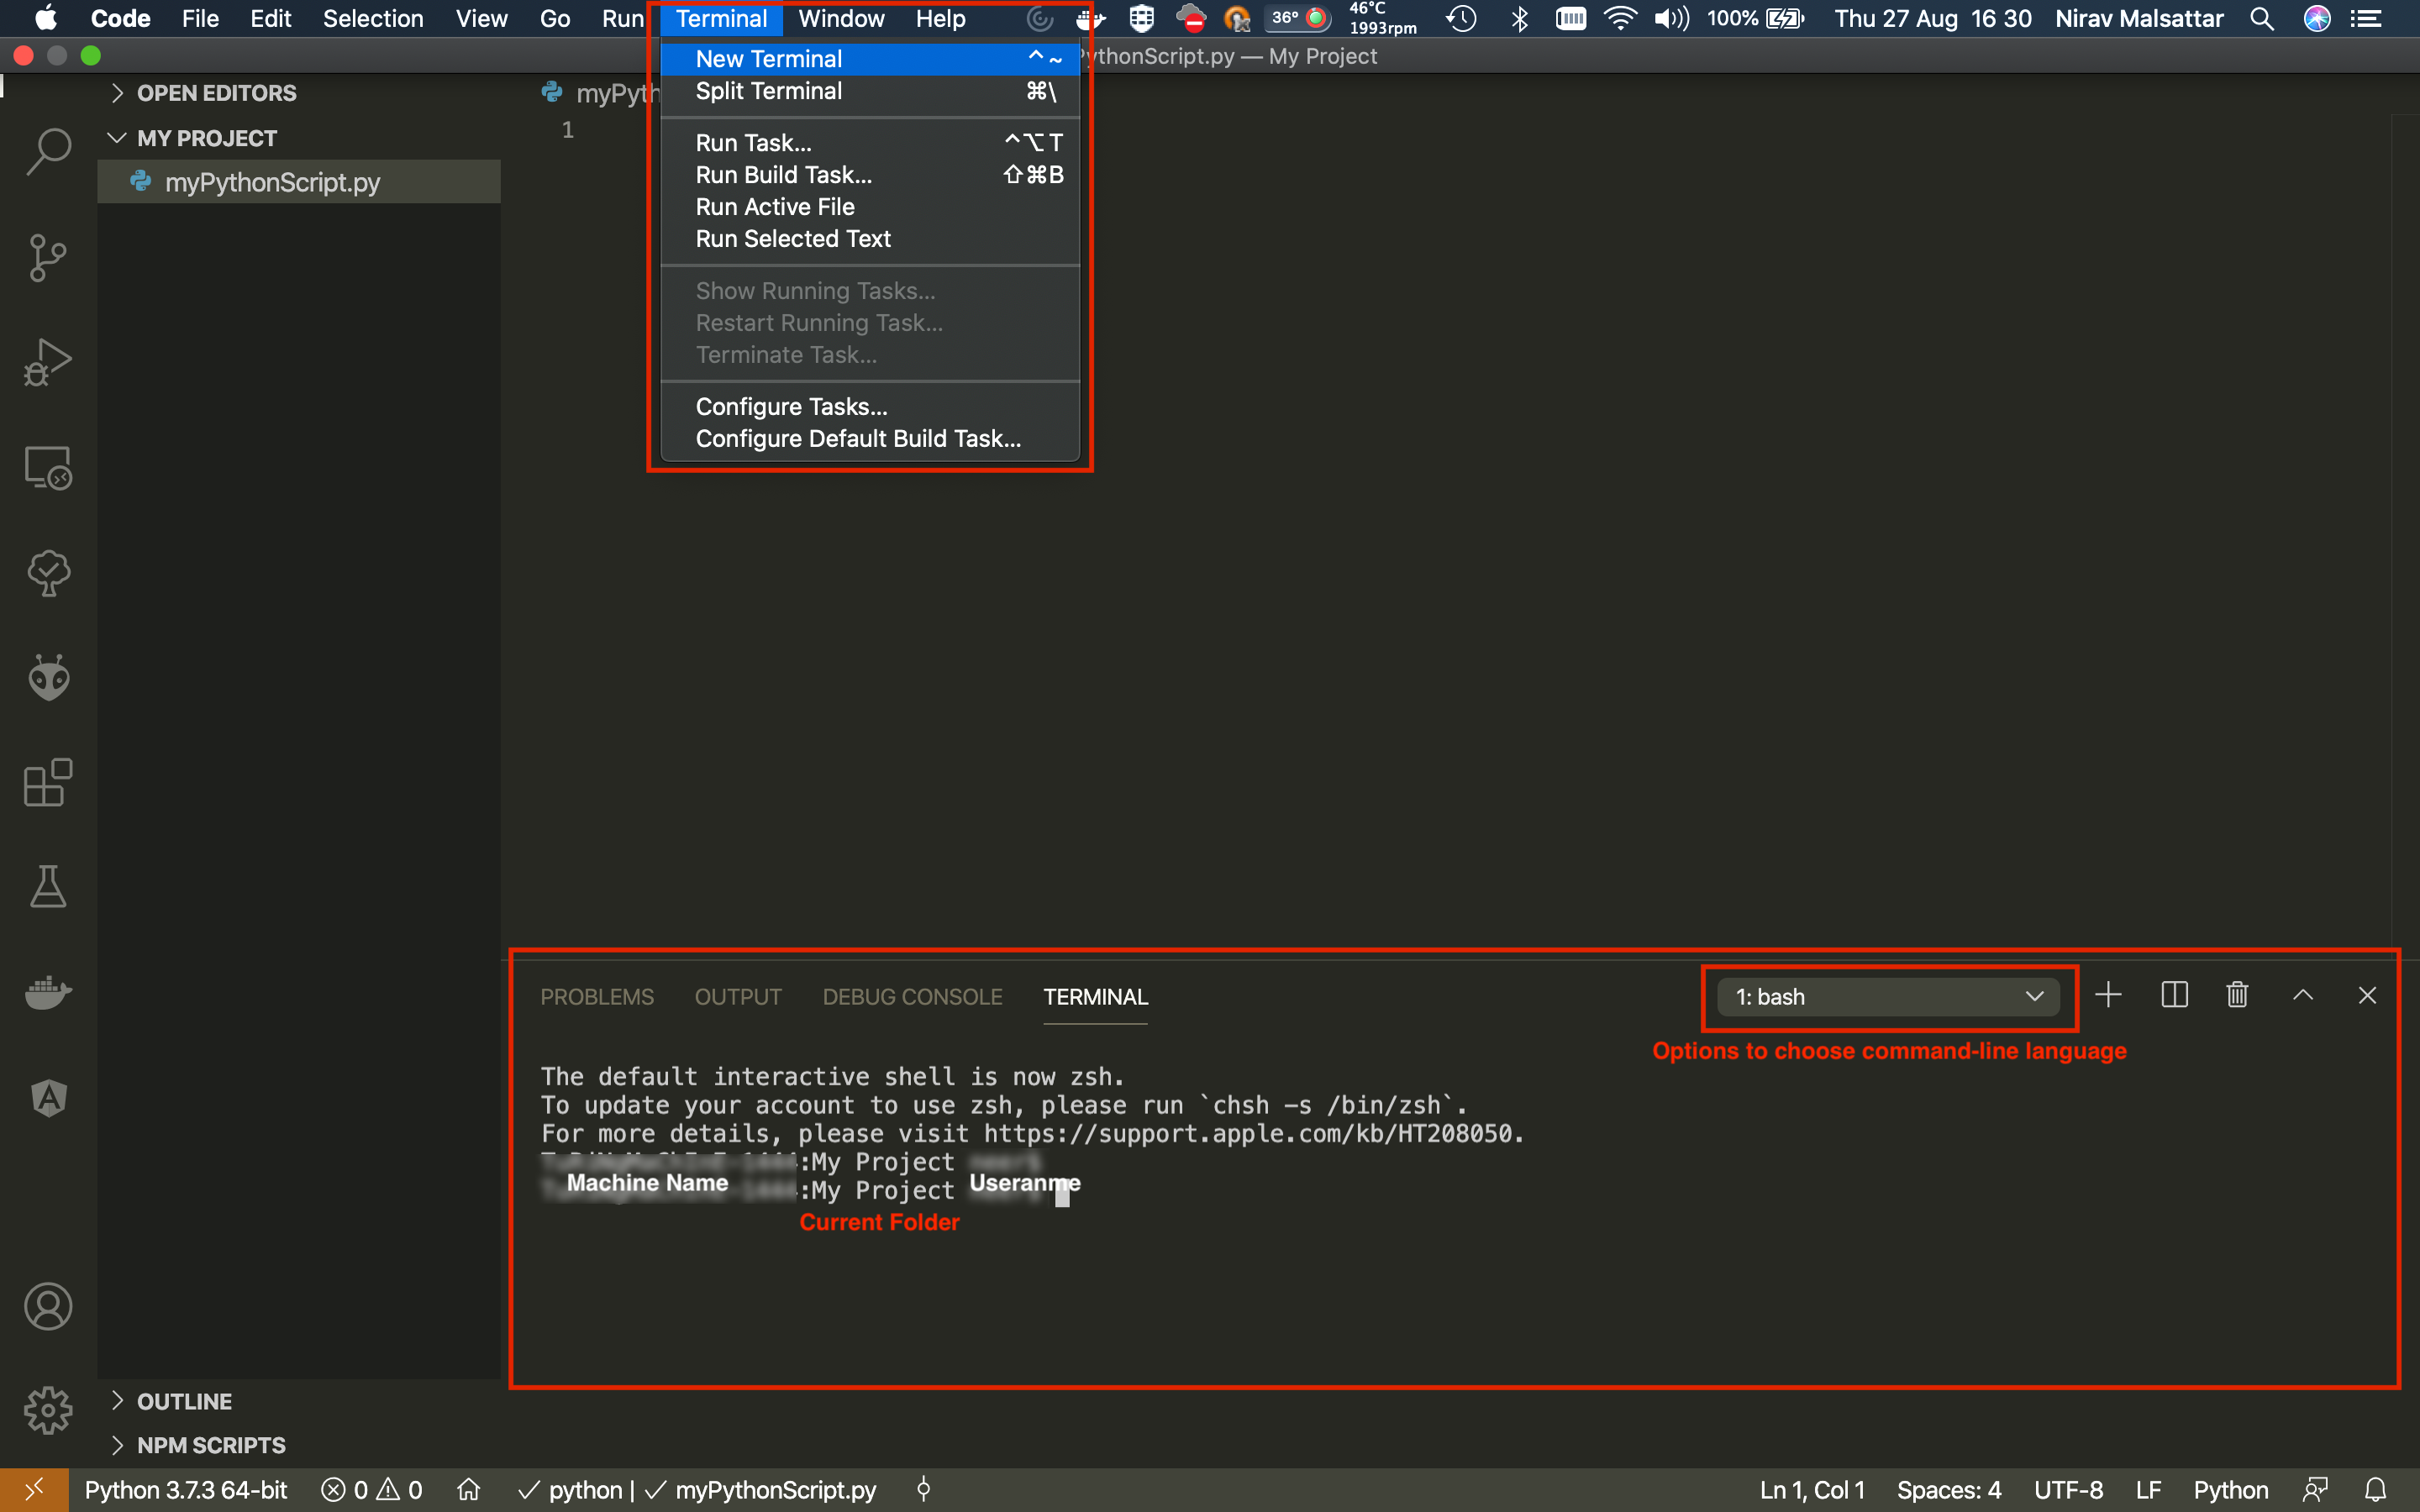
Each command line start with your username @ your machine name. Then, the current folder is shown
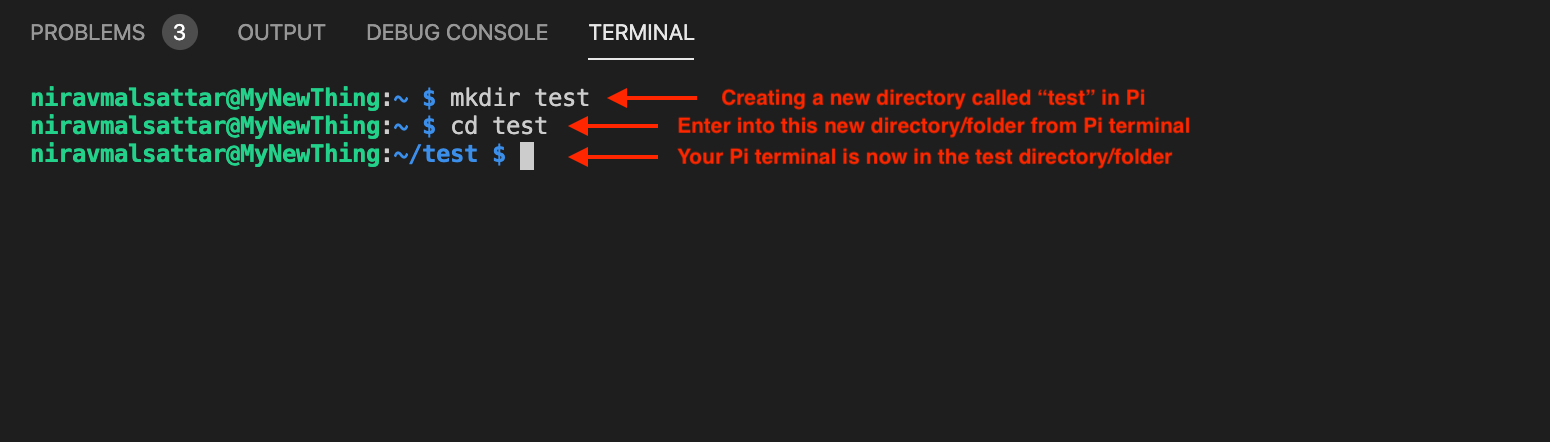
To execute a command simply type it, and press the ENTER key. Let’s create a Directory (Folder) named test with the command mkdir:
mkdir test
The new folder should appear in your file tree in the left panel. ls (Mac/Linux) and dir(Windows) is the command to list files and directories inside the current folder. Type ls or dir followed by ENTER:
Mac/Linux:
ls
Windows:
dir
Your test folder should appear as a result of this command as shown below.

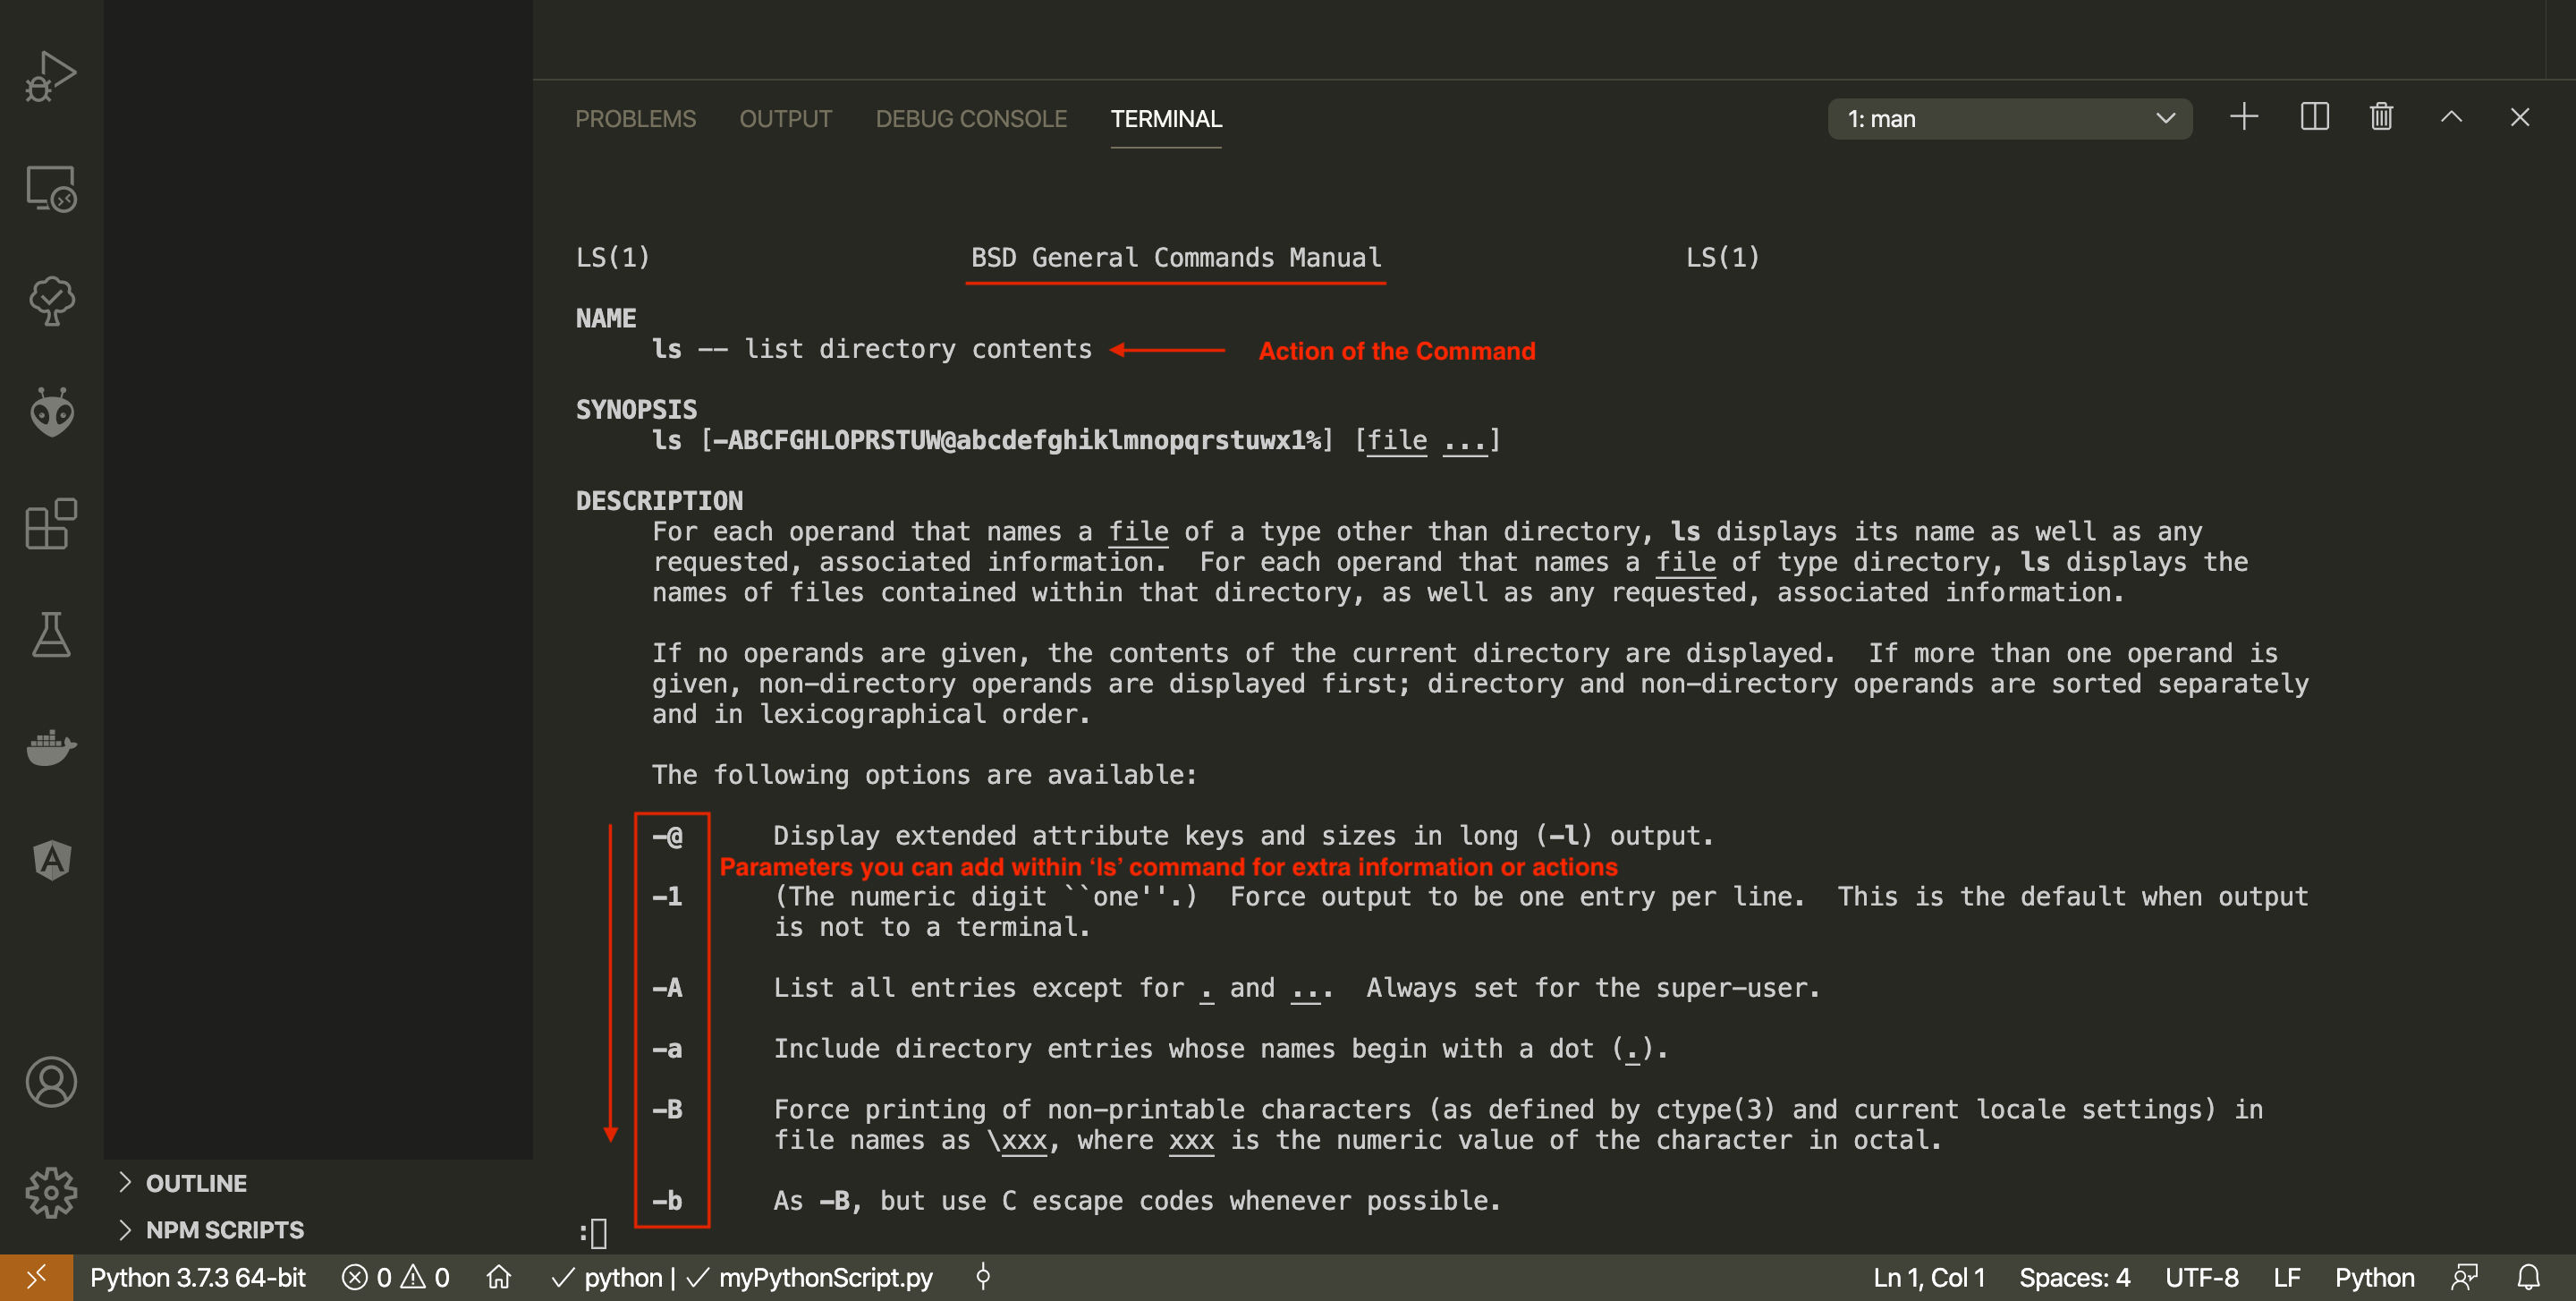
Most commands come with a manual, available with the command man (Mac/Linux) or help (Windows). Let’s explore the option of the ls with man or dir with help command.
Mac/Linux:
man ls
Windows:
help dir
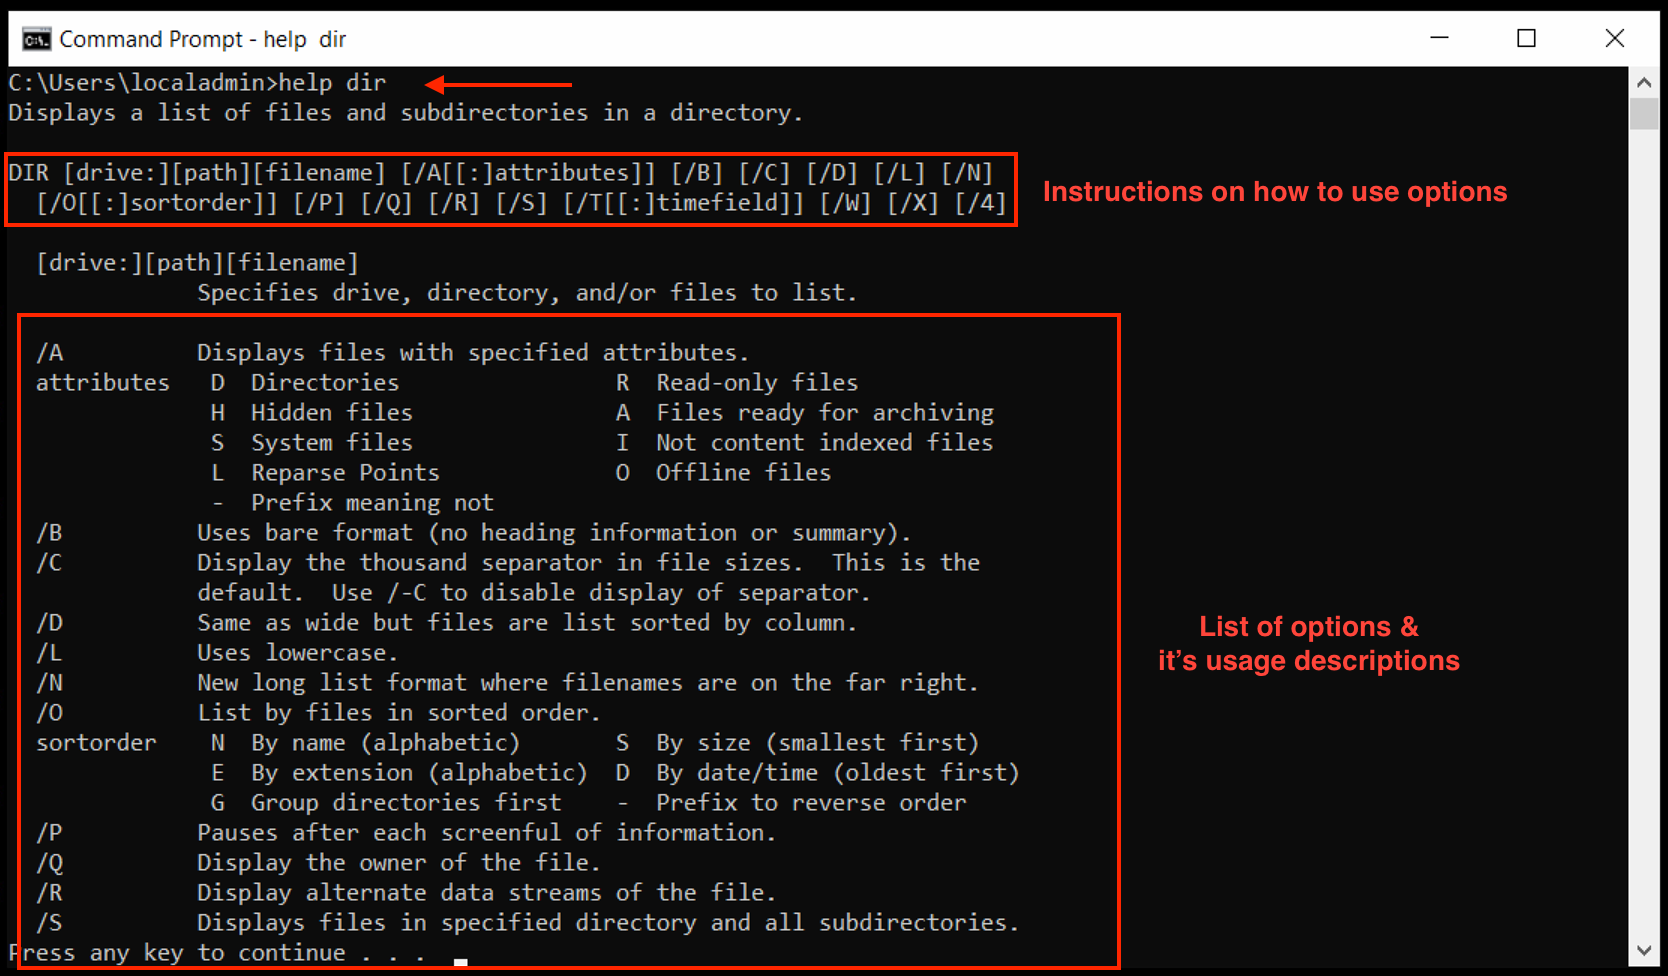
You can see a long list of option, starting with a dash - in Mac/Linux or start with / in Windows.
These options can be combined together. For instance in Mac/Linux you will note -G for colouring the result and -l for the long and detailed result. To quit the manual, press q.
Now we can try:
Mac/Linux
ls -Gl

Note Similarly,In Windows within the available options we identified using help dir, we can list all the hidden files in the current directory using:
dir /A:H

In the terminal, everything relates to where you are in the file tree, i.e. in which folder you are in. With the command cd you can ‘change directory’ to navigate this tree. The ‘path’ is the chain of directories to reach your targeted file or directory.
cd test

You entered ‘test’ folder, you can notice the command line is now showing ‘test’ as the current folder. There are three important path markers: dot . for the current directory, dot dot .. for the parent directory, and tilde ~(Mac/Linux) or /(Windows) for the home directory.
Going back to the parent directory:
cd ..

Finally, the tilde ~ (Mac/Linux) or ./ (Window) will leads you to your home directory in Mac or most parent location in your Windows current drive:
Mac/Linux:
cd ~

Windows:
cd /

Tip To avoid typing the same command again and again,you can press the Arrow-Up key to bring back you previous commands.
Read this Bash cheat sheet for some additional basic commands for Mac/linux. and Windows Command prompt cheat sheet for Windows
Task 2.4: Installing a Python Programming Language
The last tool we need is Python, the programming language for this course.
On Windows, download and install from here. Navigate to ‘Latest Python 3 Release’ and scroll down to file a Windows installer.
On Mac OS, download and install from here. Navigate to ‘Latest Python 3 Release’ and scroll down to file a Windows installer.
Restart VS Code. open your course folder and open a Terminal. Check your Python installation with:
python3 --version
This command should return a version number of Python 3.x.x. From now, whenever we want to use Python from the Terminal, we can start the command with python3
Task 2.5: Setting up Virtual Environment to work
A virtual environment is a self-contained directory tree that contains a Python installation for a particular version of Python. It also includes additional packages (modules/libraries) to meet the requirements of each python application we are developing. Different python application can use different virtual environments.
To create a virtual environment, open the Terminal inside VS Code. Type below two commands to first install the virtualenv and then create a virtual environment called venv.
Mac/Linux:
pip3 install virtualenv
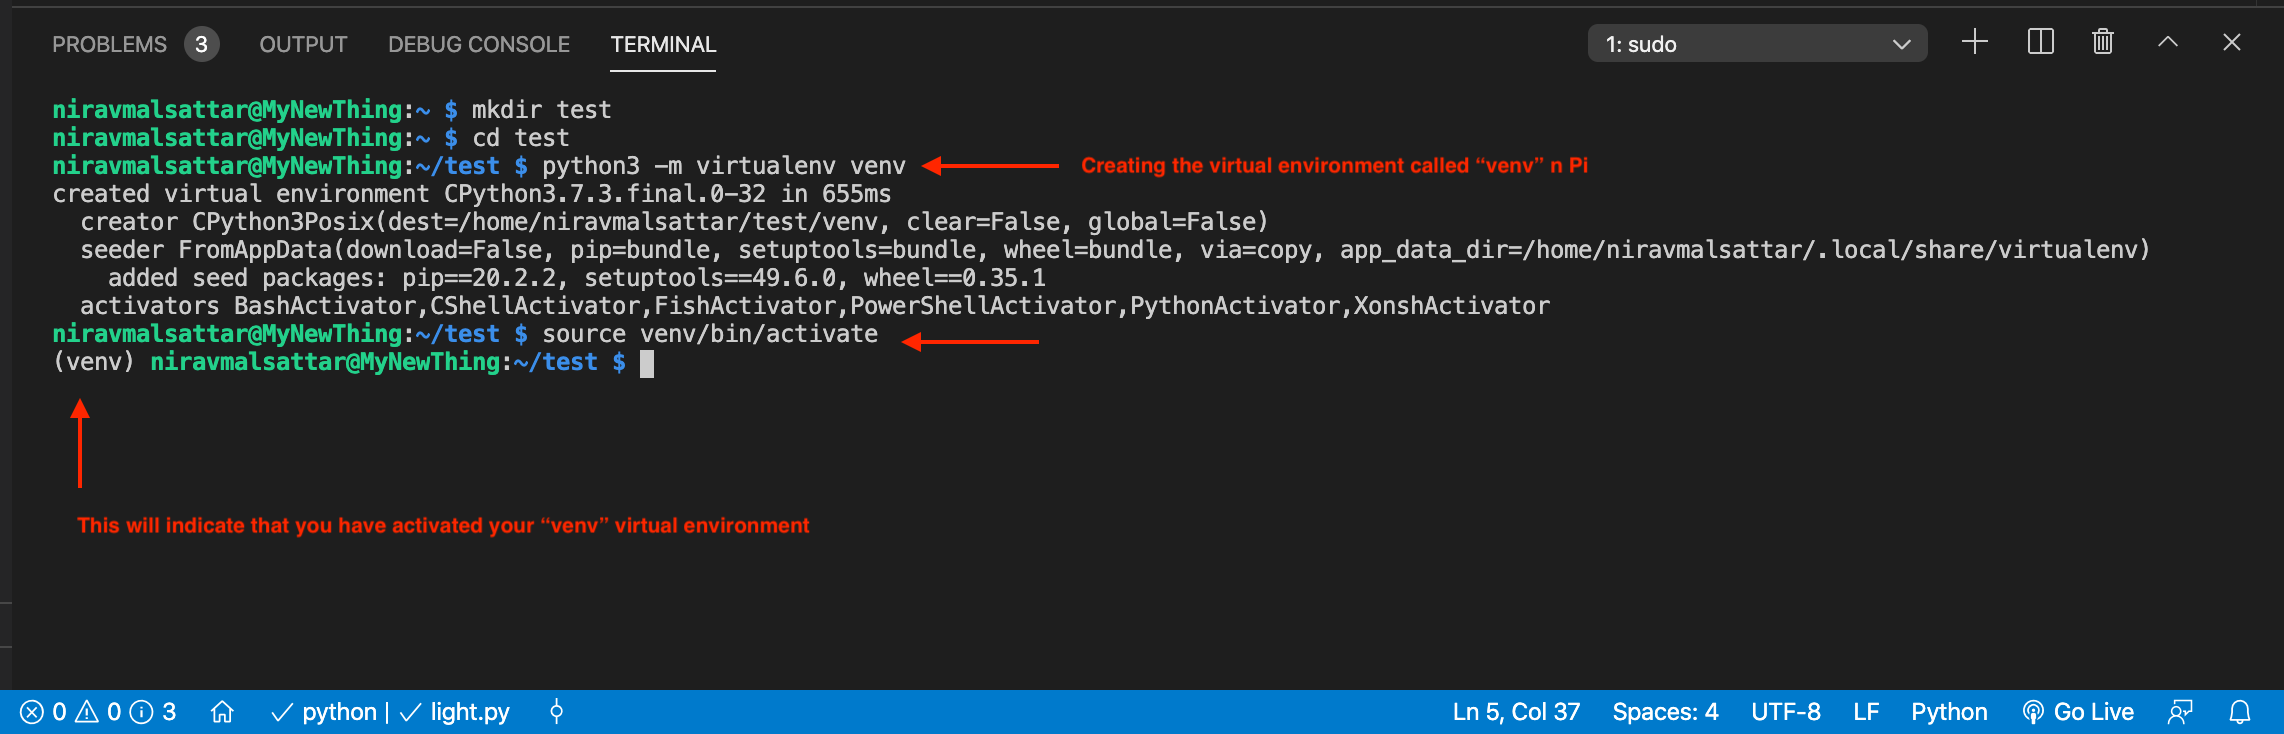
sudo python3 -m virtualenv venv
Windows:
pip3 install virtualenv

python3 -m virtualenv venv
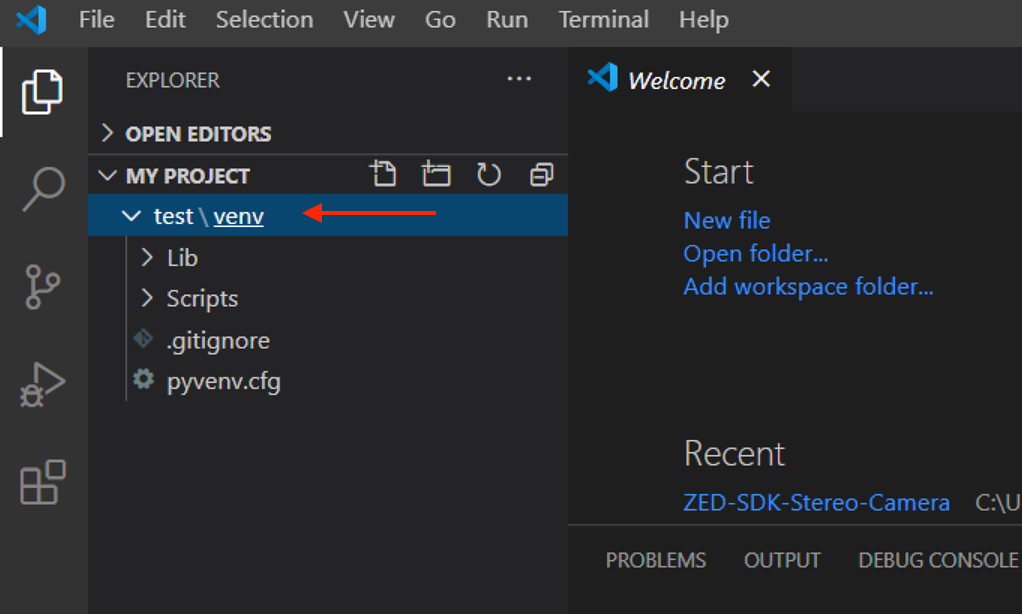
This command will create an venv directory, inside the test folder.
Now to activate this newely created virtual environment, in the terminal type the following command (make sure the terminal is in same ‘test’ directory):
Mac/Linux:
source ./venv/bin/activate
Windows:
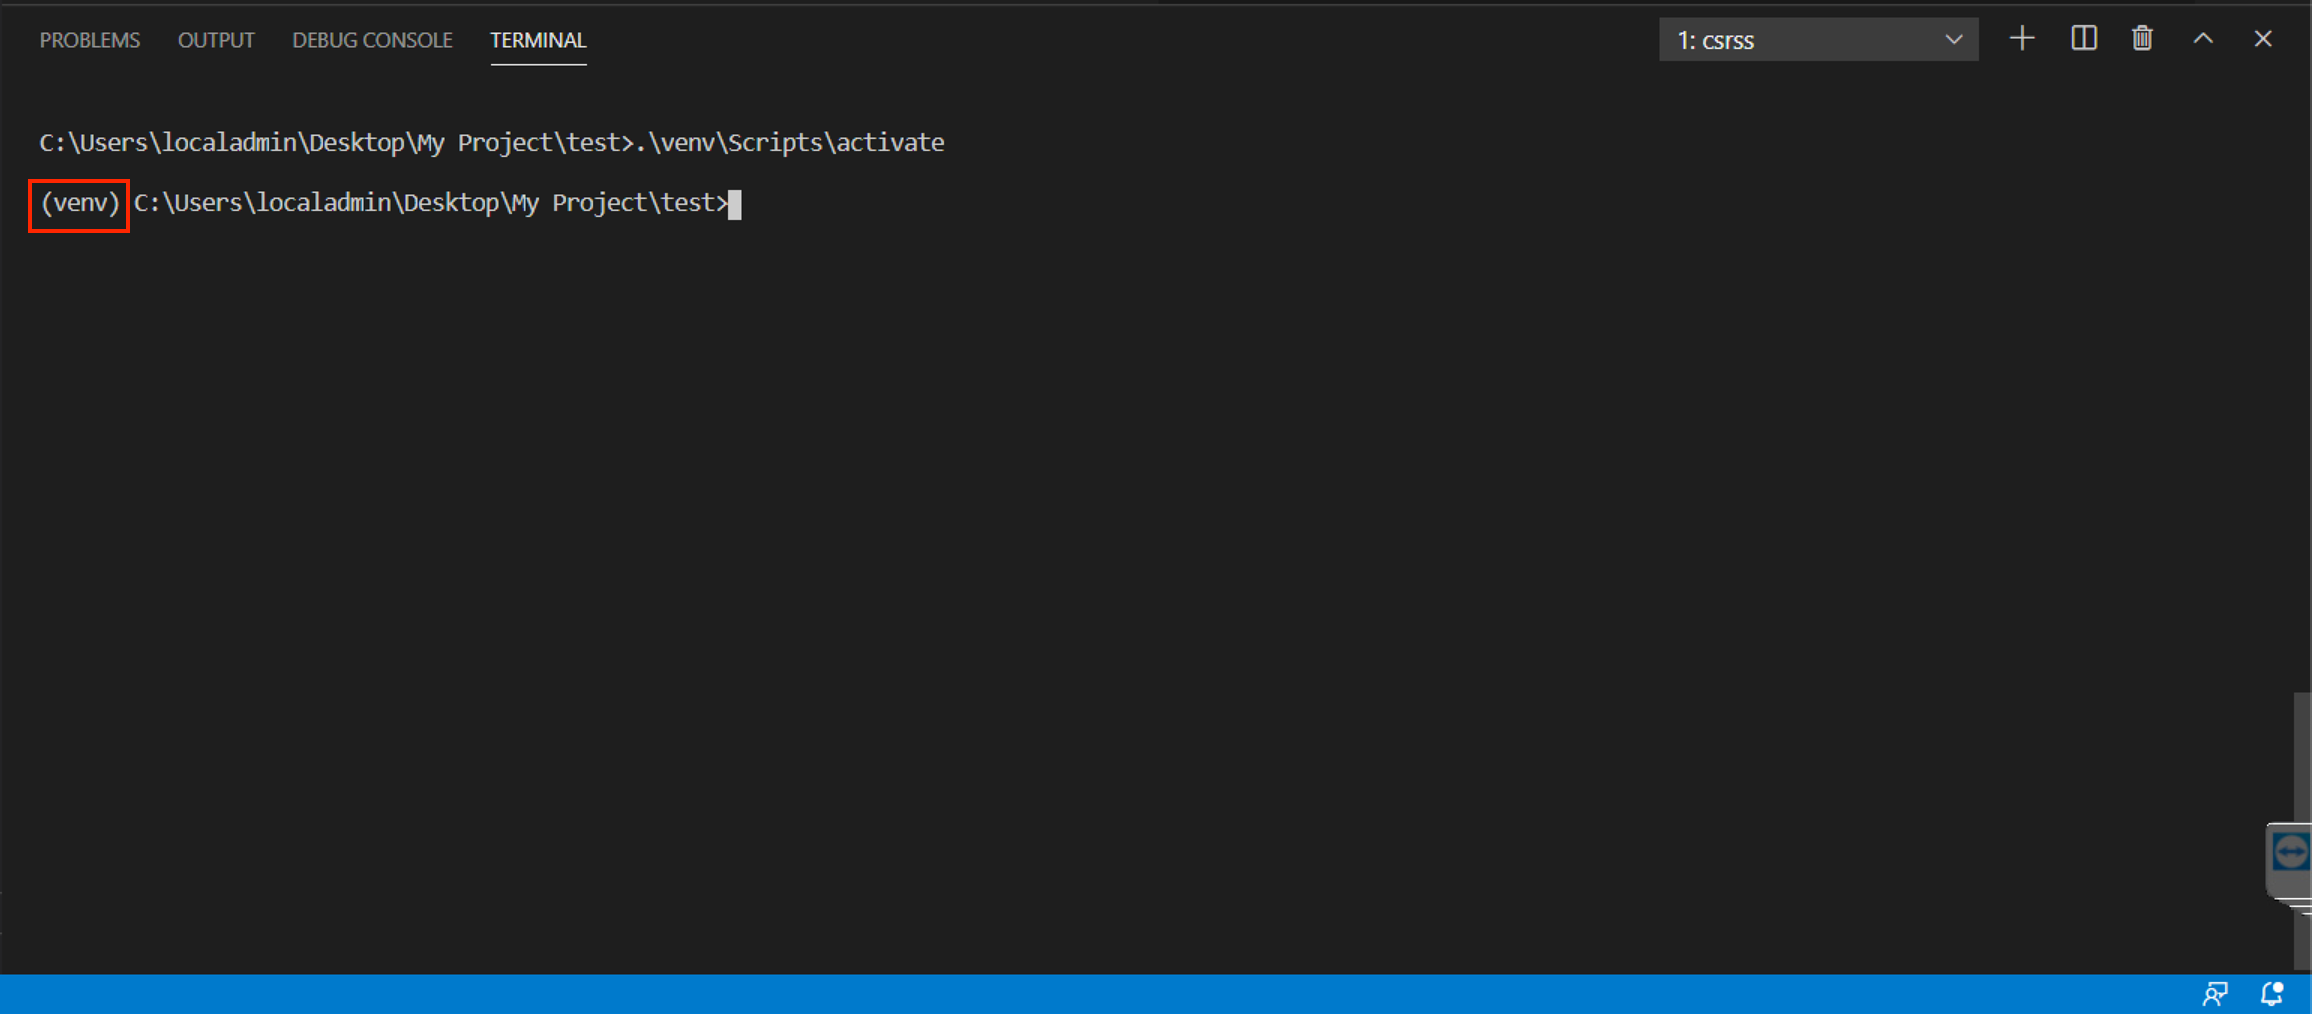
.\venv\Scripts\activate
Notice the difference, the Terminal statement starts with (venv).
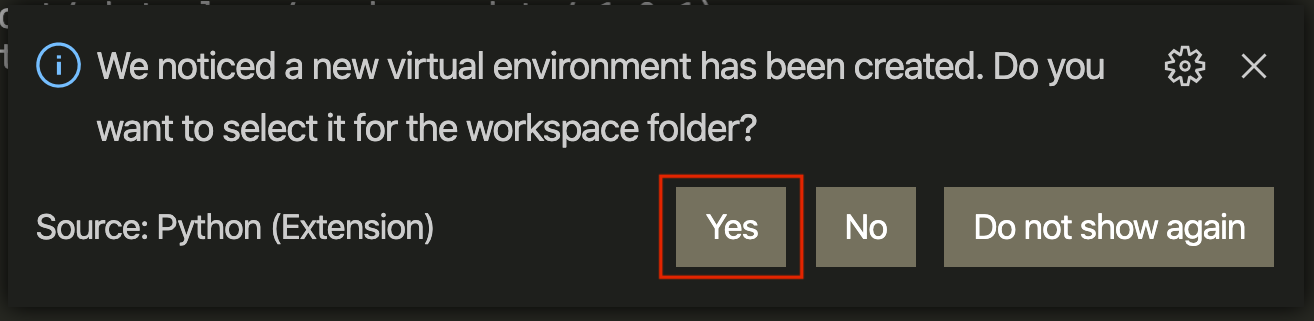
Note In some cases, VS Code might recognises the creation of this new environment and it will ask you through prompt (Bottom right corner of the screen) if you want to switch, click ‘Yes’. This will restart the terminal and you will see in the terminal that the virtual environment has been activated.
To deactivate the virtual environment, you can simply type:
deactivate
What did we achieved?
- We have a machine ready for developing, executing and sharing Python code.
Step 3: Set up your connected light bulb
Throughout this course, we will control a connected light bulb to prototype a service similar to the GoodNight Lamp. Let’s have a look to the light bulb in the prototyping kit: the TP-Link LS110 or LS130.
Task 3.1 Screwing the light bulb
The 101 step of any light bulb is to screw it on a socket, the LS100 series fit on an E27 socket. Make sure it is powered so that its WiFi is turned on.
Task 3.2 Installing a Python library
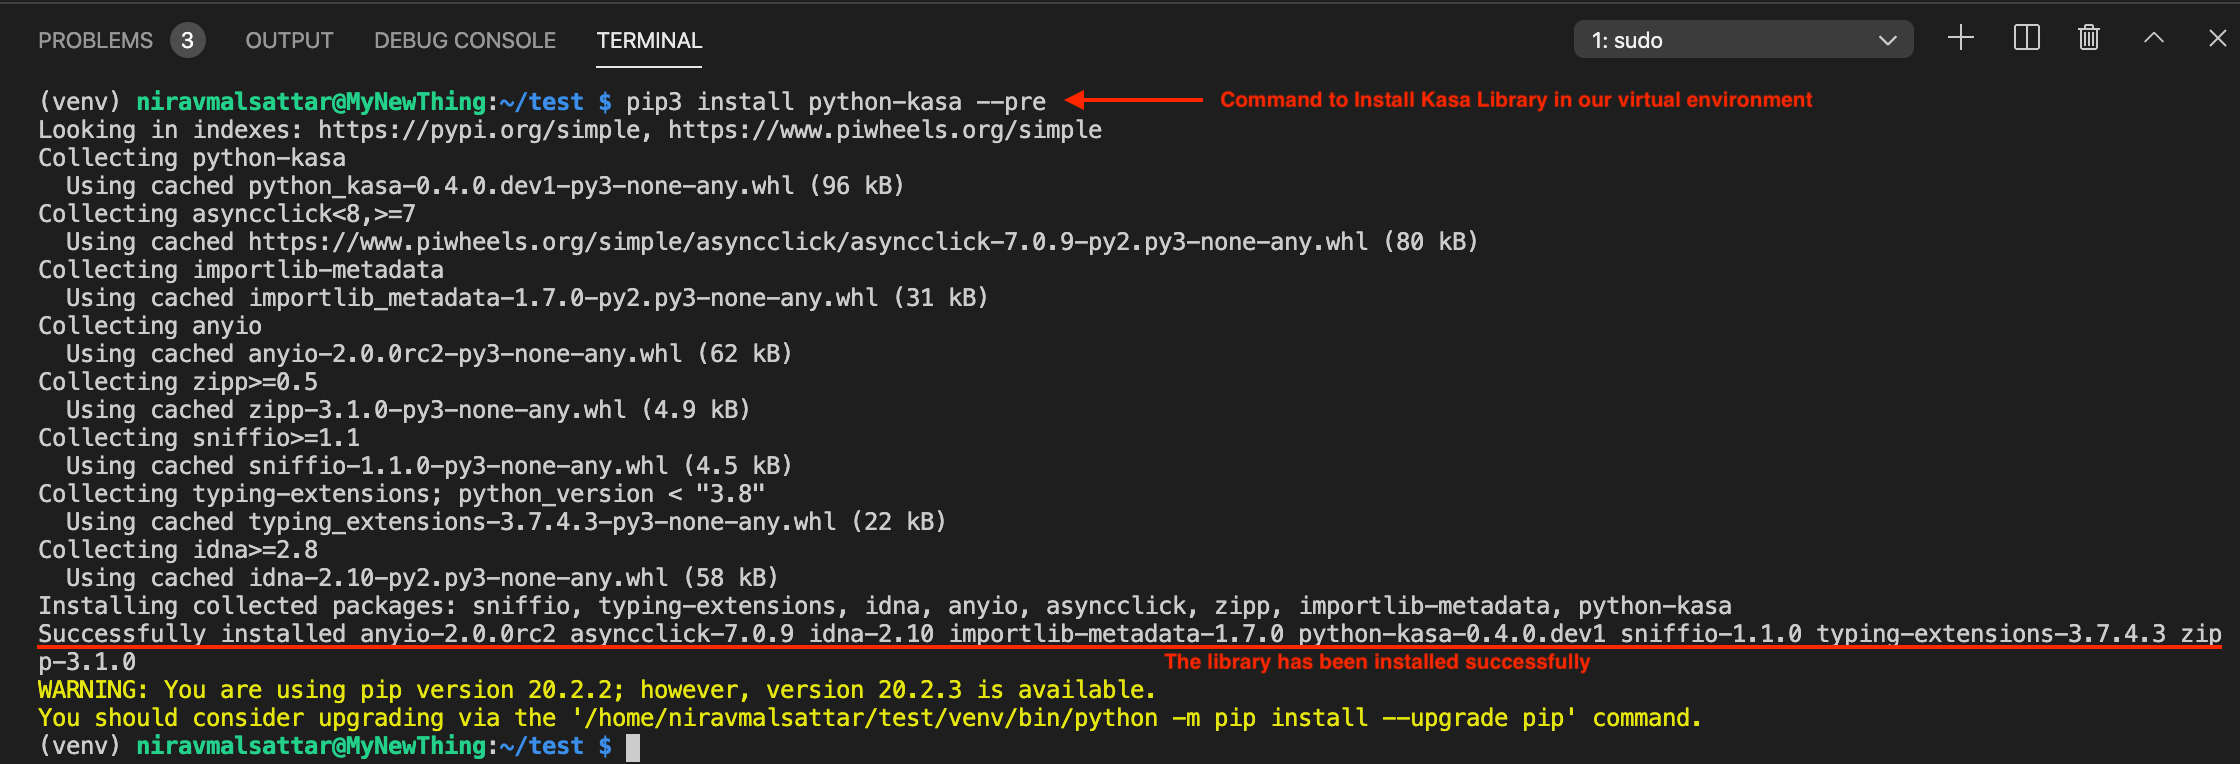
To interact with the light bulb, we will rely on a Python library. A software library is a set of data, a piece of code and documentation. In our case, the python-kasa library will help us interact with the light bulb.
To install this library, go back to VS Code in your course directory and open a Terminal.
We will use pip to install a Python library. Thanks to the virtualenv setup, we can install this library inside the course folder only, avoiding any disruption of other Python program on your machine. In the following command,the –pre option signal that we want to install the most recent version of the library, including pre-release.
pip install python-kasa --pre
kasa## Task 3.3 Connecting to the Network
To connect the light bulb to the network, we need to provision it with the WiFi network information. Taken out of the documentation, here are the steps:
- You need to turn on and of the light bulb 3 times in a row. The light bulb blinks a couple of times. This is the way to let it disconnect from any network and start emitting its own WiFi network;
- Connect your personal computer / laptop to the light bulb network (it should appear as TP-LINKSmart Bulb…). Make sure that your machine is not connected to a wired network at the same time.
- Execute the command
kasa discoverto locate the IP address of the device (likely 192.168.0.1)
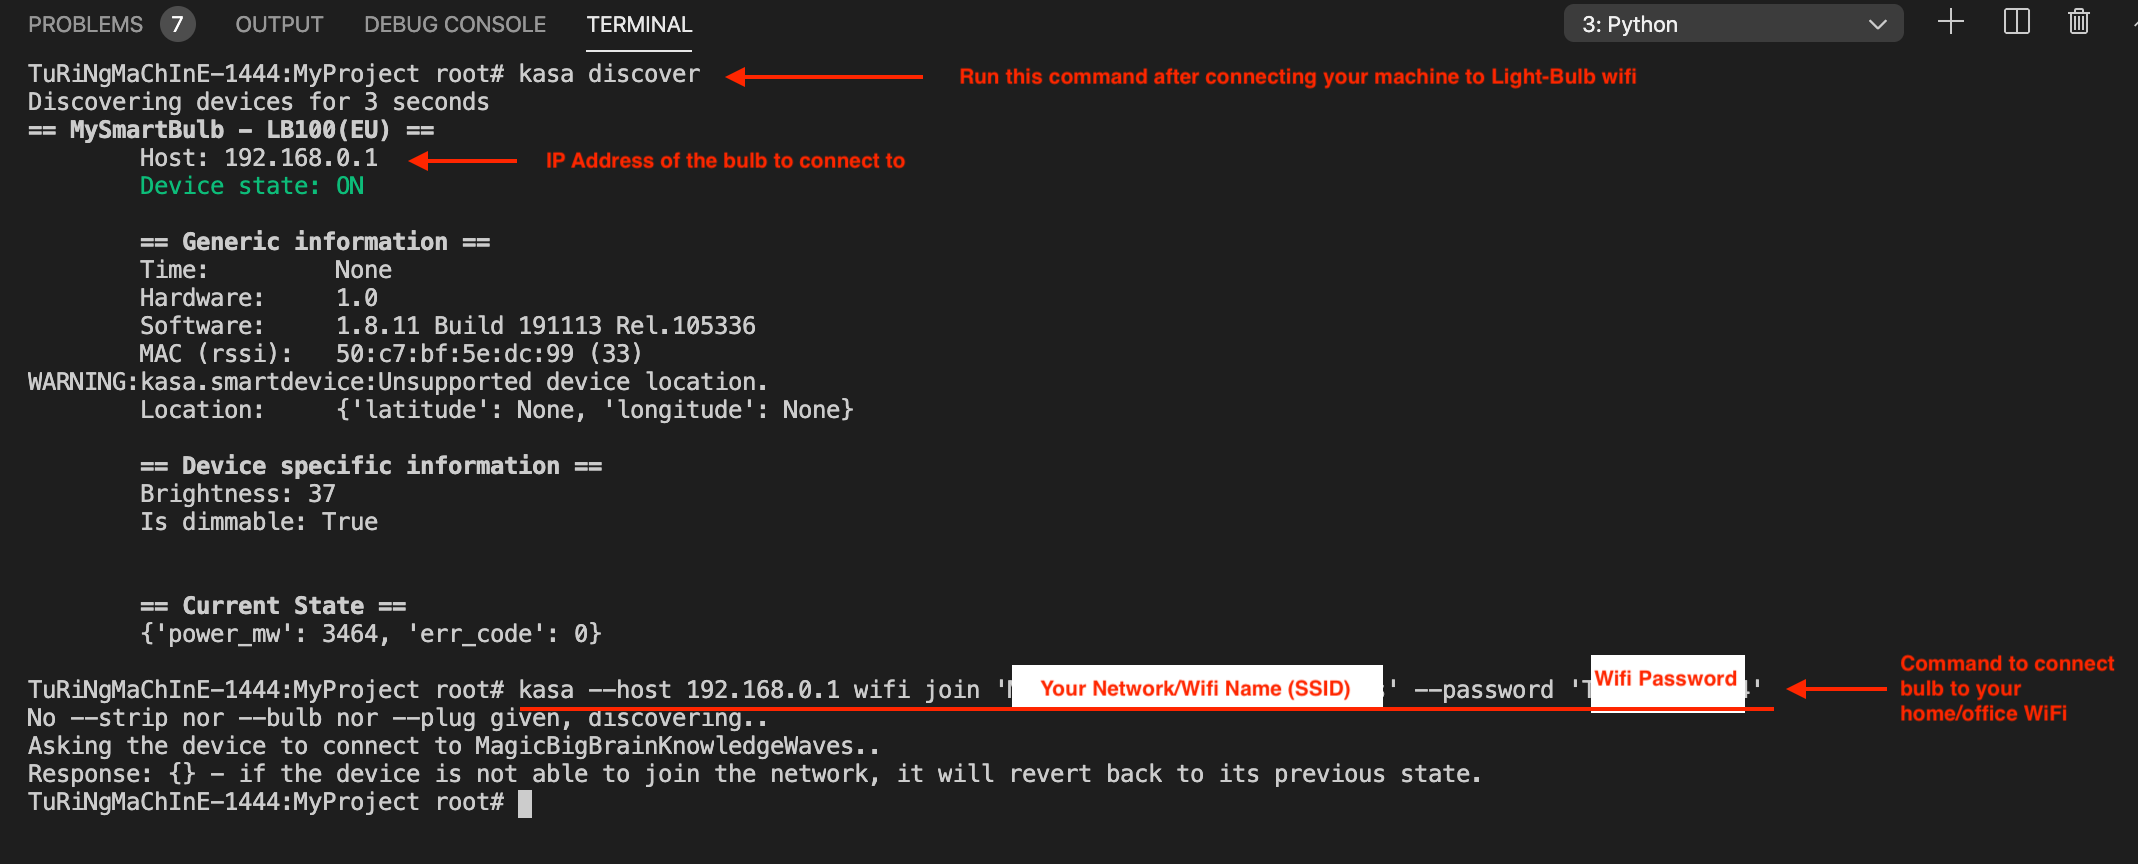
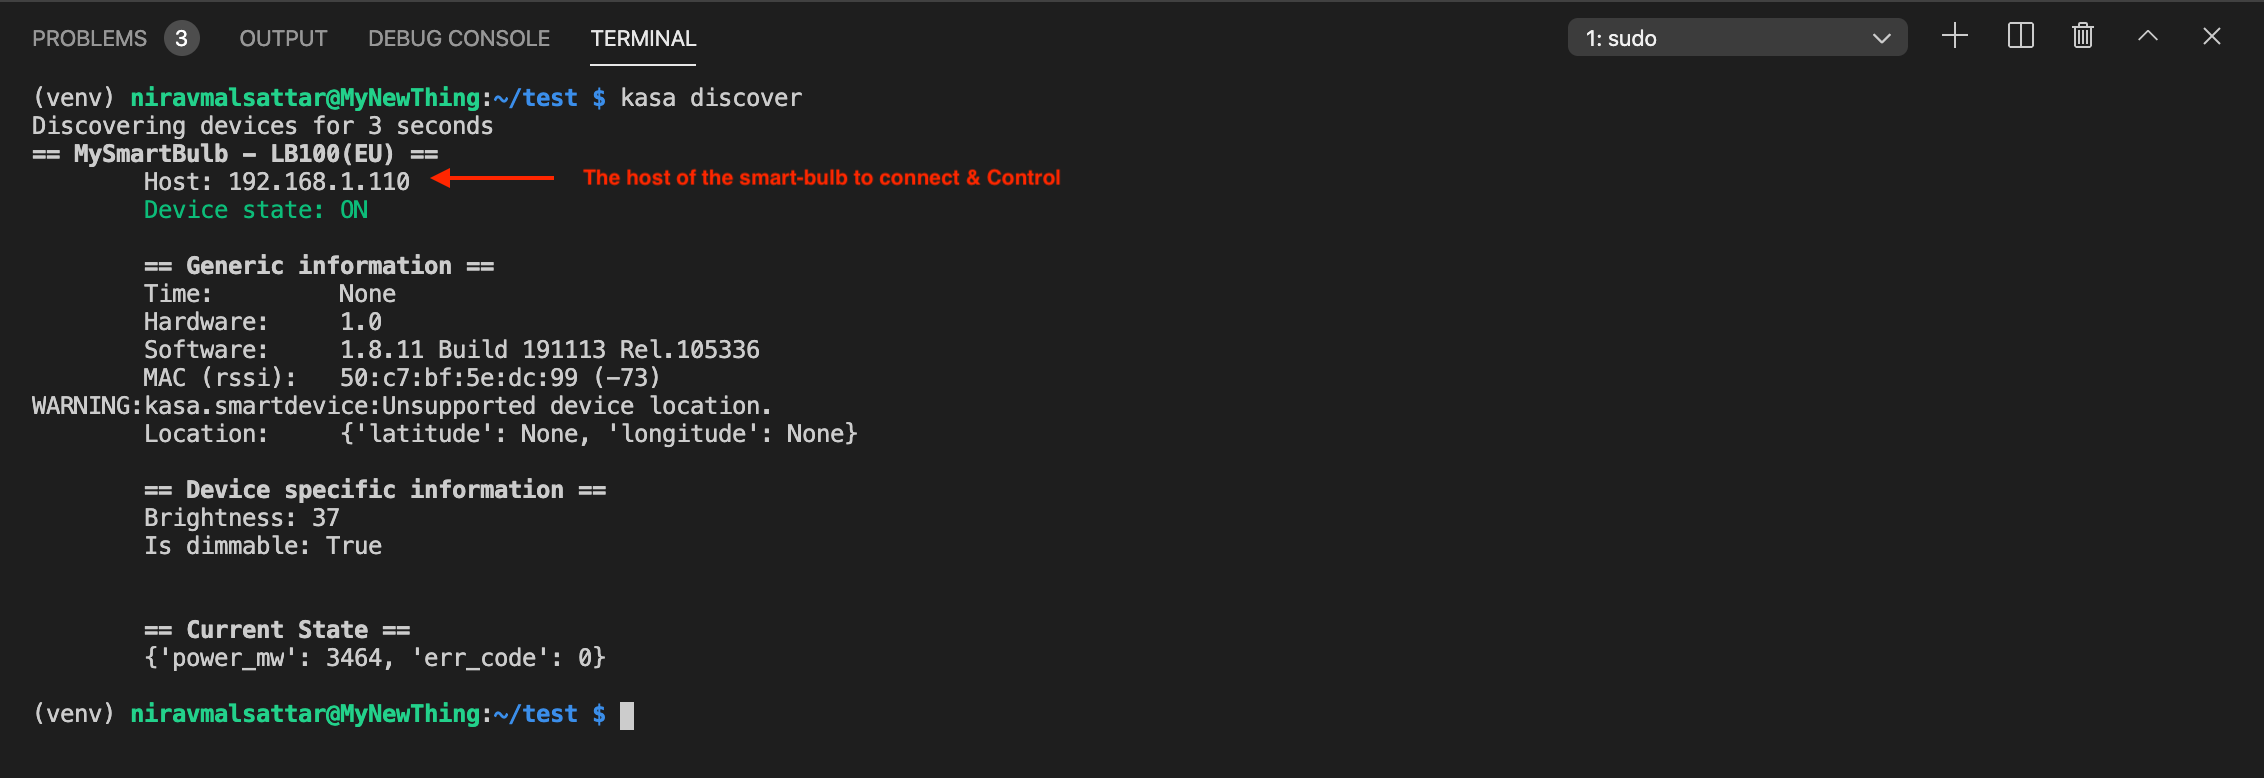
kasa discover
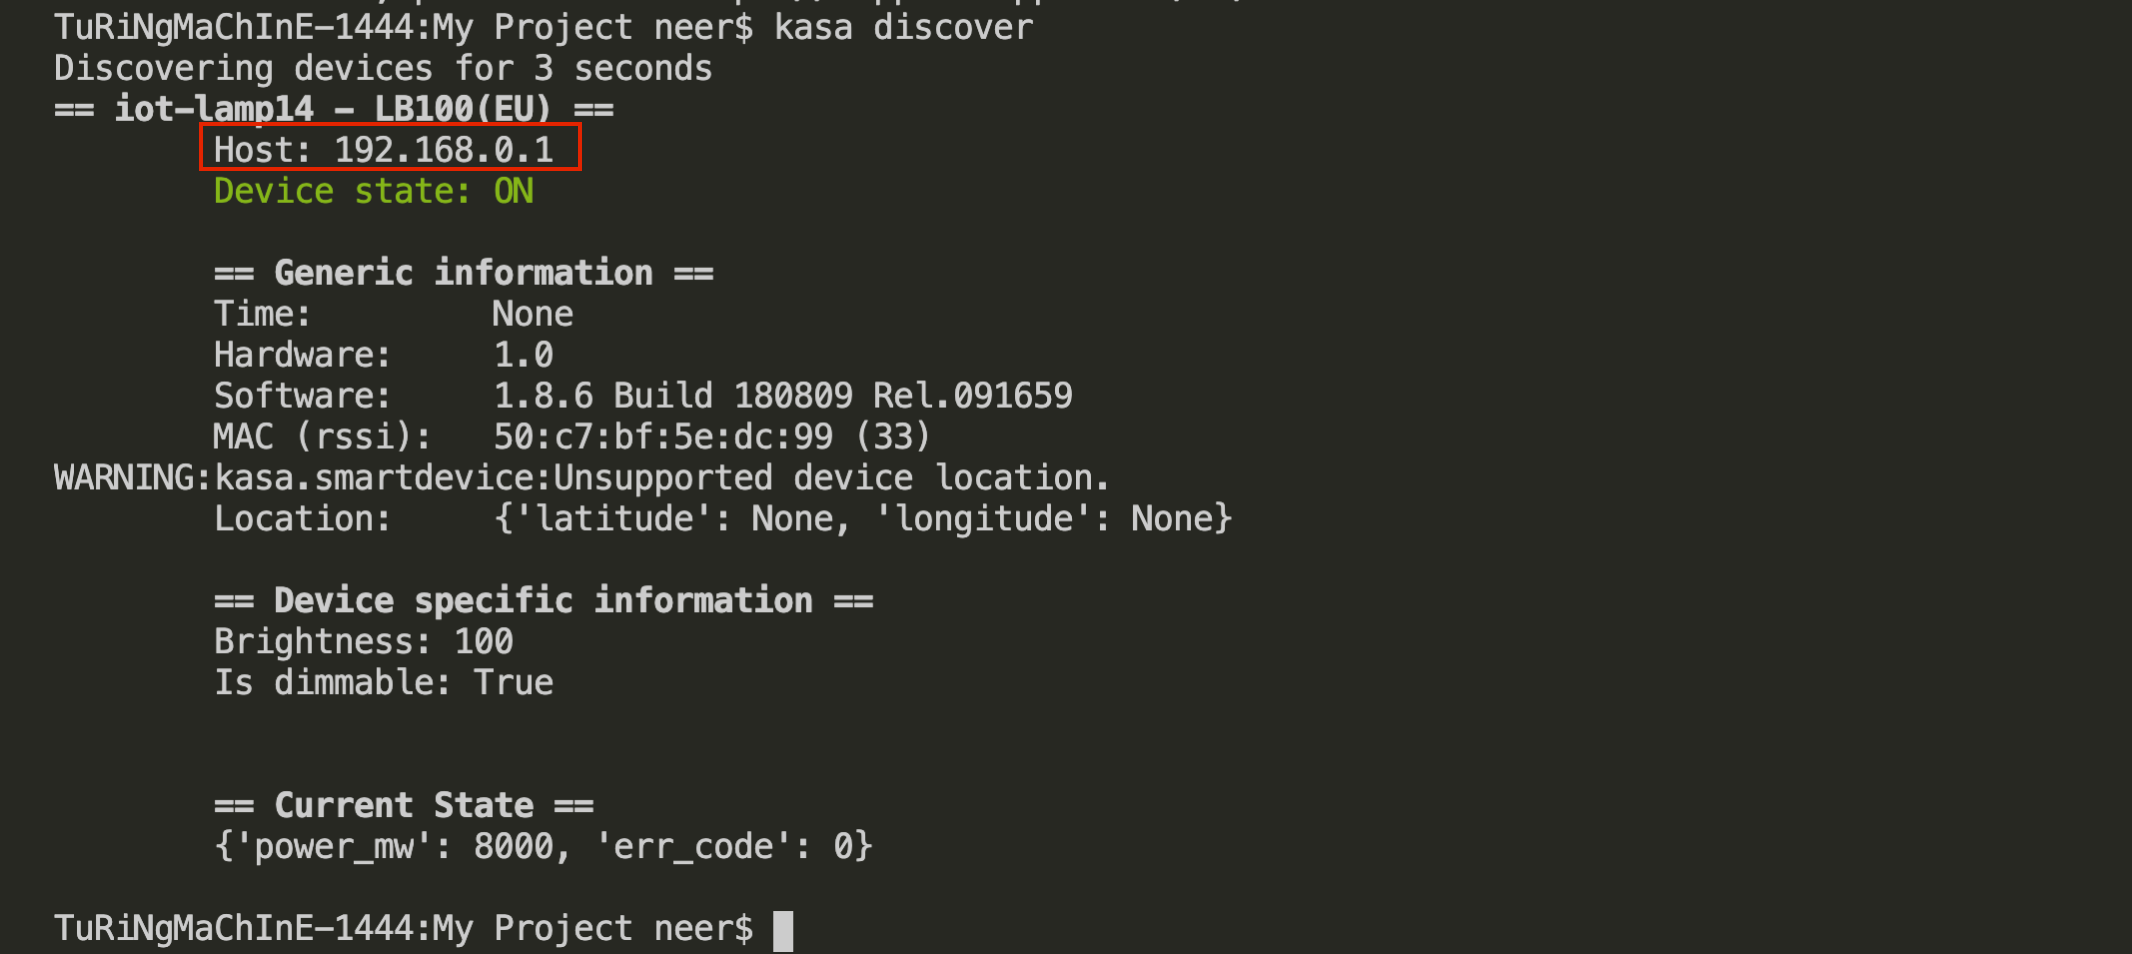
When the light bulb is found, at the top of the result you will note ‘Host:’ followed by 4 digits separated by dots. This is the IP address of the light bulb on the network, i.e. the address to send messages to it.
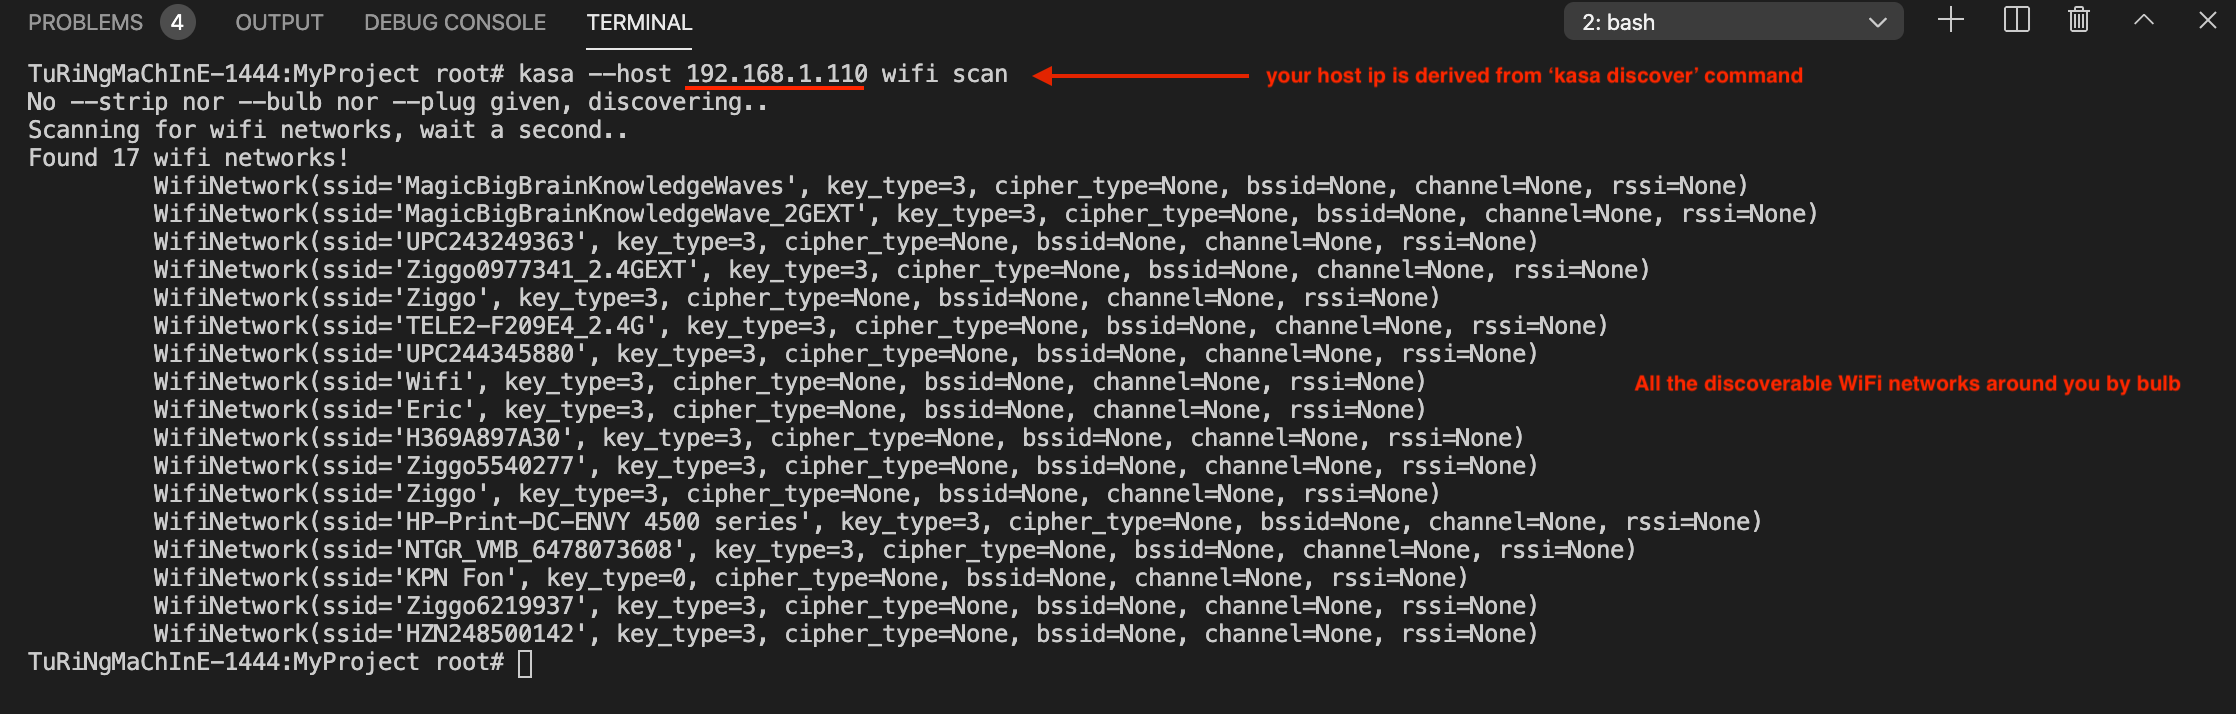
- You can scan for the WiFi networks, in case you do not know which one to connect the light bulb to.
kasa --host <YOUR_HOST_IP> wifi scan
- Finally, we send a message to the light bulb with the WiFi network information. In the following command, the
<HOST>is the IP address of the light bulb identified in step 3, ‘wifi join’ are the command and subcommand,<YOUR_WIFI_SSID>is the SSID of the network to connect to (i.e. name of the network/Wifi), the password option provision the network/wifi password andkeytypeis the category of the network.
kasa --host <HOST> wifi join <YOUR_WIFI_SSID> --password <YOUR_WIFI_PASSWORD> --keytype="3"
If the process works, the light bulbs blinks a two of time, then connect to the provisioned network.
NOw, connect your machine back to your home network/wifi and run the discover command. Make sure that your machine is not connected to a wired network at the same time, otherwise the discover function might look on the wrong network and find no device.
kasa discover

Task 3.4 Interacting with the Light Bulb
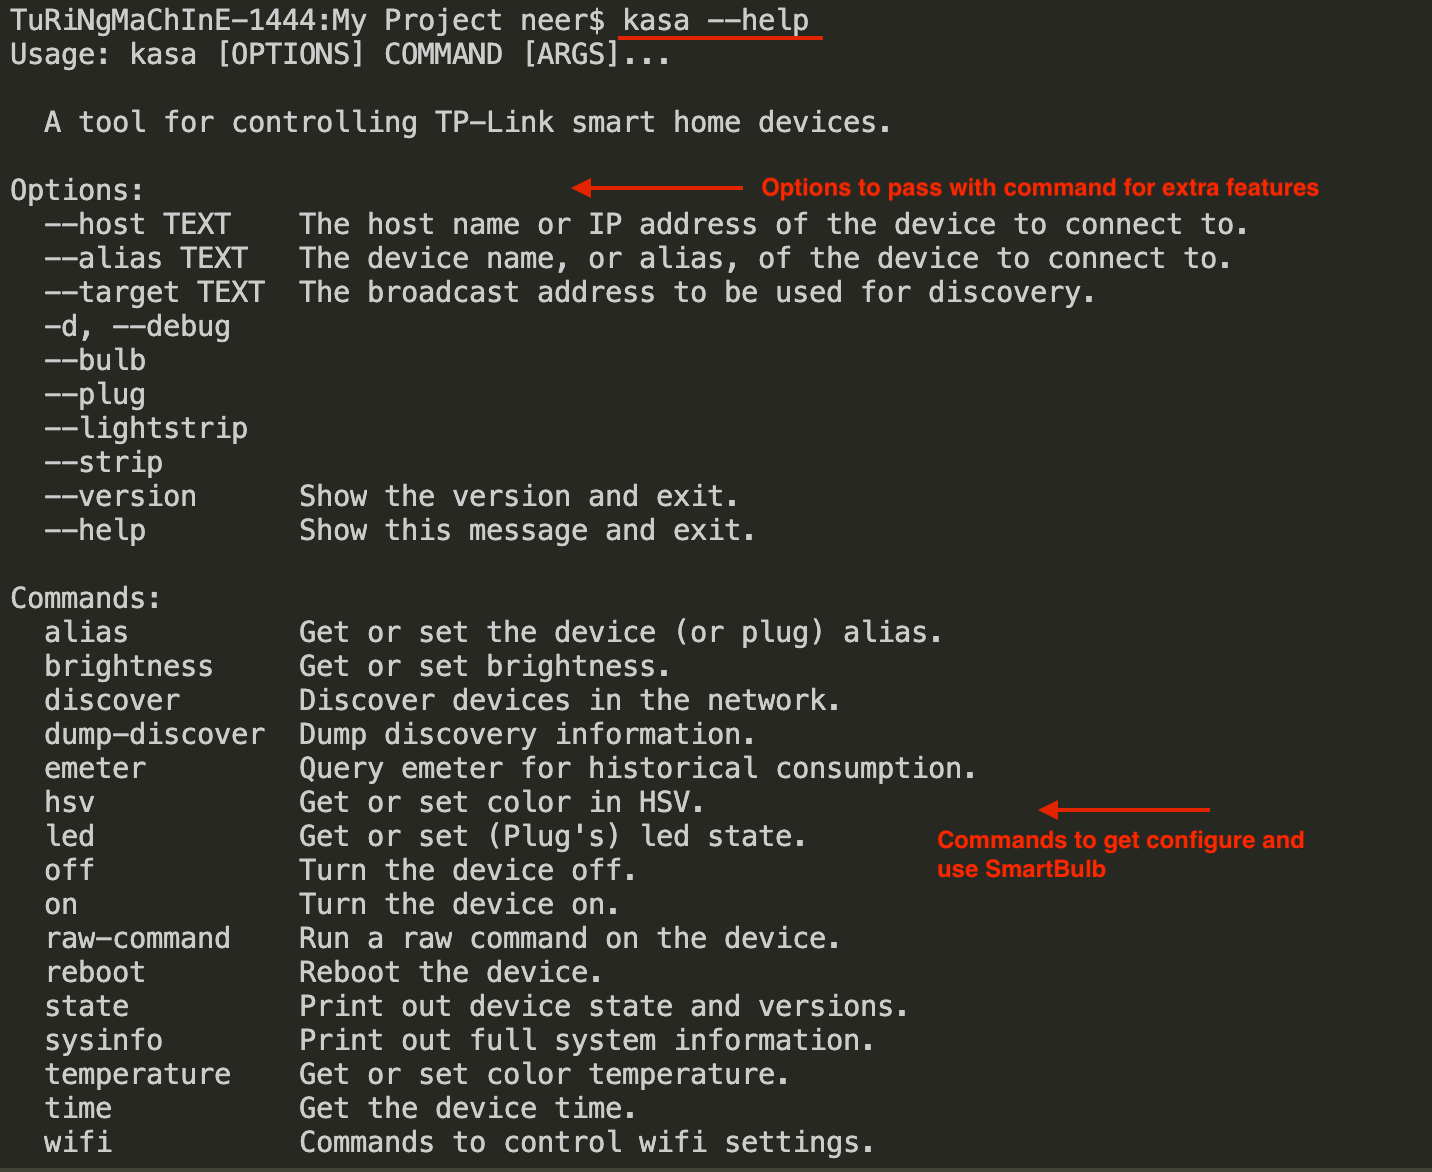
It is now the time to explore what are the capabilities, using the documentation or the –help option
kasa --help
kasa --host <HOST> brightness
kasa --host <HOST> off
kasa --host <HOST> on

What did we achieve?
- we are able to control the connected light bulb from our computer
Step 4: Set up a Raspberry Pi as Home Hub
What is a Raspberry Pi, in contrast with an Arduino-like device? Here is a comparison, opposing a ‘Microprocessor’ and a ‘microcontroller’. Why do we use another computer rather than our own machine? Throughout the course, you will also test your code on your machine. However, when prototyping connected products, you want them to be connected over time, especially for a home hub, and not depending on your laptop activity (e.g. closing the lead, moving out of the house). The Raspberry Pi can be permanently connected and serve its purpose. Besides, it also makes a device on which we can set up network access, enabling your laptop, your phone and other devices to interact with it.
Task 4.1: Installing the Image
By now your Raspberry Pi image should be ready. Let’s go back to Bucket, navigate to you Thing in the left. If the generation is complete, a blue download button appears. Press it to download the file.
You receive a zip file. Unzip it to obtain an image file (extension .img)
To install this image on the SD card, download and install Etcher: Etcher
Starting Etcher, you first select your image file, then your SD card, and ‘Flash’.
Slide in the SD card into the Raspberry Pi and power it with the USB micro charger. Avoid powering the Raspberry Pi with your laptop as it draws more power than your USB port are designed for.
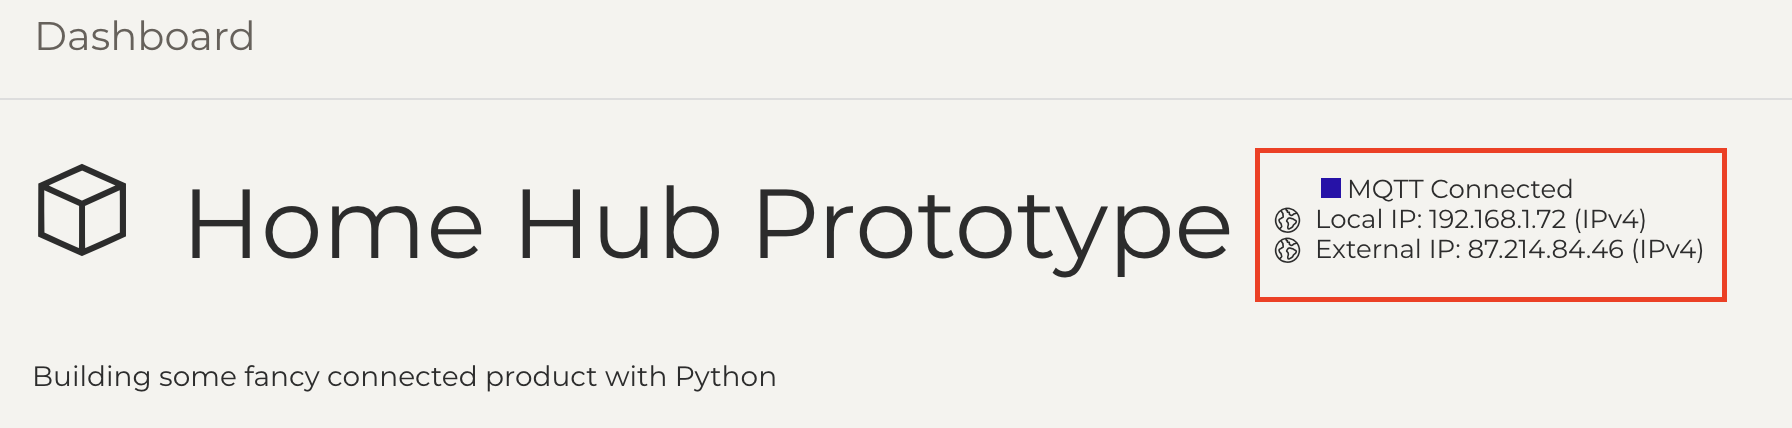
If you properly entered the details of your home network, your Raspberry Pi should automatically connect to this network. After a couple of minutes, refresh your Thing page on the Bucket web app. You should see the IP address of your Raspberry Pi at the top of the page. We will use the local IP address.
Task 4.2: Connecting to the Raspberry Pi
You can connect your Raspberry Pi to a screen, a keyboard and a mouse to use it as you would use your own computer. However, while prototyping your Raspberry Pi is often embedded in your setting and knowing how to handle it remotely is an important skill to have.
Throughout this course, we will thus access the Raspberry Pi remotely. For this, we will use the ssh command as follows. Replace the square brackets with the username and hostname that you provisioned on Bucket. Pressing enter, you will be prompt for your password. Notice the .local after your hostname: it means that we look for the name of a machine on the local network.
ssh [username]@[hostname].local
Another way to connect to your Raspberry Pi, less convenient but often more reliable, is via its local IP Address (displayed on the Bucket web app). It is composed of 4 numbers separated by dots.
ssh [username]@[your.local.IP.address]
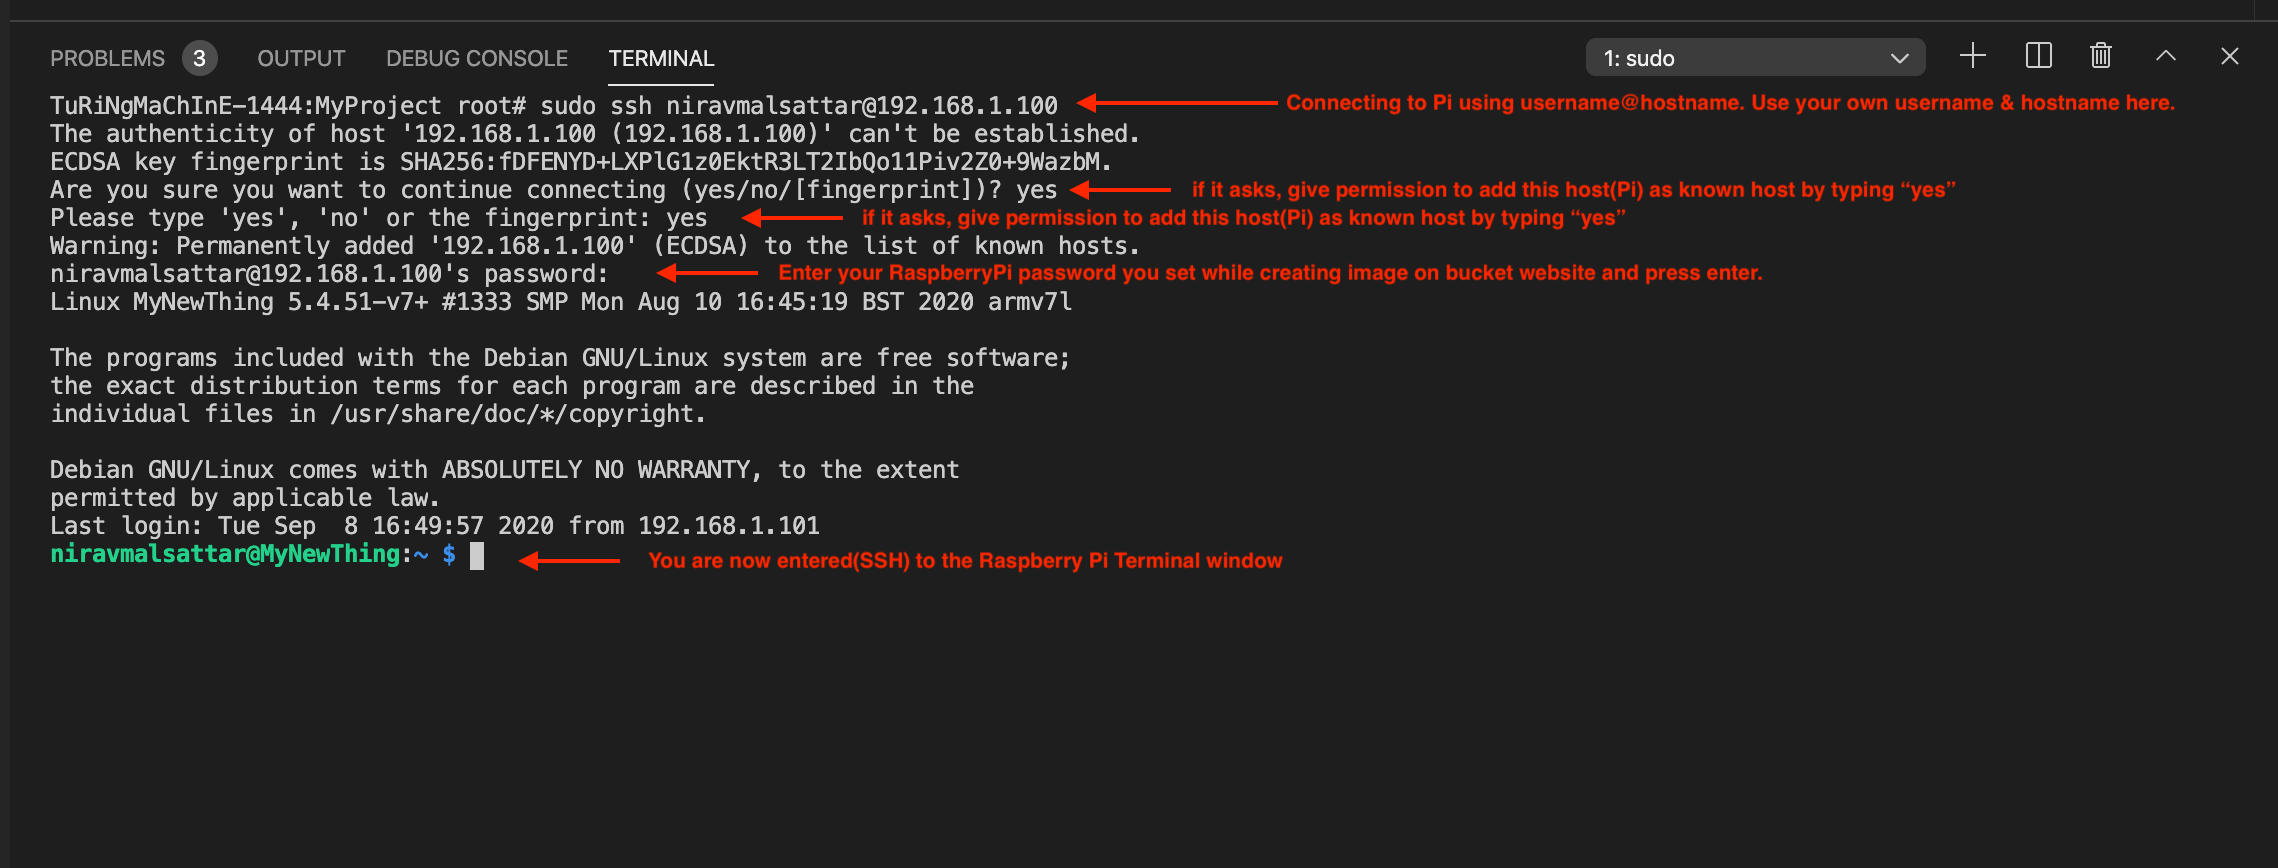
Note: When you enter your password, nothing appears? It is the normal behaviour, we do not want to leave traces of our password in the command line. Type your password (blindly) and press enter.
Task 4.3: Controlling the Light Bulb from Raspberry-Pi
As a final task for this assignment, let’s replicate what you achieved on your laptop controlling the light-bulb.
On the Raspberry Pi, open the Terminal and create a directory named test with the command mkdir. Then, navigate inside it with the command cd.
mkdir test
cd test
Like on our laptop, we want to create a Python environment that we can fully control, without disturbing any other Python setting already on the Raspberry Pi. Thus, we create a virtual environment using the same command as we did on our personal computer: virtualenv. In the Terminal type the following command to create a virtual environment called venv.
python3 -m virtualenv venv
Then, activate this virtual environment by:
source venv/bin/activate
Notice the venv prefix on the left side of the line in the Terminal: we are inside the venv Python environment that we have just created. We can now install the kasa-python library to control the light bulb from the Raspberry Pi. In the terminal, type in the following command. Remember pip is the library manager of Python, we want to install the python-kasa library. The option --pre means that we want a pre-release (e.g. the very most recent version of this library).
pip install python-kasa --pre
As we already connected the light bulb to our home/office network, we can skip the network provisioning step this time. However, make sure that the pi is connected to the same WiFi network as smart-bulb.
Let’s use some of the commands from the python-kasa library to control the light bulb. First, we can check if the bulb is connected to the WiFi network with the discover command:
kasa discover
This will show the name of our smart bulb, its IP address, some hardware details and its current status with device-specific information.
Now that we have the IP address of the bulb (HOST), we will try to interact with it by running some simple commands. For each of the following command, replace [host] by the IP address found with the discover command.
kasa --host [HOST] brightness
kasa --host <HOST> off
kasa --host <HOST> on
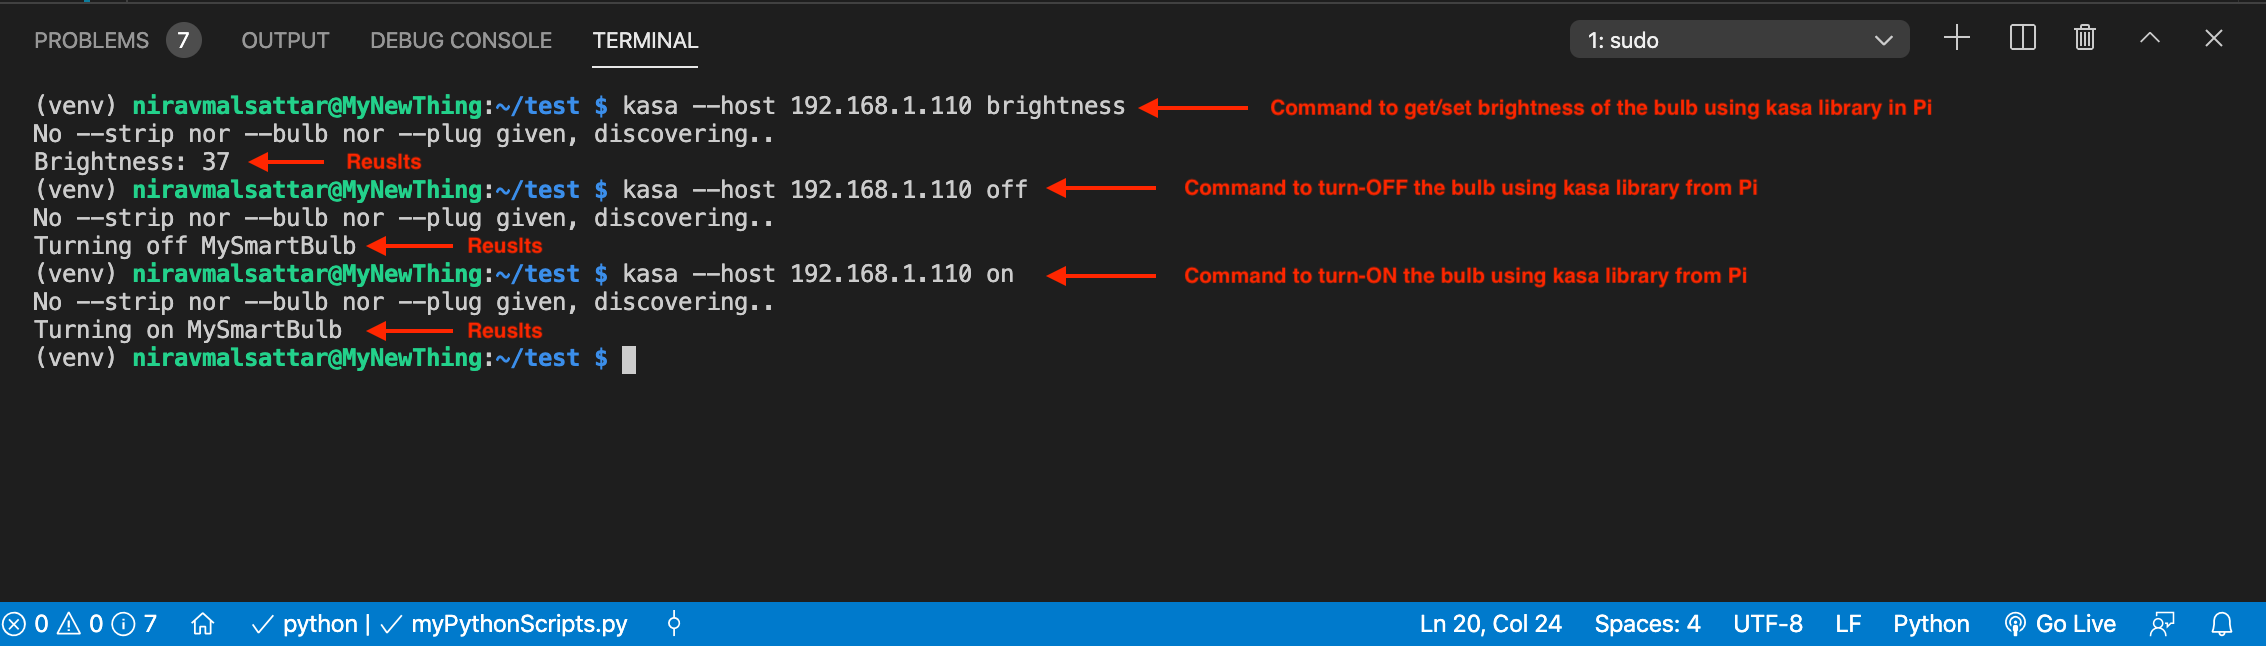
What did we achieve?
- we have a Raspberry Pi up and running, connected to the same network as the light-bulb and able to control it.
![]()
![]()
![]()
The European Commission's support for the production of this publication does not constitute an endorsement of the contents, which reflect the views only of the authors, and the Commission cannot be held responsible for any use which may be made of the information contained therein.