In this assignment, you will experience the basics of Python programming. You will write a program that control the connected light bulb. You will rely on code written by others developers and share it with the rest of your team.
- Step 1: Walking through the Version Control Flow
- Step 2 Turn on the light with Python
- Step 3 Turn on the light! I mean for real!
- Step 4 Shaping the Lamp’s Behaviour
In the previous module we set up a prototyping environment and we explored the behaviour of a default Python modules (kasa) running on our laptop and our Raspberry Pi. It is time to start coding and define ourself this behaviour.
Step 1: Walking through the Version Control Flow
In this step, we will learn how to use a Version Control System (e.g. Git) to work remotely on your project with other teammates collaboratively. So far, you joined a team on GitHub and wrote documentation in Markdown to report your first lab experiment directly on the GitHub website. You might have encountered some collaboration issues? Indeed, GitHub brings the conversation around the code, but the co-development takes place on each developer’s machine.
Task 1.1: Getting the Shared Repository on your Machine
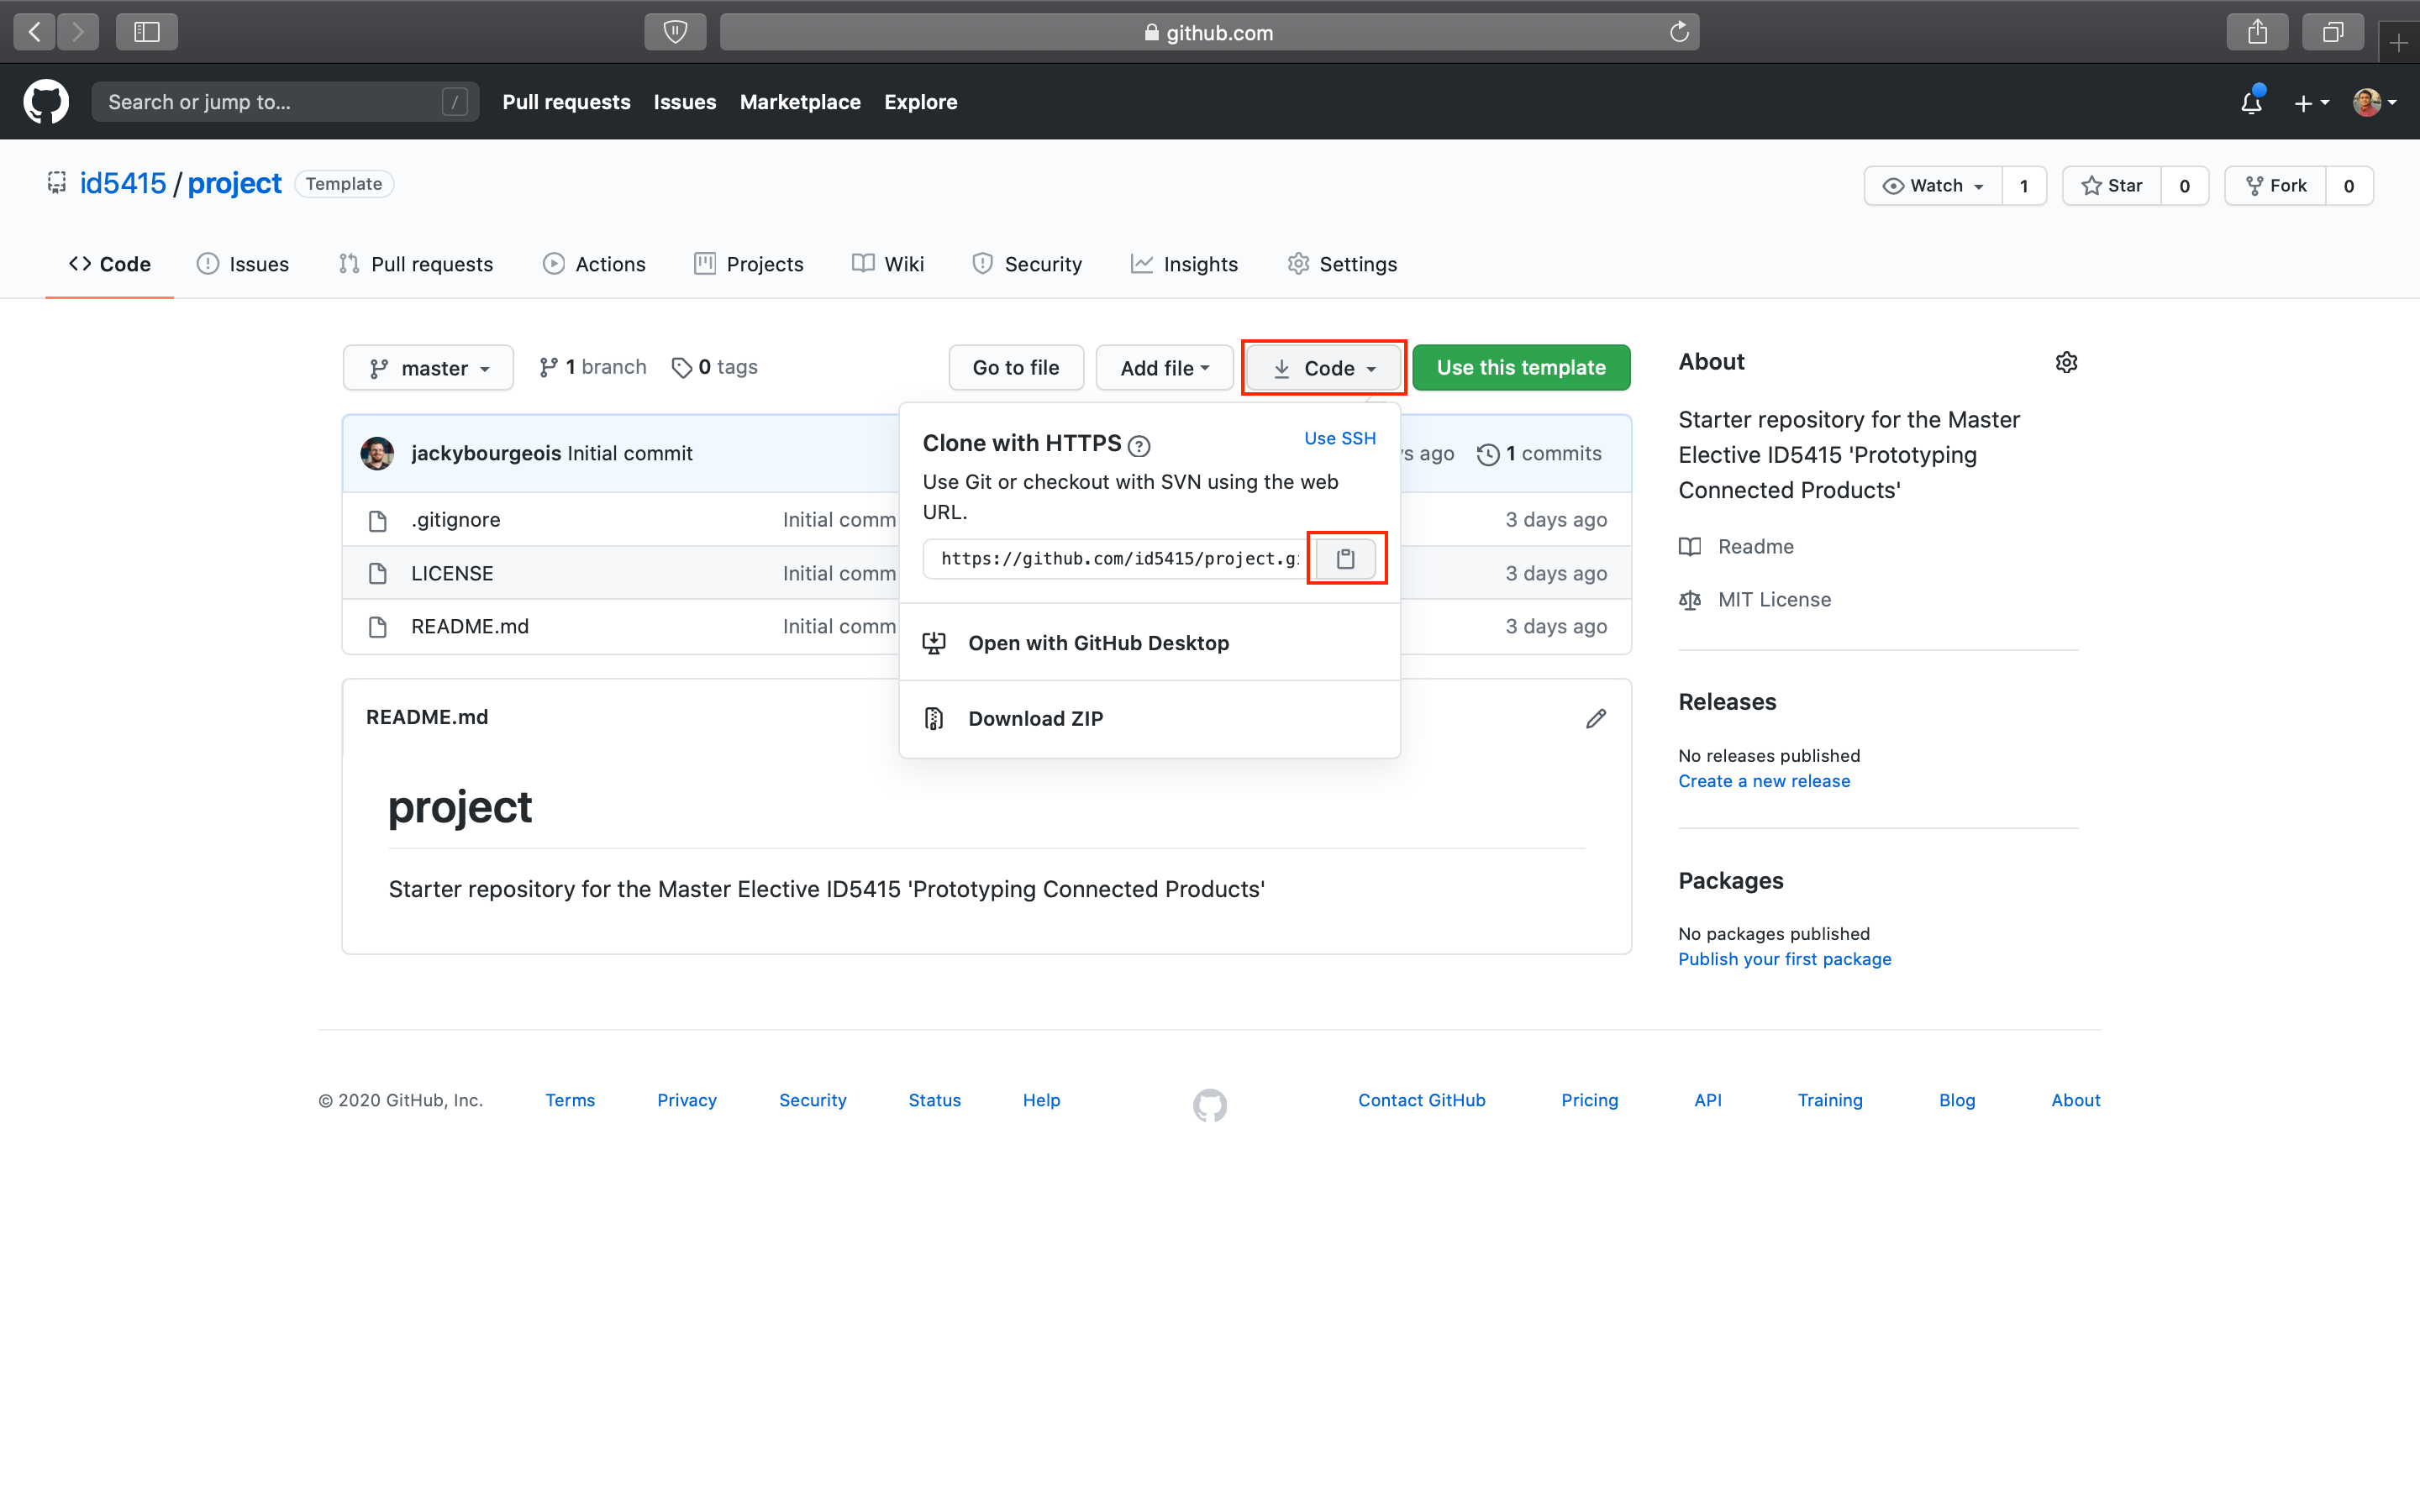
To get your remote repository on your machine, we use git clone followed by the URL of your repository. You can find this URL on the GitHub page of your repository. Click on the green drop-down button ‘Code’ and copy the URL.
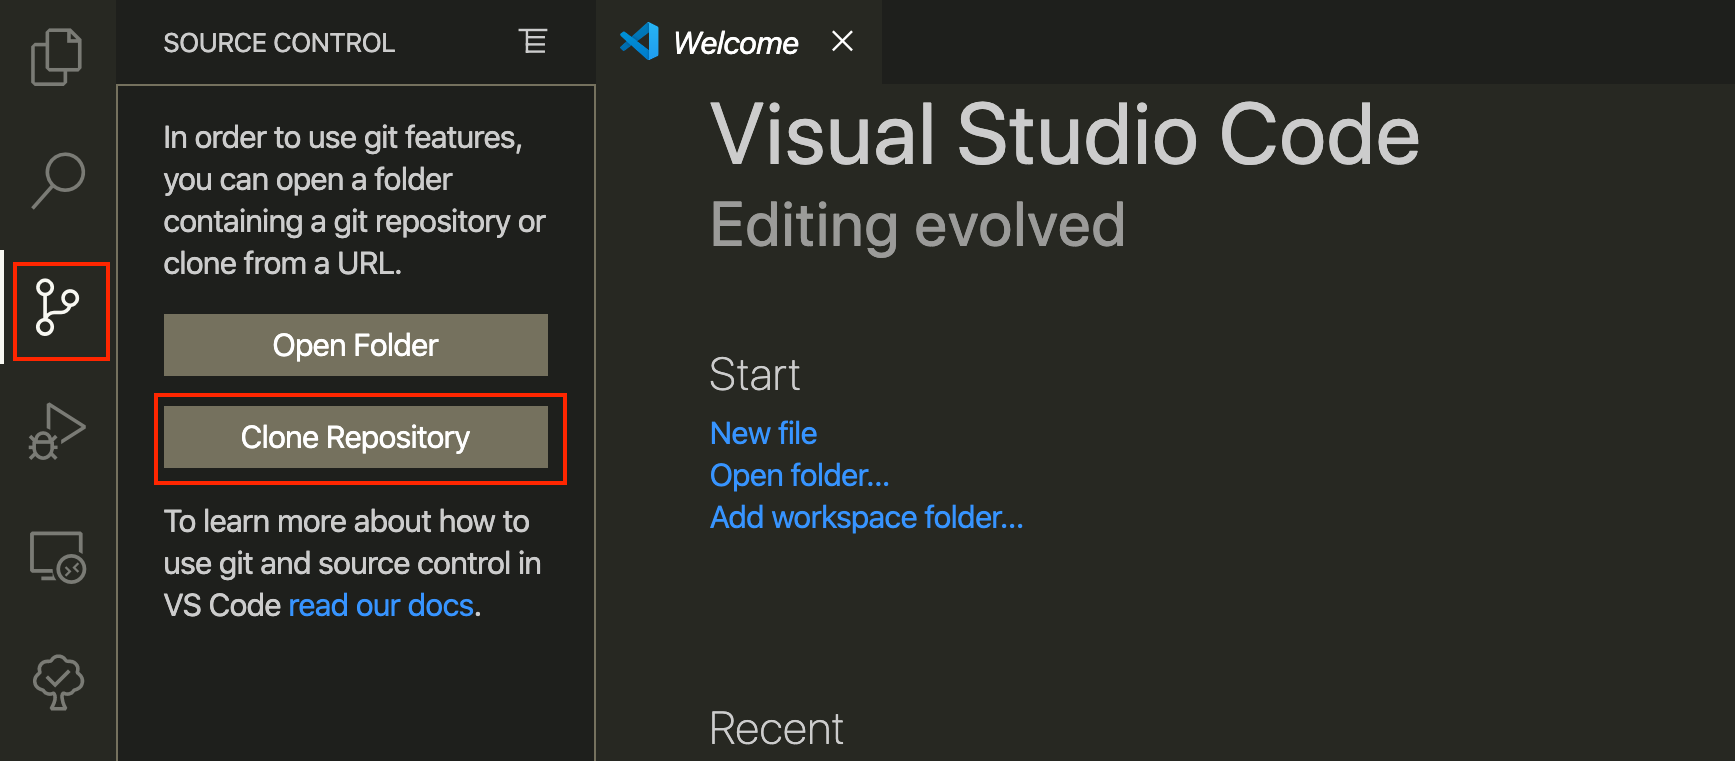
Open VS Code and click on the Source Control button (3rd icon in the left panel), then click on ‘clone repository’.
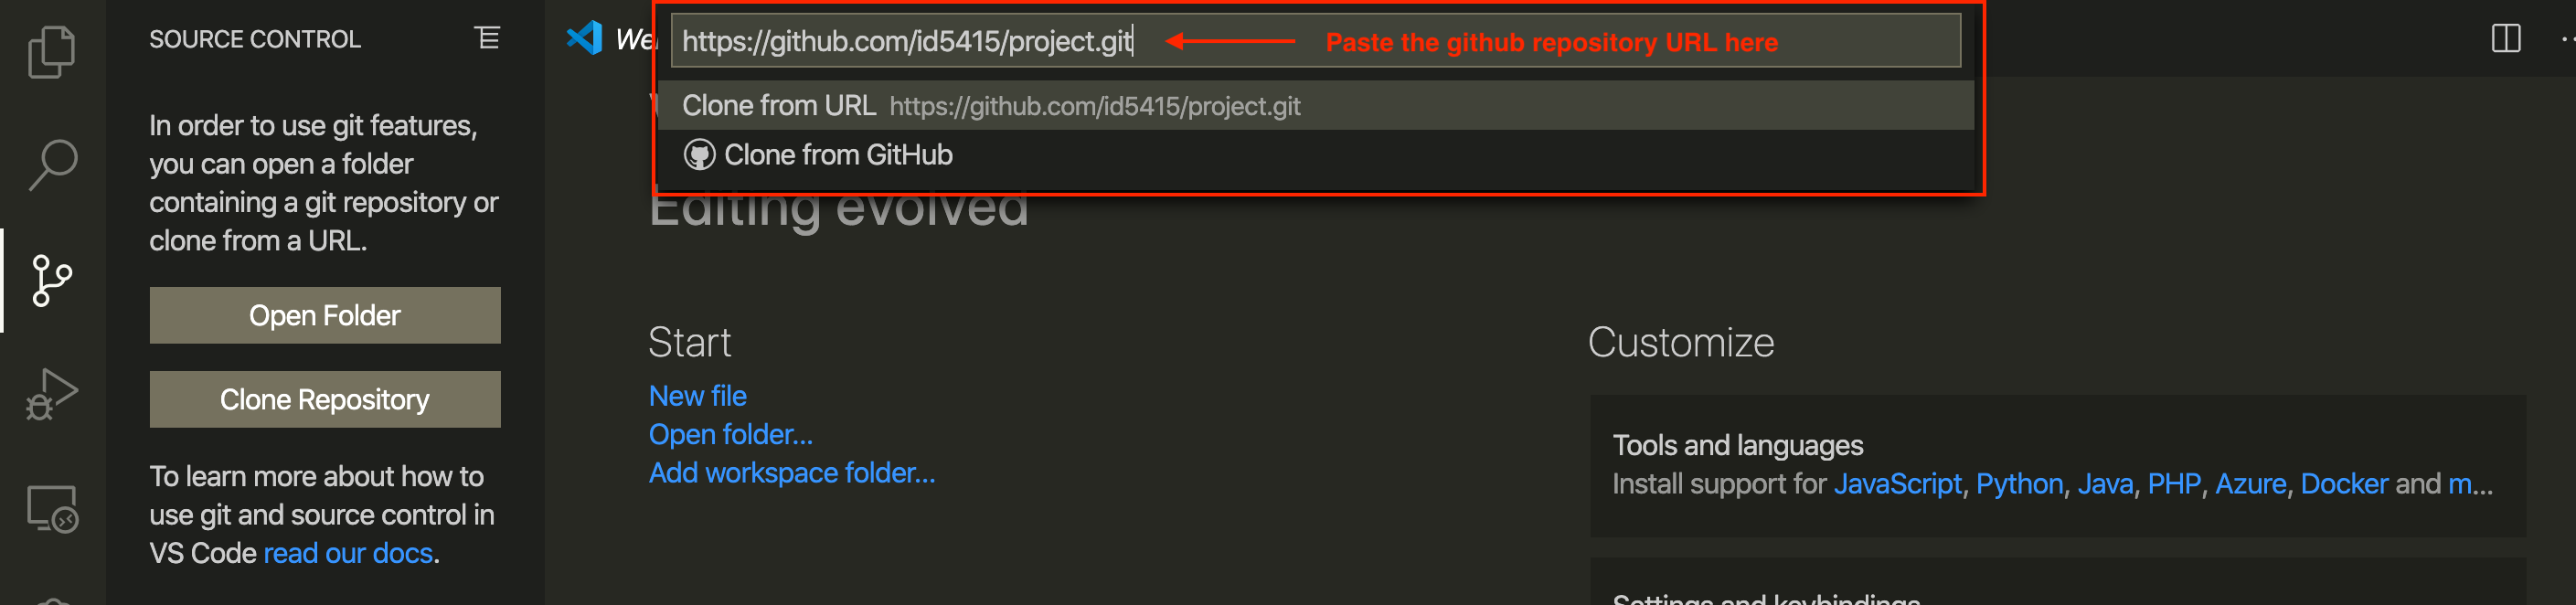
In the text field that opens at the top, paste the URL of your repository and press ENTER. A prompt will ask you to choose the location in your machine to save the Repository. For now, choose Desktop.
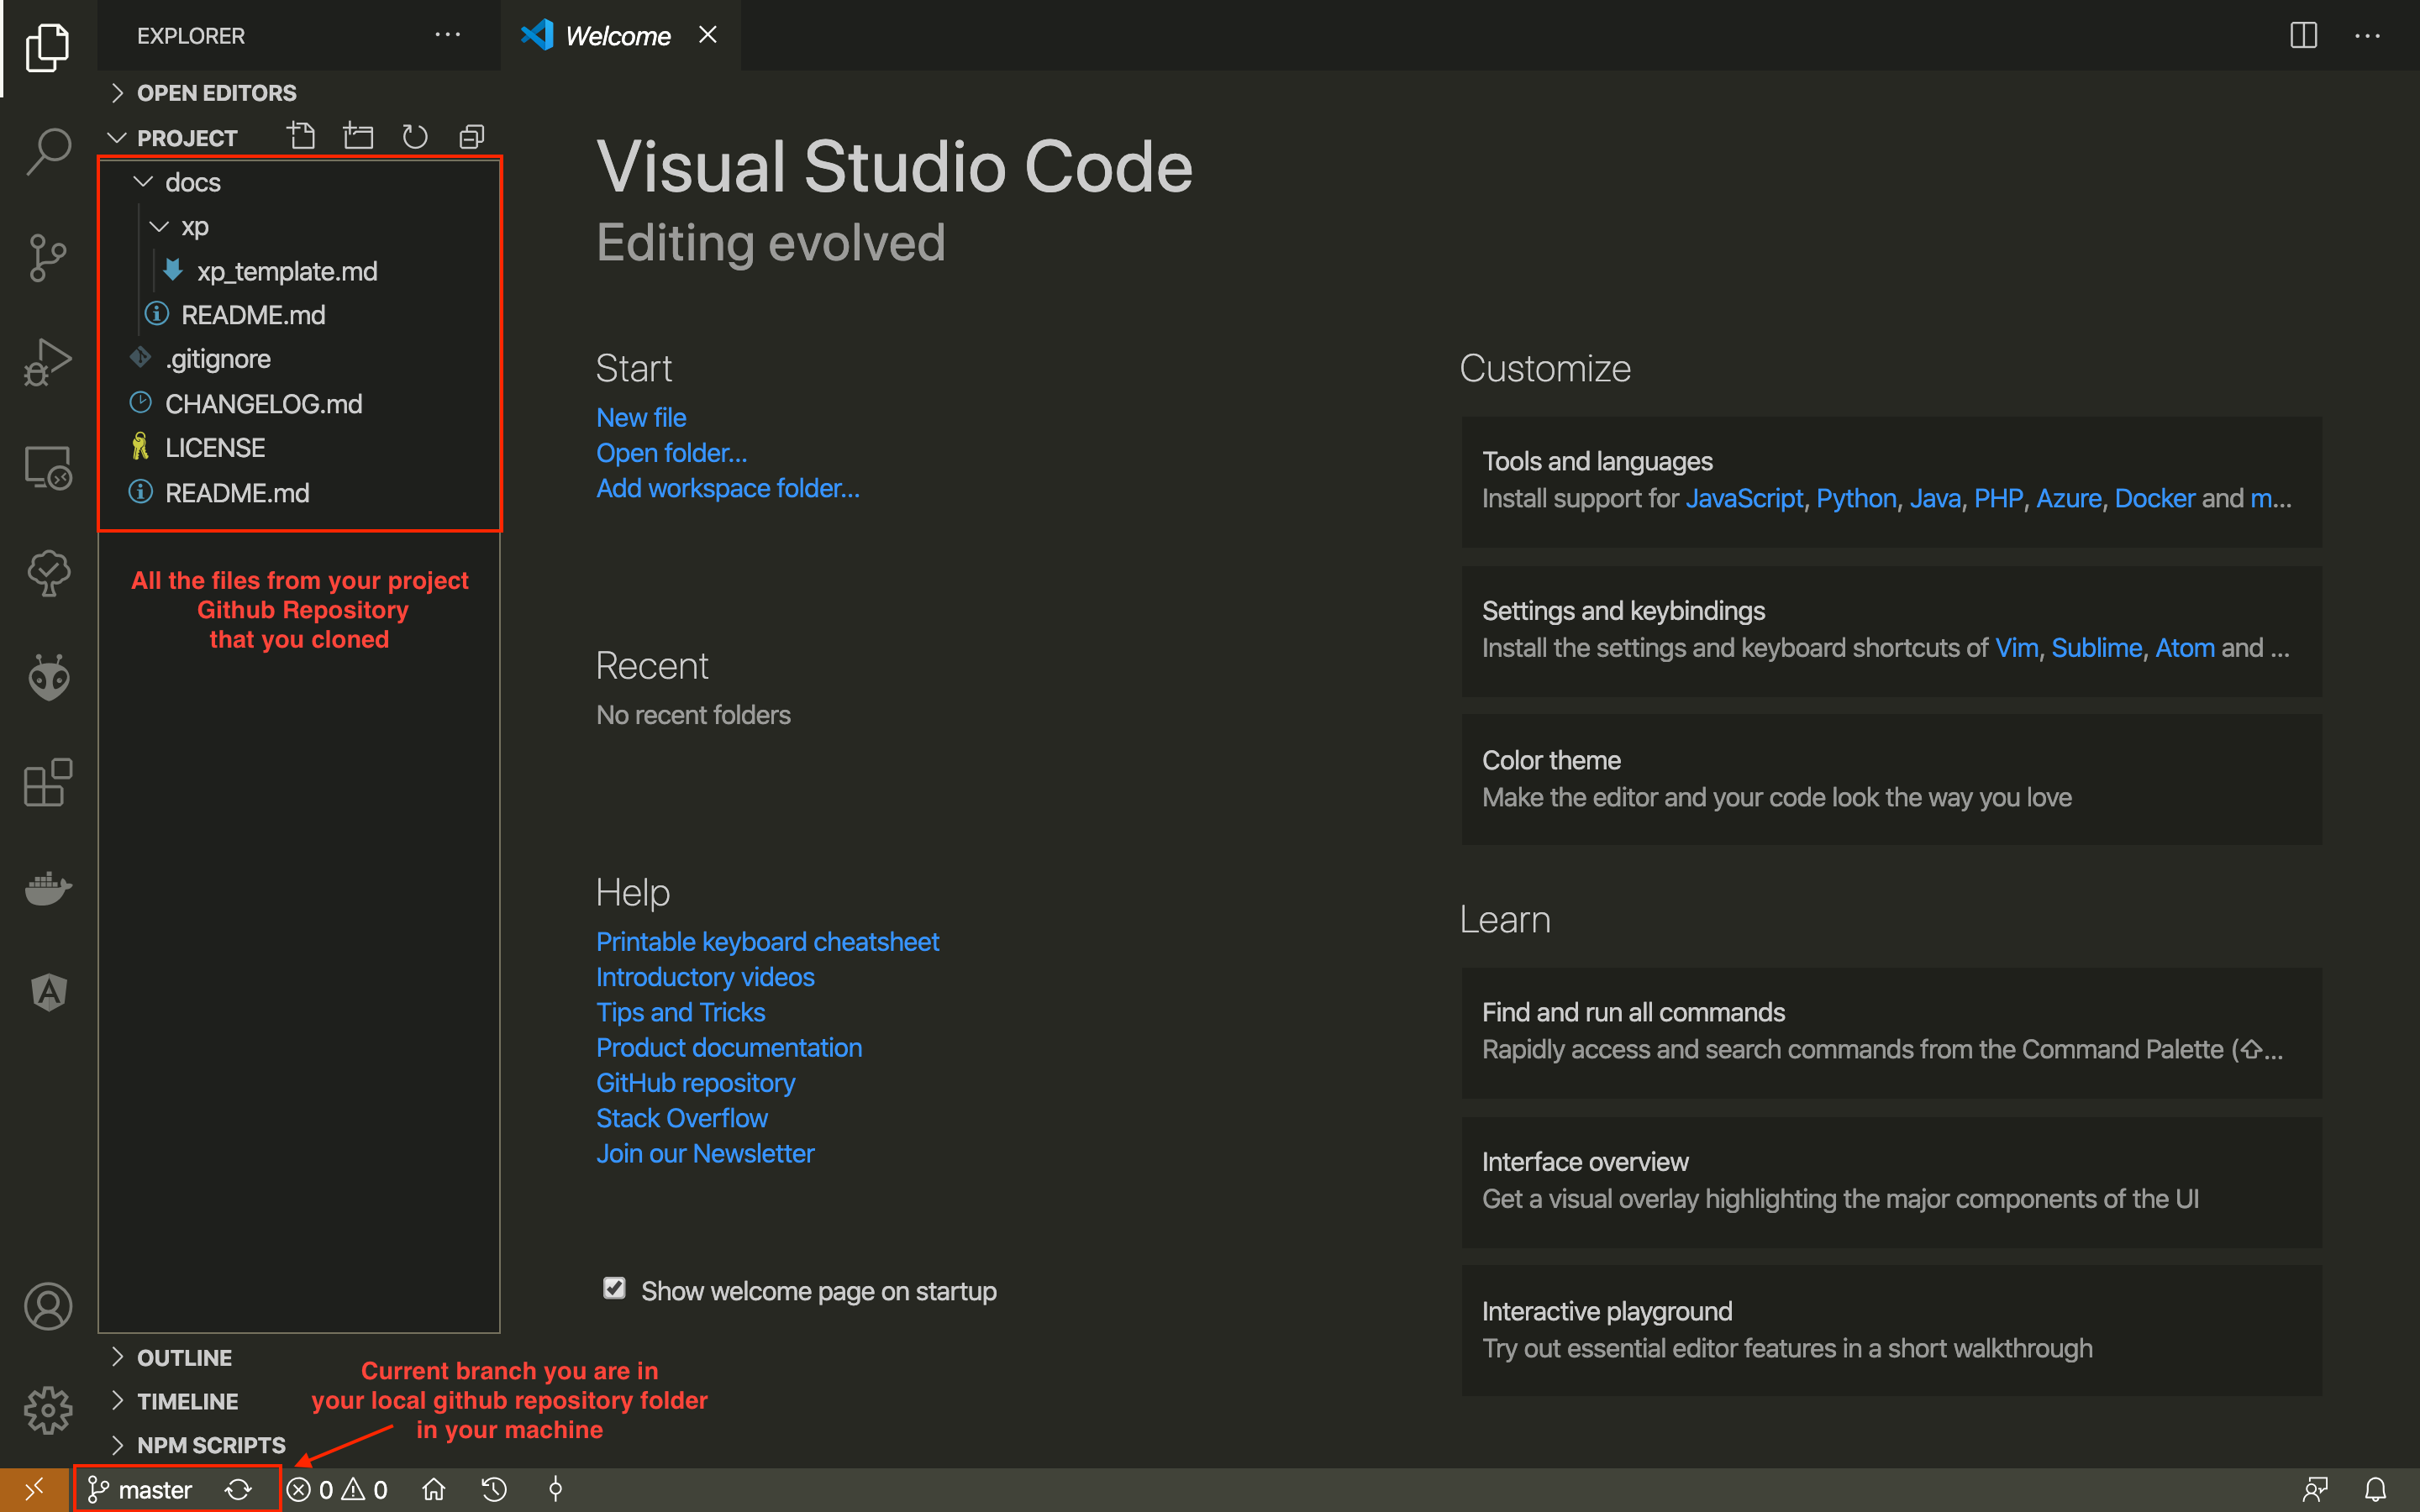
You now have a copy of your team repository on your machine. In the left panel, you will recognise the tree of files and directories, including the docs directory and the README.md files.
git clone [my repository]Get a copy on the repository on my machine
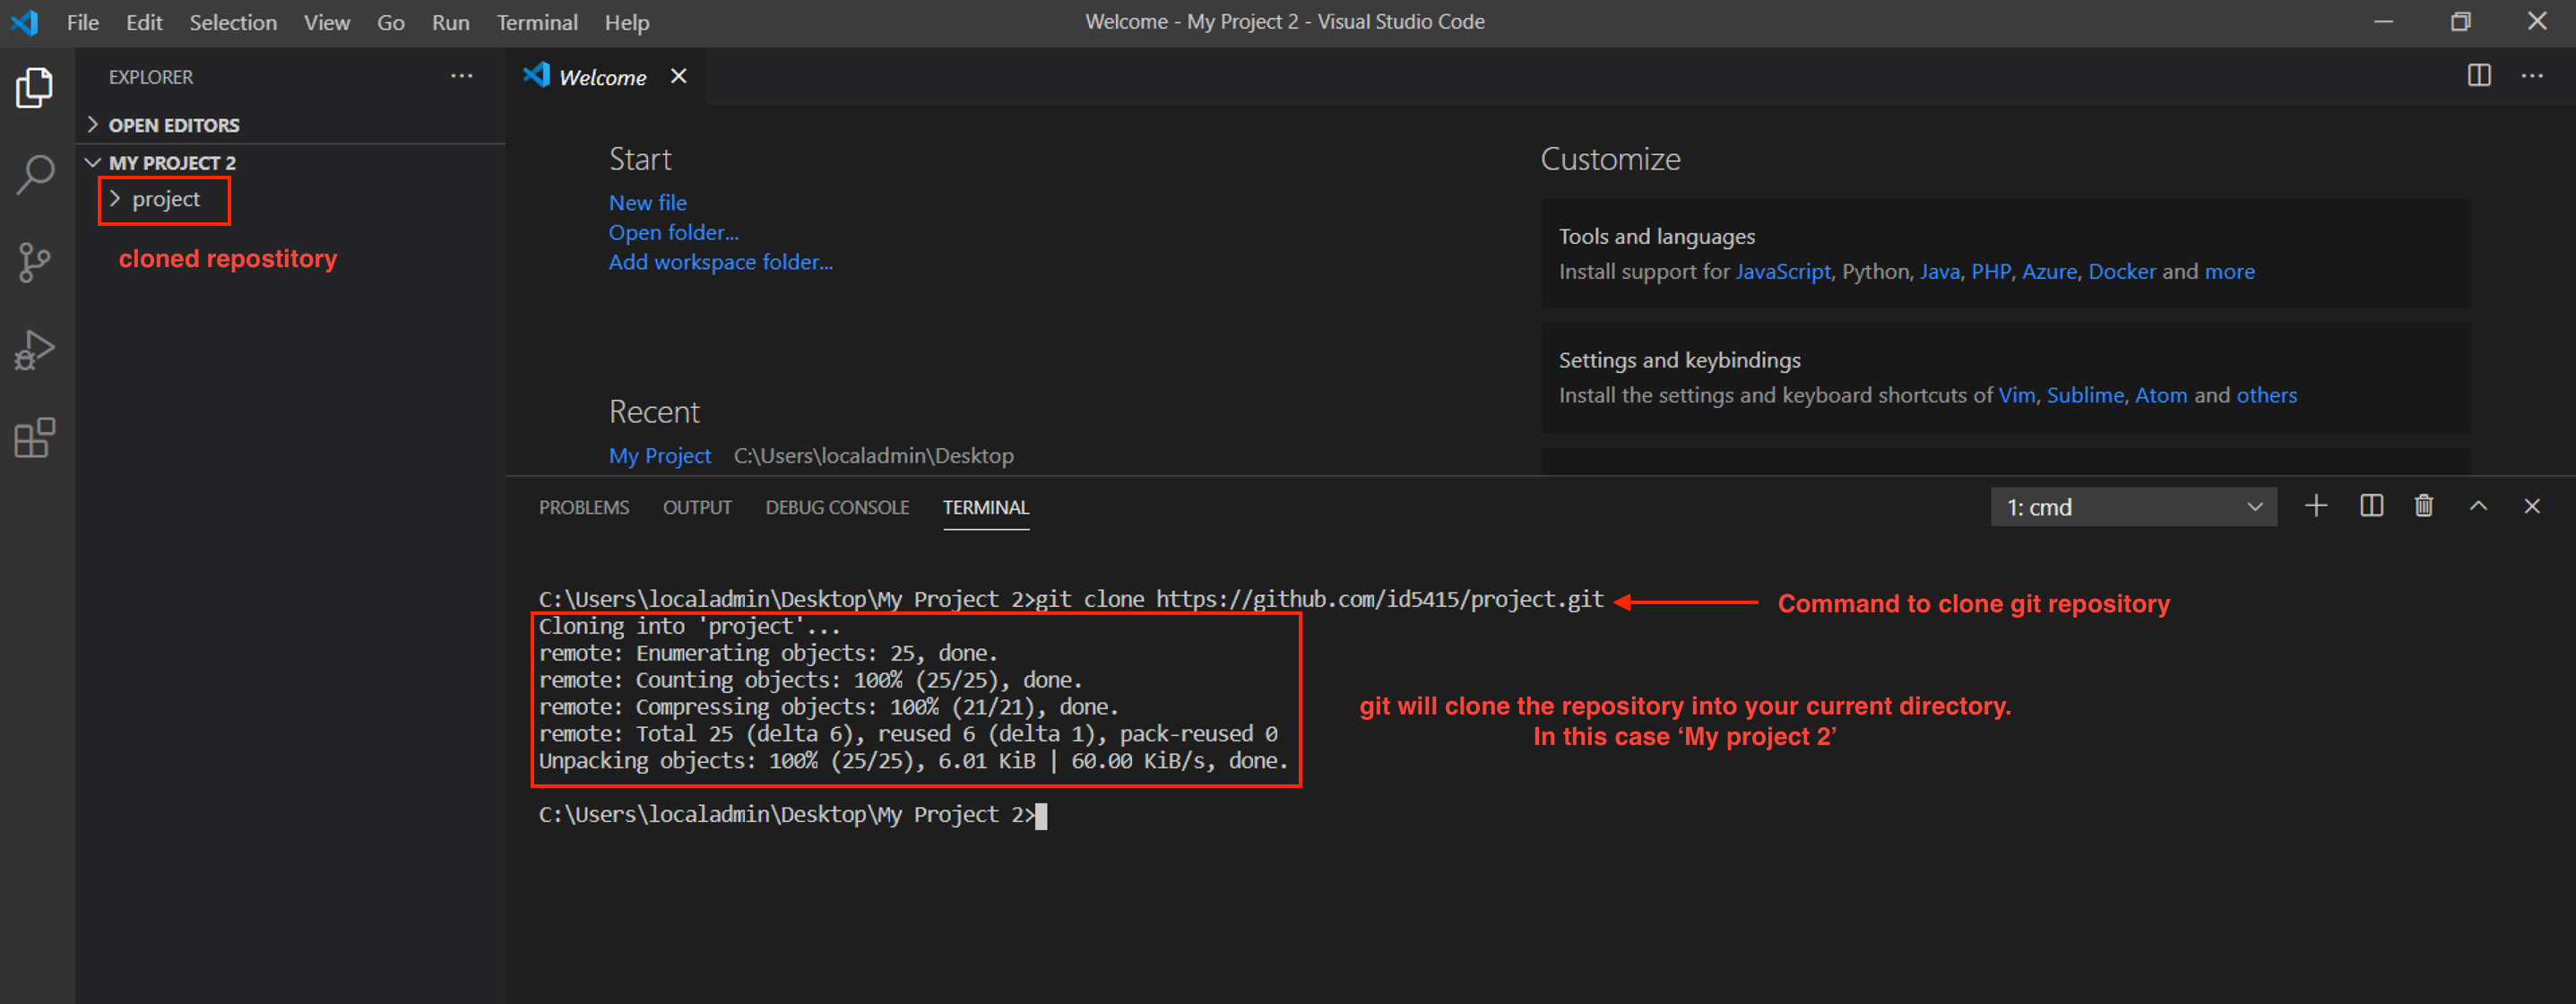
Note If you do not able to find the ‘clone repository’ button in the source control, you can do the same thing using git clone command followed by the URL in the Terminal window.
To do that, first create a folder somewhere in your machine, open that folder with VS Code > File > Open Folder. Now open the terminal in VS code and type:
git clone URL_OF_THE_REPOSITORY
After successfully cloned, you will see the copy of git repository into your file explorer window.
Task 1.2 Edit your files
As we were editing the file README.md on GitHub in the previous module, we can do the same here on our machine.
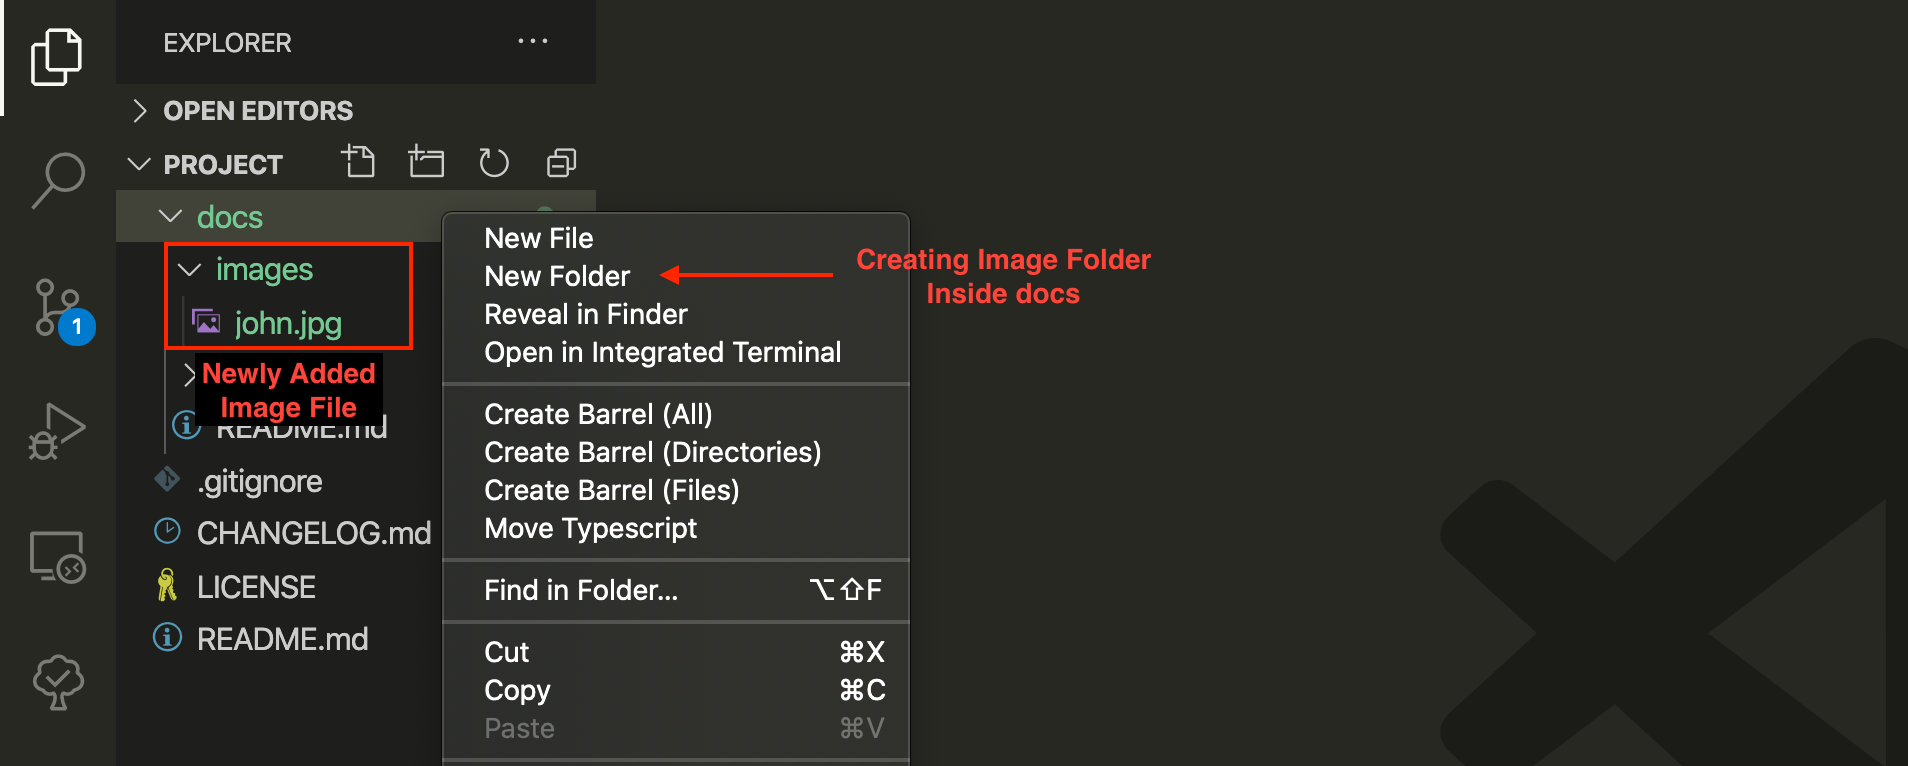
Each team member can, on her/his machine, drag and drop a picture of her/himself in the directory docs/images. You note that this file is shown in a green font: it is a new file to track.
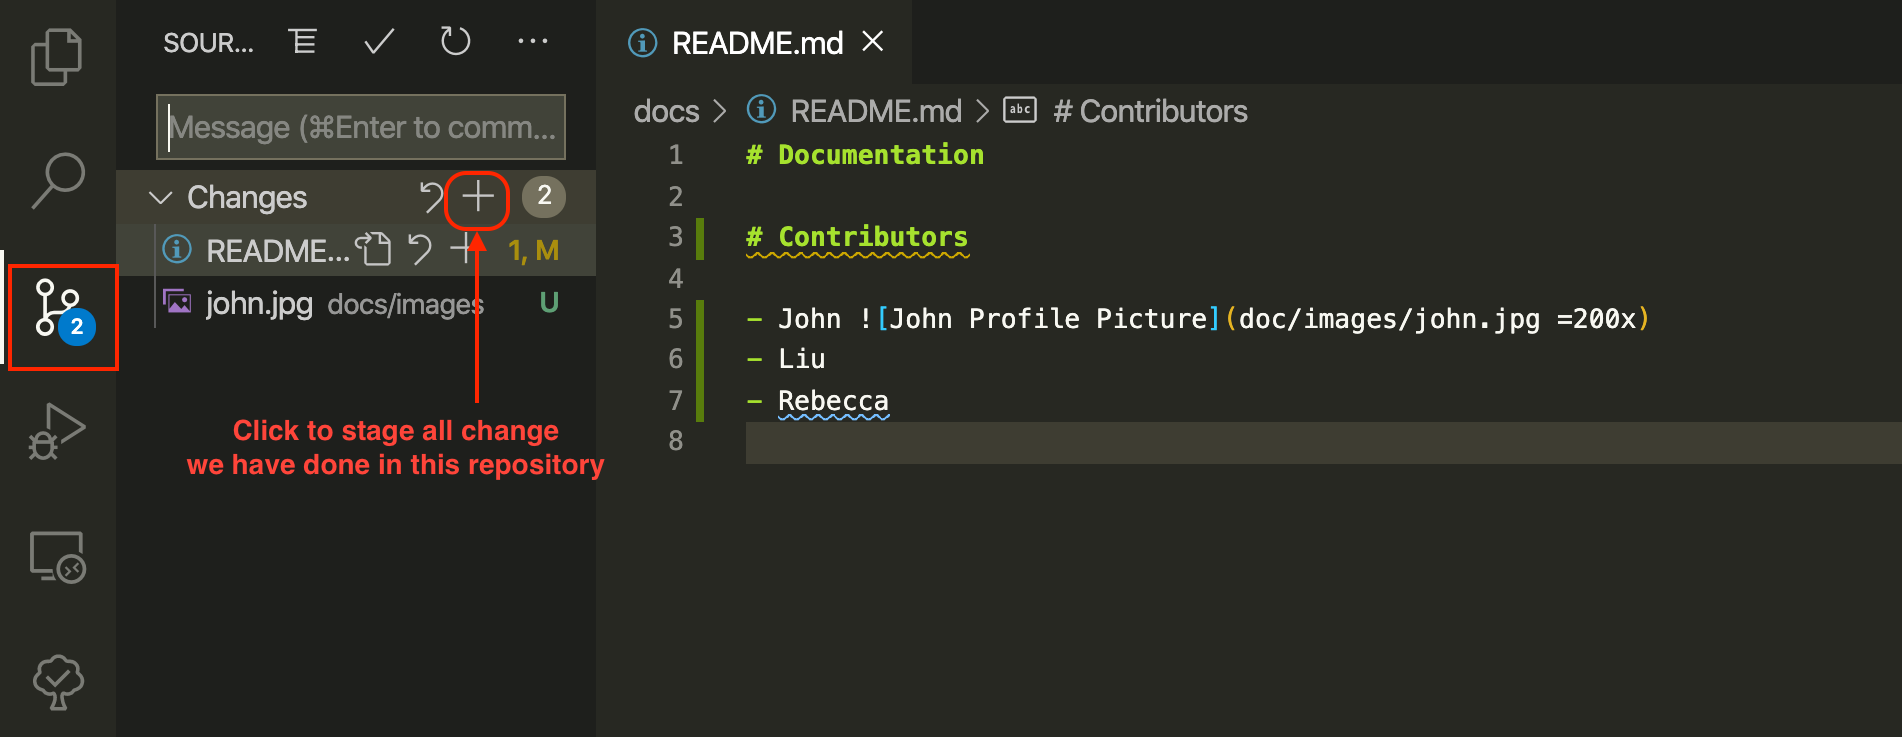
Then, open the README.md and edit the Contributors section to show your profile picture. We use again the Markdown image command, adding a maximum width of 200 pixels (we do not want the pic to appear unreasonably big).

The README.md file appears now in a yellow font: it has been modified.
Task 1.3 Stage and Commit Changes
We can now prepare our files for a new version. We select the changes we want in this new version. This is called ‘staging’. Click on the + icon next to each file in GitHub source control button on.
After staging the changes, we will add a small description about the changes and create a new version of the git repository by pressing ‘right tick mark’. We call this step Committing. We are committing our changes in a local repository (on your machine only) and create a snapshot of the entire project directory (locally) with new changes. Later we can move back and revert the changes we want.

git add [a file name]Include a file in the next version of the codegit commit -m "Description of my changes"Create a new version of the code with all staged files
Note If you get the warning of “unknown identity”. In the terminal type the following:
git config --global user.name YOUR_NAME

git config --global user.email YOUR_EMAIL_ADDRESS
Task 1.4 Synchronize with your remote (Pull/Push)
Till now we have staged all our changes and created a snapshot of the entire directory in our local machine. However, none of our teammates can see these changes yet. We created a new version of the repository on our machine, but we did not share this version on GitHub yet. The remote repository is the one we cloned from the GitHub website (using git clone) in the first step.
It also means we do not have the newest versions of the code which were created by our teammates.
At the same time, we also need to pull (download) all the changes that other teammates have pushed into the remote repository.
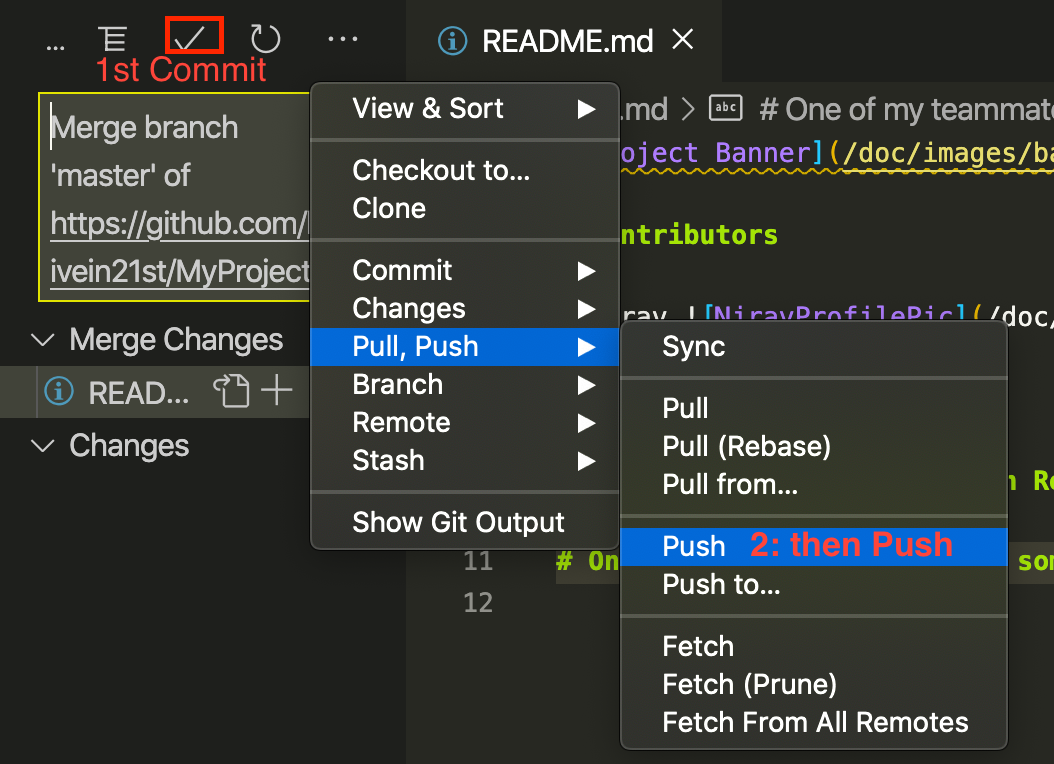
We can do this both steps together in VSCode by pressing the ‘Synchronize’ button left corner. (However before pressing this button, make sure you staged and commit all your changes).
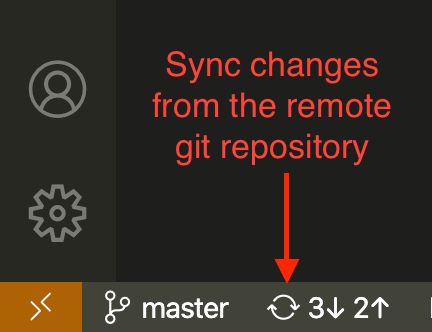
Clicking on this button triggers three actions:
git fetchGet all new versions from GitHub (since the last fetch).git mergeMerge the latest version fetched from GitHub with the latest version on our machine.git pushUpload the new, merged version on GitHub.
You get the newest version existing on GitHub and it is merged with your local version. The resulting version is uploaded to GitHub to be shared with your teammates.
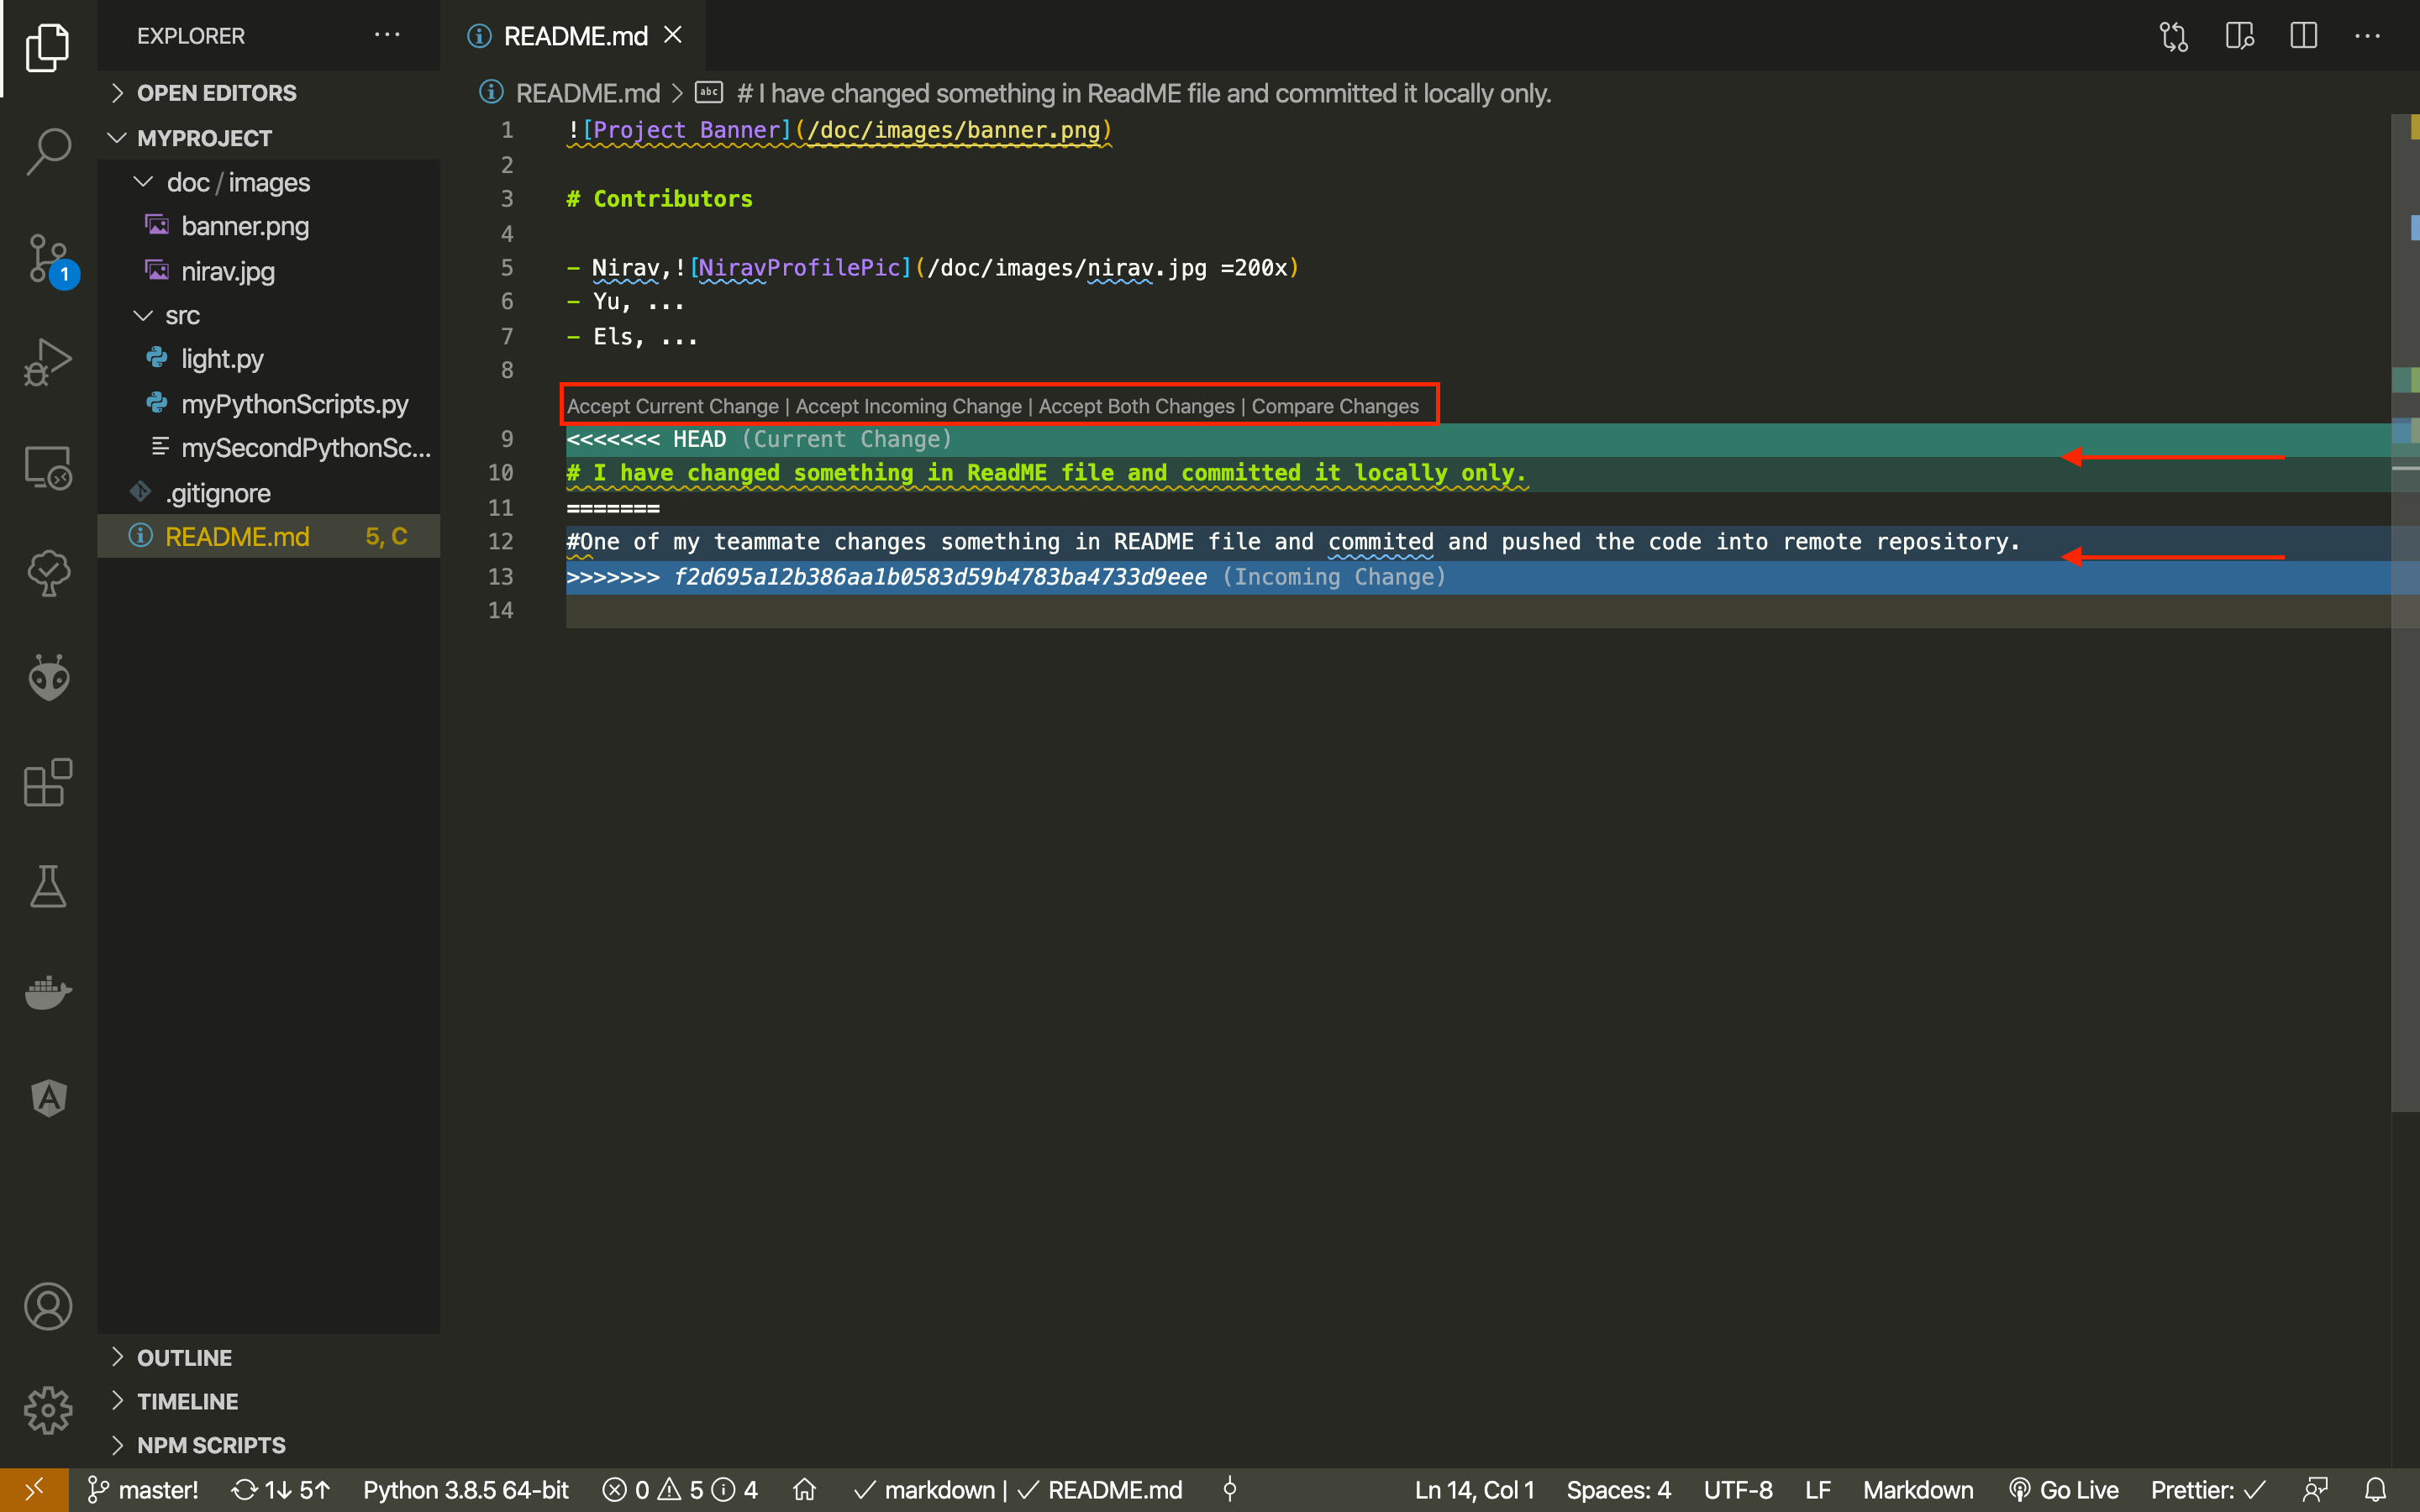
However, there are cases when merging cannot be done automatically. This happens when you modify the same part of the code as your teammate. Git does not know which version to use and rather than deleting one, it asks you what to do.
Git prompts you to let you choose, for each conflicting block of code, which one to keep. This is called a conflict. To resolve the conflict, you can decide what final code you want to keep. Either you can accept all incoming changes (your teammates’) or outgoing changes (yours), merge from both sides or compare changes from each side and keep the one you want.
Following this assignment, you and your teammates have edited the README.md file and committed the changes to a new version locally. The first teammates sharing her/his new version on GitHub will have no conflict. The next one will first receive the new version git fetch and try to merge git merge. At this point, VS Code will prompt you to resolve the conflict.
After you decide and accept either version, you again have to commit these changes and push to the local repository.
Note the fundamental difference between Git and a platform such as Google Docs.
Task 1.5 Create a Branch
As every team member start making larger contributions to the repository, we can quickly see how merging can get complicated(as the conflict scenario explained above). To minimize this challenge, we suggest a combination of 2 strategies:
- Commit your code as often as possible. The smaller the versions, the greater chances of a successful automatic merge. (As mentioned in Task 1.4)
- Create separate branches for your different application features.
In Git, a branch is a copy of your another git repository brach with all the commits included(e.g. master). In this copied branch, we can start working without worrying about deleting/editing content from the main branch but commit our changes to the copy of the new branch. Later once the changes are finish we can merge this copied branch back to master.
Let’s try to understand this by first creating a branch from the master branch.
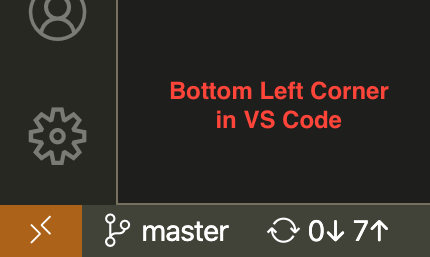
By default, you are on the master branch. In VS Code you can create a branch by clicking on the bottom left corner on ‘master’ (the name of your current branch). A menu pops up, click Create a new branch from. In the text field, provide the name of your new feature, e.g. ‘feature/john-python-exploration’. Then select the branch ‘master’ (your branch will be copied from the current master branch).

Once you have successfully created the new branch, you will see that you are now working from your newly created branch and not the master branch.
You can always switch back to another branch (e.g master) to look for reference or edit some code. NOTE make sure you have committed all your changes from the current branch before switching to the new one.

A more complete tutorial on branches is available by Atlassian.
Task 1.6 Virtual Environment
In the first assignment, we set up a virtual environment to isolate our Python project from other Python code of our machine. Let’s do this again in the project directory. To do so, enter the following command in the terminal.
Mac/Linux:
pip3 install virtualenv

sudo python3 -m virtualenv venv
Windows:
pip3 install virtualenv

python -m virtualenv venv
This command will create an venv directory, inside the test folder. 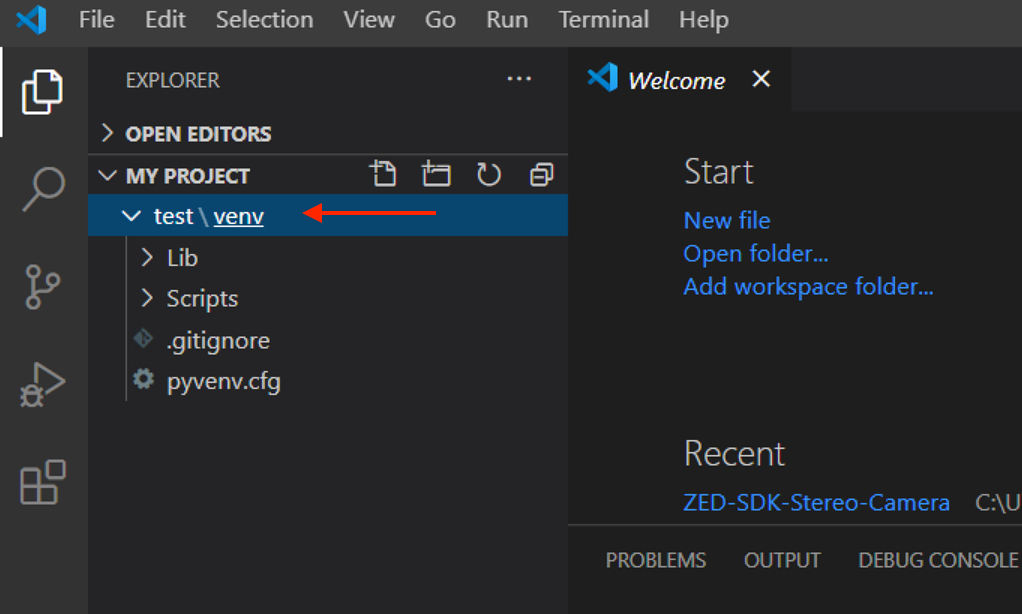
Now to activate this newely created virtual environment, in the terminal type the following command (make sure the terminal is in same ‘test’ directory):
Mac/Linux:
source ./venv/bin/activate
Windows:
.\venv\Scripts\activate
Notice the difference, the Terminal statement starts with (venv). 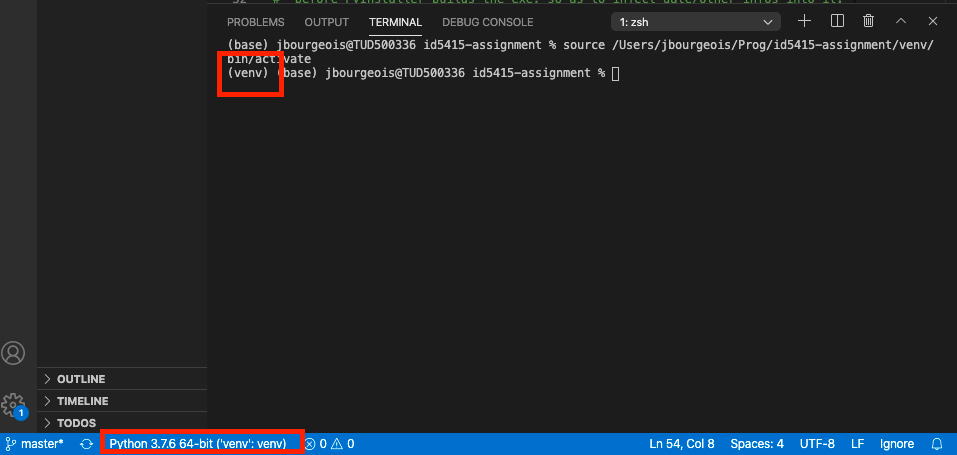
Note In some cases, VS Code might recognises the creation of this new environment and it will ask you through prompt (Bottom right corner of the screen) if you want to switch, click ‘Yes’. This will restart the terminal and you will see in the terminal that the virtual environment has been activated.

To deactivate the virtual environment, you can simply type:
deactivate
Step 2 Turn on the light with Python
Now each team member can explore Python in her/his own branch, committing new versions of her/his code without conflict.
Task 2.1 Create a Python Script
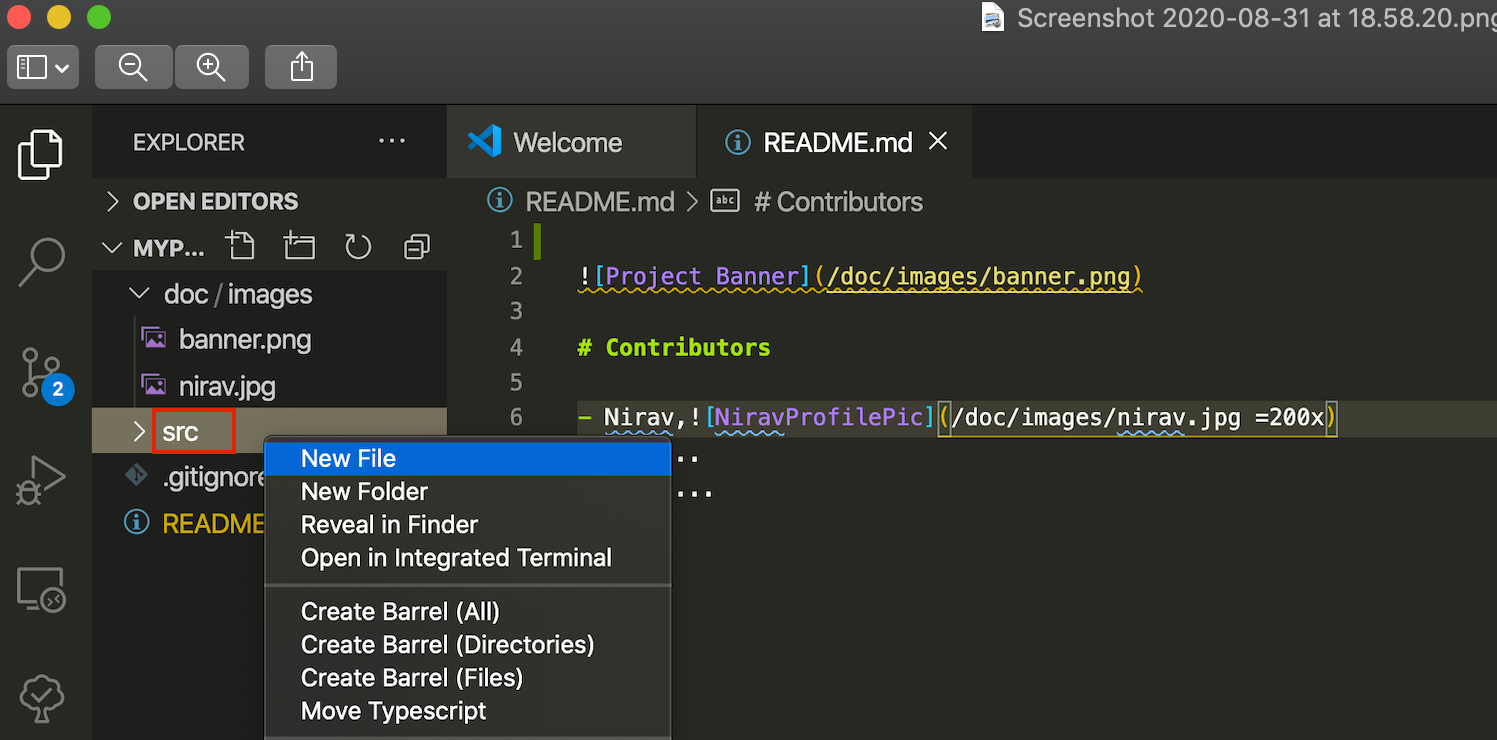
Let’s create a directory src, a typical name to place code files in a development project. Right-click in the left panel and select the second option New Folder. Type in src and press ENTER. We write Python code into files with .py extension. Let’s create a new file light.py in the src directory. To create a new file, right-click on the src folder and select the first option New File. You will see that in file explorer a new text field will ask you to give a name to this new file. Write light.py and press ENTER.
Write the following lines in the newly created Python script file light.py
# This function 'print' the message 'The light is on!' in the Terminal
print("The light is on!")
Task 2.2 Executing a Python script from the Terminal
In the terminal, use the Python command followed by the path to your file to execute your Python script:
python src/light.py
The sentence Turn on the light! appears in the Terminal.
What is happening? The first line (appearing in green) starts with a hash #. It is a comment and is ignored by the Python interpreter. Do not hesitate to use comments extensively to remember the purpose of a piece of code. The second line is a call statement, calling the function named print. The role of print() is to display a message in the terminal. It takes 1 argument, the message to display).
To call a function: my_function_name(value1, value2…)
Task 2.3 Variables and Types (Data Types)
As we saw in the self-study material, a variable is a storage location paired with an associated symbolic name. Each of the variables holds a value that either static or varies overtime when the program runs.
The value stored in this variable can have different types:
- numerical information (integer, float or complex), such as
3or4.6; - textual information are commonly called ‘string’ (a sequence of characters), such as
"Some very important notes". In Python, simple or double quotes"characterise a ‘string’; - binary information so-called ‘boolean’ with two possible values, either
TrueorFalse; - a list that holds multiple information in one variable, such as
[True, 1, 2, "three", 3.5]. In Python, square brackets[]characterise a list.
Type in the following code in your file ‘light.py’ and run your code again (see Task 2.2).
turn_ON = "The light is ON "
turn_OFF = "The light is OFF"

brightness = 60

print(turn_ON + "with brightness: ", brightness)
In this example, we use the assignment statement to store information into a variable.
Assignment statement: my_variable = “a value to store”
So far, we have a Python code that pretending that it knows the status of the light bulb.
Step 3 Turn on the light! I mean for real!
Finally some action. Here we will add a structure to our Python script and import the necessary libraries to control the light bulb.
Task 3.1 Main Function
The main element of a Python program is its main() function. As we saw with print(), a function takes care of a task, such as showing a message on the Terminal. Let’s introduce the main() function, which is a function you define as the starting point of you Python program.
To define a function:
def my_function():followed by a series of indented statements.
In the code below we added def main():. This is the syntax to define the behaviour of a function. Notice that what is ‘inside’ this function is indented, i.e. moved to the right by one tab. This is how Python recognise that these lines are part of the function.
def main():
    # This function 'print' the message 'The light is on!' in the Terminal
    print("The light is on!")
In the terminal, execute your code again (python src/light.py).
What happened? Nothing! The text is no longer showing up, what is going on? Well, we defined a function main(), but we are not calling it. Like print(), to call our function we can write main() at the bottom of the file.
def main():
    # This function 'print' the message 'The light is on!' in the Terminal
    print("The light is on!")

main()
Execute your code again. We now have our message back. First, we define def main(), then we call it at the end by main().
Task 3.2 Packages
Our Python code is far from having the ability to talk to the light bulb yet. Fortunately, we do not reinvent the wheel for every piece of code. We can reuse code written by others: these are called packages. Add the following two lines at the top of your code.
import asyncio
from kasa import SmartBulb
This illustrates two ways of importing libraries into your program. The first statement
import ...import the entire asyncio package. The second statementfrom ... import ...is specifically selecting the definitionSmartBulbfrom the package calledkasa.
What is the purpose of these packages?
‘asyncio’ is part of Python so-called ‘standard library’ which means that we do not need to install it. By default, statements of our Python scripts are interpreted one after the other, waiting the previous one to be completed. This is a synchronous sequence of statements. However, to control the light bulb we need to send a message over the network, and wait for it to answer back. With synchronous statements, you would block the Python program until receiving a response. Asyncio gives us the ability to execute statements in an asynchronous way, meaning that we can send our message to the light bulb, do something else, then come back where we left when we receive a response from the light bulb.
‘kasa’ is the package that we used in the previous module to control the light bulb.
Before executing our script, we need to install this external package ‘python-kasa’. We do so as we did in the first assignment with the pip command (pip is a package manager for Python).
pip install python-kasa --pre
Like we did in the previous assignment, we can use kasa discover to find the IP address of our light bulb on the network.
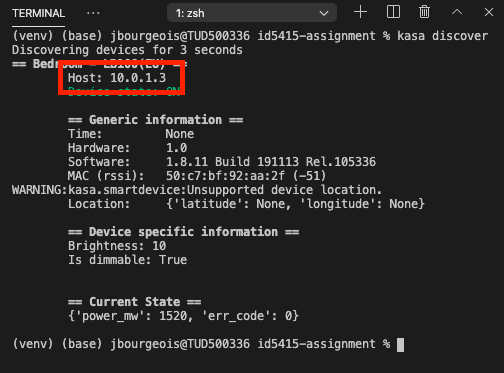
Look up the host line of the result for the IP address.
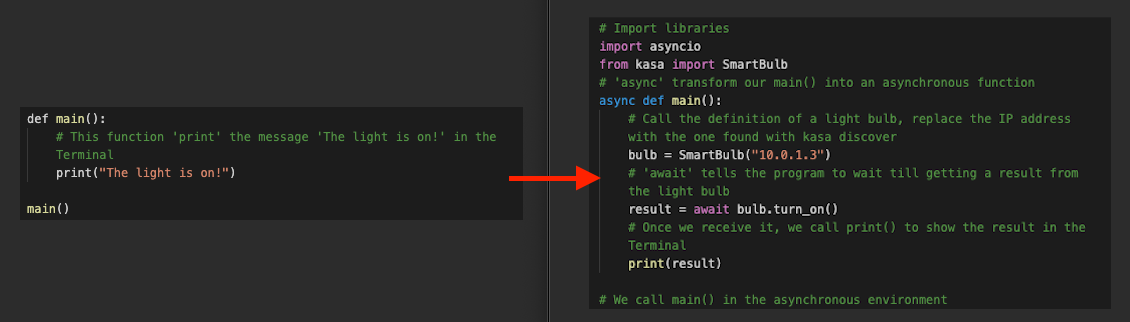
Let’s transform our main() to be asynchronous.
# Import libraries
import asyncio
from kasa import SmartBulb
# 'async' transform our main() into an asynchronous function
async def main():
    # Call the definition of a light bulb, Note: replace the IP address with the one you found using kasa discover command in terminal
    bulb = SmartBulb("192.168.1.110")
    # Get newest update from the light bulb, 'await' till we get a response
    await bulb.update()
    # 'await' tells the program to wait till getting a result from the light bulb
    result = await bulb.turn_on()
    # Once we receive it, we call print() to show the result in the Terminal
    print(result)

# We call main() in the asynchronous environment
asyncio.run(main())
The transformation of your code looks like this:
Let’s run this code! The light should turn on and the Terminal should look like that:

Task 3.3 Analysing the Result
What do we see in the Terminal? A JSON structure which is a typical way to exchange data on the Internet of Things. It starts and ends with curly brackets {}. It is composed of "key": "value" sets separated by a comma ,. A value can be any of the primitive types string, float, integer or boolean covered in the previous Step. It can also be a JSON structure itself with curly brackets {} or an array of any of those types, delimited with square brackets [].
{
  "key": "value",
  "key2": ["array", "of", "values"],
  "key3": {
    "subkey": "value"
  }
}
In our example, you can recognise the key ‘on_off’, an integer with value 1: The light is on.
Commit and Push! You’ve written a new piece of code, let’s make sure that Git keeps a version of it. To do so, repeat Task 1.3 and Task 1.4. Your commit message could be ‘controlling the light bulb’
Step 4 Shaping the Lamp’s Behaviour
So far we explored variables and states to store information throughout our code, and we can use use the kasa library to control a connected light bulb. In this step, we want to shape the behaviour of the light to make it blinks for 5 seconds. We achieve this with conditions and repetitions: we call these elements control flow statements.
Task 4.1 Toggle switch
As the name suggests, conditions are checkpoints in your code to make sure it won’t execute the particular block of code until the condition is fulfilled.
Let’s explore the if/else statement with to realise a toggle.
Toggle: to alternate between two different options
Here we will first extract the current state of the light. Then, using the if statement we will check the state of the light. If it is ON, then we will turn it OFF. Otherwise, using the else statement we will turn the light ON. After updating the light state, we will print its current status as well.
Copy and Paste the following piece of code in your light.py file (erase the code we typed before) and run the script from the Terminal (you know how to run the script from the Terminal, we did it in the previous step).
import asyncio
from kasa import SmartBulb

# 'async' transform our main() into an asynchronous function
async def main():
    # Call the definition of a light bulb, replace the IP address with the one found with kasa discover
    bulb = SmartBulb("192.168.1.110") # Make sure to replace your smart-bulb IP Address here

    # Get newest update from the light bulb, 'await' till we get a response
    await bulb.update()

    # 'await' tells the program to wait till getting a result from the light bulb
    result = await bulb.get_light_state()
    print (result)

    #Example if condition
    if result['on_off'] == 1: #If the light bulb is ON
        print("Light was ON, I turned it OFF")
        await bulb.turn_off() #Turn_Off the bulb
    else:
        print("Light was OFF, I turned it ON")
        await bulb.turn_on() #Turn_On the bulb if it is OFF

    #Getting the current stat of light bulb after updating it previous stat above.
    result = await bulb.get_light_state()
    print (result)

# We call main() in the asynchronous environment
asyncio.run(main())
After running the scripts, you will see that your light bulb will either turn ON or turn OFF according to its current state. You will also see its current status in the Terminal window.

To learn more about Python condition, you can have a look at the Python guide on Conditions
Task 4.2 Loops
In contrast, if you want to run a piece of code continuously over time (e.g a blinking light bulb for 10 seconds), you can use iterative control flow which will repeat a piece of code in a loop.
There are two common loop statements in Python: for and while.
Let’s update our light.py file. You don’t need to delete anything, just add the following lines. First import the time package at the top of the file, before async def main()::
from time import sleep
Then, insert the following code after the last print(result).
 for x in range(10):        # Here we are asking to loop the indented code for 10 times
    await bulb.turn_on()    # Turn on the light
    print("Loop: ", x)      # Print current loop number
    sleep(1)                # Sleep for 1 seconds
    await bulb.turn_off()   # Turn off the light
    print("Loop: ", x)      # Print current loop number
    sleep(1)                # Sleep for 1 seconds
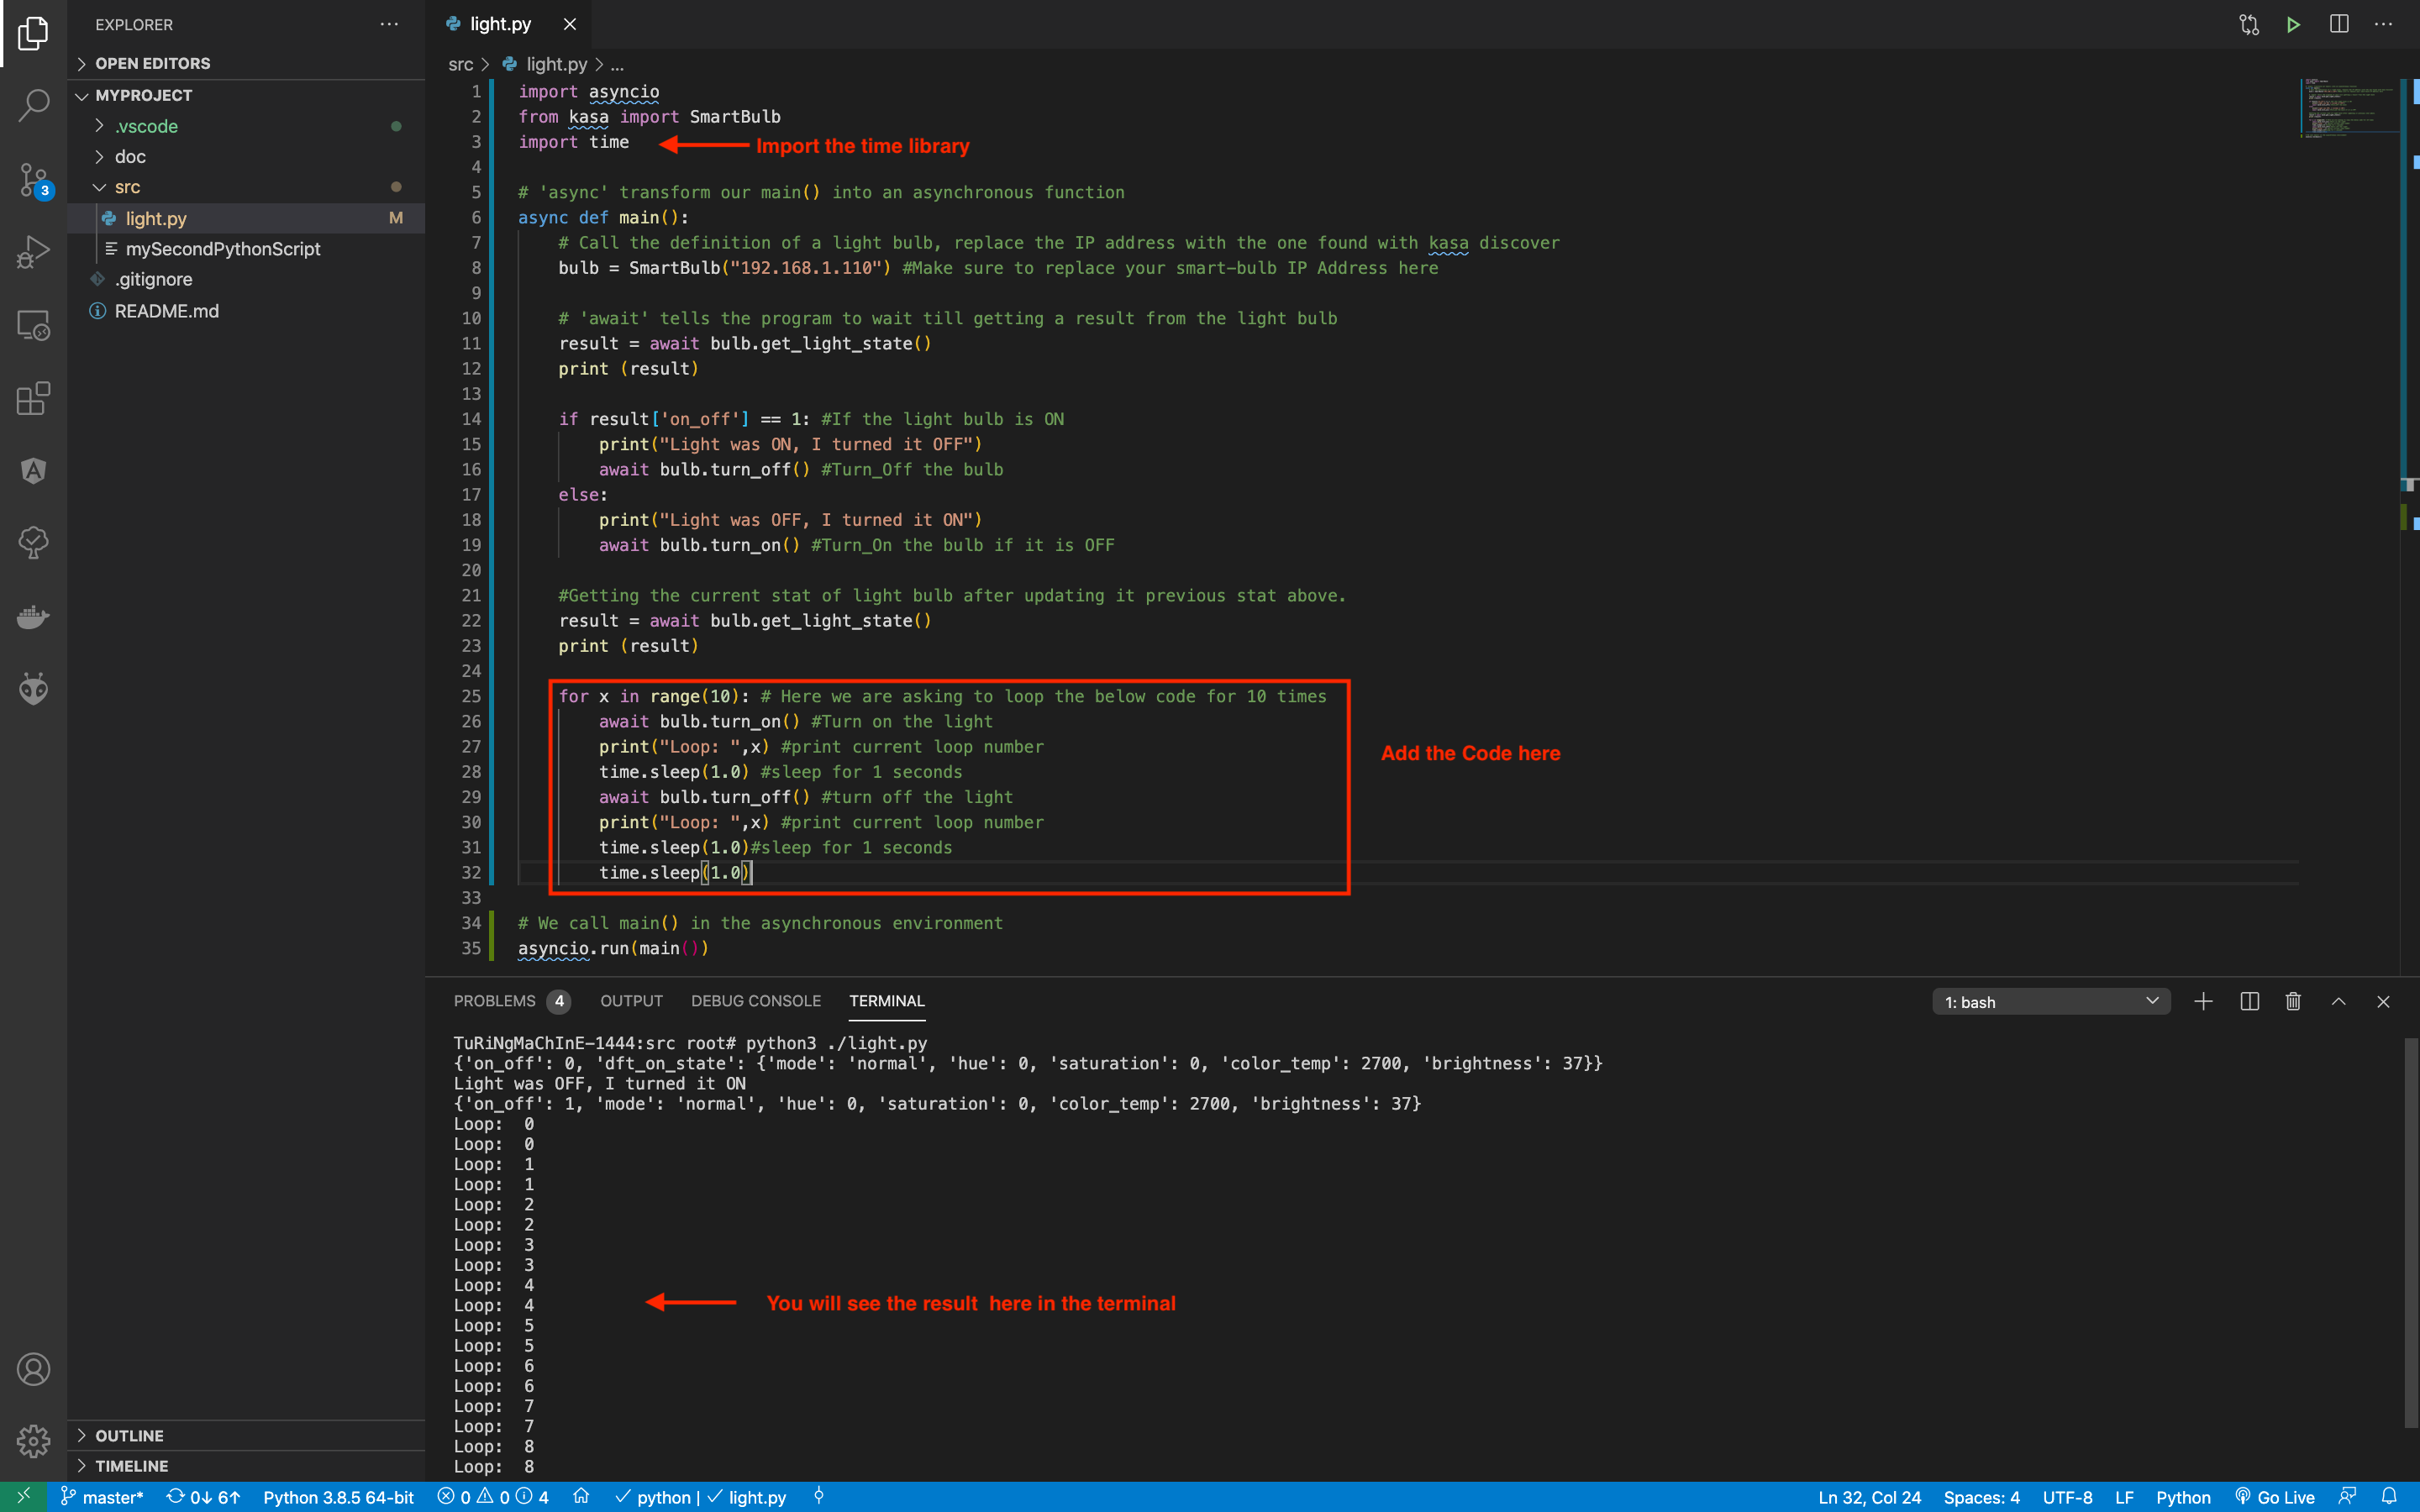
What happened here? We have created a for loop which will keep executing the code inside its block for 10 times and then terminate. Inside this loop, we wrote a code that turns the light bulb ON and OFF. We are also using the time module in this example to hold the execution of code for a second, in between turning ON/OFF the bulb.
To learn more about Python for statements, you can have a look at the Python Guide on For Loops.
Commit and Push! You’ve written a new piece of code, let’s make sure that Git keeps a version of it. To do so, repeat Task 1.3 and Task 1.4. Your commit message could be ‘shaping the light bulb behaviour’
Task 4.3 Go Ahead and Shape!
Now that you have the basic elements to control the light bulb, we suggest each team member to develop one of the following functions.
pulse(): this function controls the brightness of the light bulb in loops to shape a pulsating (or breathing) pattern;morse(): this function controls the on/off state of the light bulb in loops, at long and short intervals, to communicate a message in morse code;frequency(): this function controls the on/off state of the light bulb at various blinking frequencies.
These are only three examples. Feel free to experiment in shaping the behaviour of your light bulb.
Commit and Push! You’ve written a new piece of code, let’s make sure that Git keeps a version of it. To do so, repeat Task 1.3 and Task 1.4. Your commit message could be ‘shaping the light bulb behaviour’
Updating the CHANGELOG file In this assignment you have made significant additions to your prototype. Edit the file
CHANGELOG.mdand add what you have achieved in this assignment.
![]()
![]()
![]()
The European Commission's support for the production of this publication does not constitute an endorsement of the contents, which reflect the views only of the authors, and the Commission cannot be held responsible for any use which may be made of the information contained therein.