Through the second assignment, we shaped the behaviour of our connected lightbulb with Python. In this lab experiment, we will start collecting data from the light bulb.
When prototyping connected product, collecting data plays an important role. It might be sometimes the only reason to build a functional prototype so that you can get insights for example on accuracy (checking feasibility) or interaction (checking usage).
Adam Amran put it nicely together in his Medium article, distinguishing with live data from real, realistic-looking and fake/dummy data.
Step 1 Collecting Real data
In this first step, we will reach the level of ‘real’ data. Going back to our light bulb control, we will read the result from the light bulb and store it into a file.
Back to your repository in VS Code, do not forget to pull the latest version and start up your python virtual environment.
Task 1.1 Comma-Separated Values
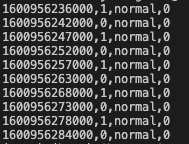
A common way to structure data is the Comma-Separated Value (CSV). In a CSV file, each line represents a data record with one or more fields. In our case, each record connects to a specific point in time. These records are also sorted by time: we refer to it as a time series.
In the previous module, we looked at the result of the lightbulb command, in the JSON format:
{'on_off': 1, 'mode': 'normal', 'hue': 0, 'saturation': 0, 'color_temp': 2700, 'brightness': 100}
{'on_off': 0, 'dft_on_state': {'mode': 'normal', 'hue': 0, 'saturation': 0, 'color_temp': 2700, 'brightness': 100}}
{'on_off': 1, 'mode': 'normal', 'hue': 0, 'saturation': 0, 'color_temp': 2700, 'brightness': 100}
{'on_off': 0, 'dft_on_state': {'mode': 'normal', 'hue': 0, 'saturation': 0, 'color_temp': 2700, 'brightness': 100}}
Python is making this JSON representation for us while using print() on a dict.
A
dict? A dictionary is another data type like numbers and strings, to store key/values information. Python description can be found here
To access the value of on_off in the result from the lightbulb, we can do get() on a dict:
result.get("on_off")
We need to format the information from this dict into a list of values which we can easily write into a file. Let’s take the following blink() function. You can see that it is not only turning on and off the lightbulb but also storing the result of these functions in the variable result. Then, it shows the on_off value of this dict with the print() function.
async def blink(bulb_address, num_iterations = 10, blink_duration = 1):
    bulb = SmartBulb(bulb_address)
    await bulb.update()

    for x in range(num_iterations):
        result = await bulb.turn_on()       # Store the result in a variable
        print(result.get("brightness"))     # display in the console
        sleep(blink_duration)
        result = await bulb.turn_off()      # Store the result in a variable
        print(result.get("brightness"))     # Display in the console
        sleep(blink_duration)
Executing this code, you will notice that every loop, one brightness value shows ‘None’. Looking closer to the data extract above, indeed, when the light is off, all but on_off values are moved into the subkey dft_on_state. It highlights that the brightness (and other fields) are still set, but their values are not relevant because the light is currently off. For our CSV format, we need a constant number of fields, thus we will pick the values from the subkey.
Let’s create a function bulb_result_to_list that reads this result and formats it as a CSV line. Note the comment starting and ending with triple quotes """. In Python, this is a Doc String, enabling you to document your code. Like regular comments, they are ignored by Python but critical for both users and developers of the code. We will use this approach to describe the functions we develop for the remaining of this course.
def bulb_result_to_list(bulb_result):
    """
    This function transform a kasa lightbulb result into a list of values.
    When the light is off, data is extracted from the subkey 'dft_on_state'.

    Args:
        bulb_result (dict): Dictionary of values returned by the a kasa command

    Returns:
       (list) : A list containing all fields of the data record.
    """
    on_off = bulb_result.get("on_off")
    mode = bulb_result.get("mode")
    hue = bulb_result.get("hue")
    # The light is off, the info can be found in 'dft_state'
    if (on_off == 0):
        dft_state = bulb_result.get("dft_on_state")
        mode = dft_state.get("mode")
        hue = dft_state.get("hue")
    # We return a list with all values
    return [on_off, mode, hue]
You can now update blink() so that it calls our new function, instead of printing directly the lightbulb result. This will look as follow:
async def blink(bulb_address, num_iterations = 10, blink_duration = 1):
    bulb = SmartBulb(bulb_address)
    await bulb.update()

    for x in range(num_iterations):
        result = await bulb.turn_on()       # Store the result in a variable
        values = bulb_result_to_list(result)
        print(values)                       # Display list of values
        sleep(blink_duration)
        result = await bulb.turn_off()      # Store the result in a variable
        values = bulb_result_to_list(result)
        print(values)                       # Display list of values
Let’s see what the result looks like, execute the code.
When you get a similar result, complete the function with the extra fields saturation, color_temp and brightness.
Task 1.2 Save into a file
We have a function that produces a list of values. We can easily convert that to a CSV line and store this into a file.
Let’s create a directory data at the root of our project (next to docs and src). Before storing data, we want to ensure it will not be shared on GitHub. We need to tell Git to ignore this new data directory. For this, open the file .gitignore and add a new line at the bottom with data.
Then, we can add a function store_csv_data() with one parameter: the list of values to write into the file. This would look like this:
def store_csv_data(values):
    """
    This function takes a list of values, convert it into a CSV string
    and appends it to the file 'data/light.csv'
    The current timestamp is added in front (as the first column) in milliseconds.

    Args:
        values (list): List of values to write into the file
    """
    # Get timestamp in millisecondes
    timestamp = str(int(time()) * 1000)
    values_with_time = [ timestamp ] + values
    # Convert all values into strings and join them together with a comma ','
    csv_line = ",".join(str(x) for x in values_with_time)
    # Open the file and append the new line at the end
    with open("data/light.csv", "a") as datafile:
        datafile.write(csv_line + "\n")
In this function, we use time() to get the current time. We first convert it into an integer, giving us a UNIX timestamp. To use this method, we import it like sleep() from the time package, at the top of the file.
UNIX Timestamp: the number of seconds since Jan 1st, 1970. It is a commonly used time format which is not dependent on timezone nor daylight saving times.
from time import sleep, time
In this function, we also open the file ‘data/light.csv’ in an ‘append’ mode, meaning that we will write at the bottom of the file instead of writing above / erasing new content. Replace the print() call in the blink() function to write into the file instead of showing in the Terminal.
async def blink(bulb_address, num_iterations = 10, blink_duration = 1):
    bulb = SmartBulb(bulb_address)
    await bulb.update()

    for x in range(num_iterations):
        result = await bulb.turn_on()       # Store the result in a variable
        values = bulb_result_to_list(result)
        store_csv_data(values)              # result > list > into file
        sleep(blink_duration)
        result = await bulb.turn_off()      # Store the result in a variable
        values = bulb_result_to_list(result)
        store_csv_data(values)              # result > list > into file
        sleep(blink_duration)
Task 1.3 Your turn
Note what we achieved: in three steps we used Python to format and save any information our code can reach.
- Use or adapt these function to collect data in the three functions implemented in the assignment:
pulse(),morse(),frequency(); - Write a piece of code to start your data file with the label of each field;
- Collect samples of CSV data and see what you can do with spreadsheet software such as MS Excel or equivalent.
- Discuss the benefit, but also the limitation of what you collect and how you collect it.
Report On GitHub, in your lab experiment report, report your instrumentation, collection and discussion following the lab xp template.
Step 2 Sending data to the Cloud
While local files are convenient, access to live data provides valuable feedback when prototyping connected product. To collect live data about the lightbulb in the cloud, we need to create its digital representation. For this, we will create a new Thing on Bucket. However, we first need a mean to authenticate our light bulb.
Task 2.1 Create a set of Private and Public keys
What problem do we need to solve? The connection to Bucket is fully encrypted and taken care of by the network. We will expand on that in module 4.
However, we need to authenticate this Thing on the Bucket so that when it receives and store information, it is confident that it comes from. It may look like a lot of precaution for sending prototype data. Keep in mind that we want to use our prototypes with users and each data point can be use somewhere in the system to trigger an action. It touches on privacy as well as security.
To achieve this authentication we use a set of asymmetric keys: two keys that are generated at the same time and share properties. A private one that you keep as a secret and a public one that you share wildly with anyone who needs to authenticate your Thing.
When you use the ssh command to connect to your Raspberry Pi, it first creates such a set of private and public keys to verify that the Raspberry Pi you think you interact with is the right one (and not pretending to be the one). Here is a short video that you might find useful for further information: Public and Private Keys
Enough of theory, let’s generate a set of keys.
We will store our keys in our project directory, respectively private.pem and public.pem. Like the data folder, we do not want to share this information on GitHub. We need to tell Git to ignore these files. In VS Code, open the file .gitignore and add a new line at the bottom with *.pem. This tells Git to ignore any file ending with .pem. The star * is a placeholder (or wildcard) that represents any string of character.
The typical tool to generate a set of keys is OpenSSL. On Mac, this tool is already installed. On Windows, you can download and install OpenSSL here.
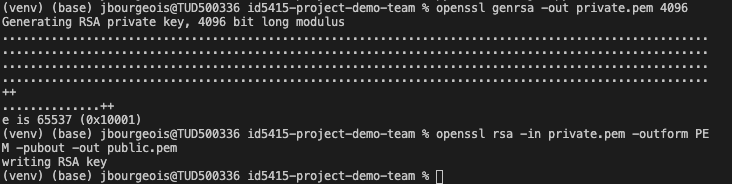
In the terminal, type in the following command to generate a private key. We generate an RSA key, the output (-out) is the private key, saved in the file ‘private.pem’ which should appear (after executing the command) in your project directory on the left panel. 4096 (or 4KB) is the size of your key.
openssl genrsa -out private.pem 4096
Then, we generate a public key from our private key with the following command. Again we use the RSA cryptosystem. This time we provide our private key as an input (-in). We want a public key in the PEM format (-outform). Thus, the output (-out) is the public key, saved in the file ‘public.pem’ which should appear (after executing the command) in your project directory on the left panel.
openssl rsa -in private.pem -outform PEM -pubout -out public.pem
Task 2.2 Create a Thing for our Lightbulb on Bucket
Now that we have a set of keys, we can create a Thing for our Lightbulb on Bucket.
On Bucket dashboard, fill in the name and description of your lightbulb. Then, select the type ‘GENERIC’. A form appears on the right side: this is the place for sharing the public key of your Thing. Thus, in VS Code open the file ‘public.pem’ that we created in the previous task, select all (CMD+A or CTRL+A) and copy (CMD+C or CTRL+C). Back on Bucket, paste (CMD+V or CTRL+V) your key in the form. Finally, click on the blue button ‘Create’ to create your new ‘Thing’.
Task 2.3 Uploading data to Bucket
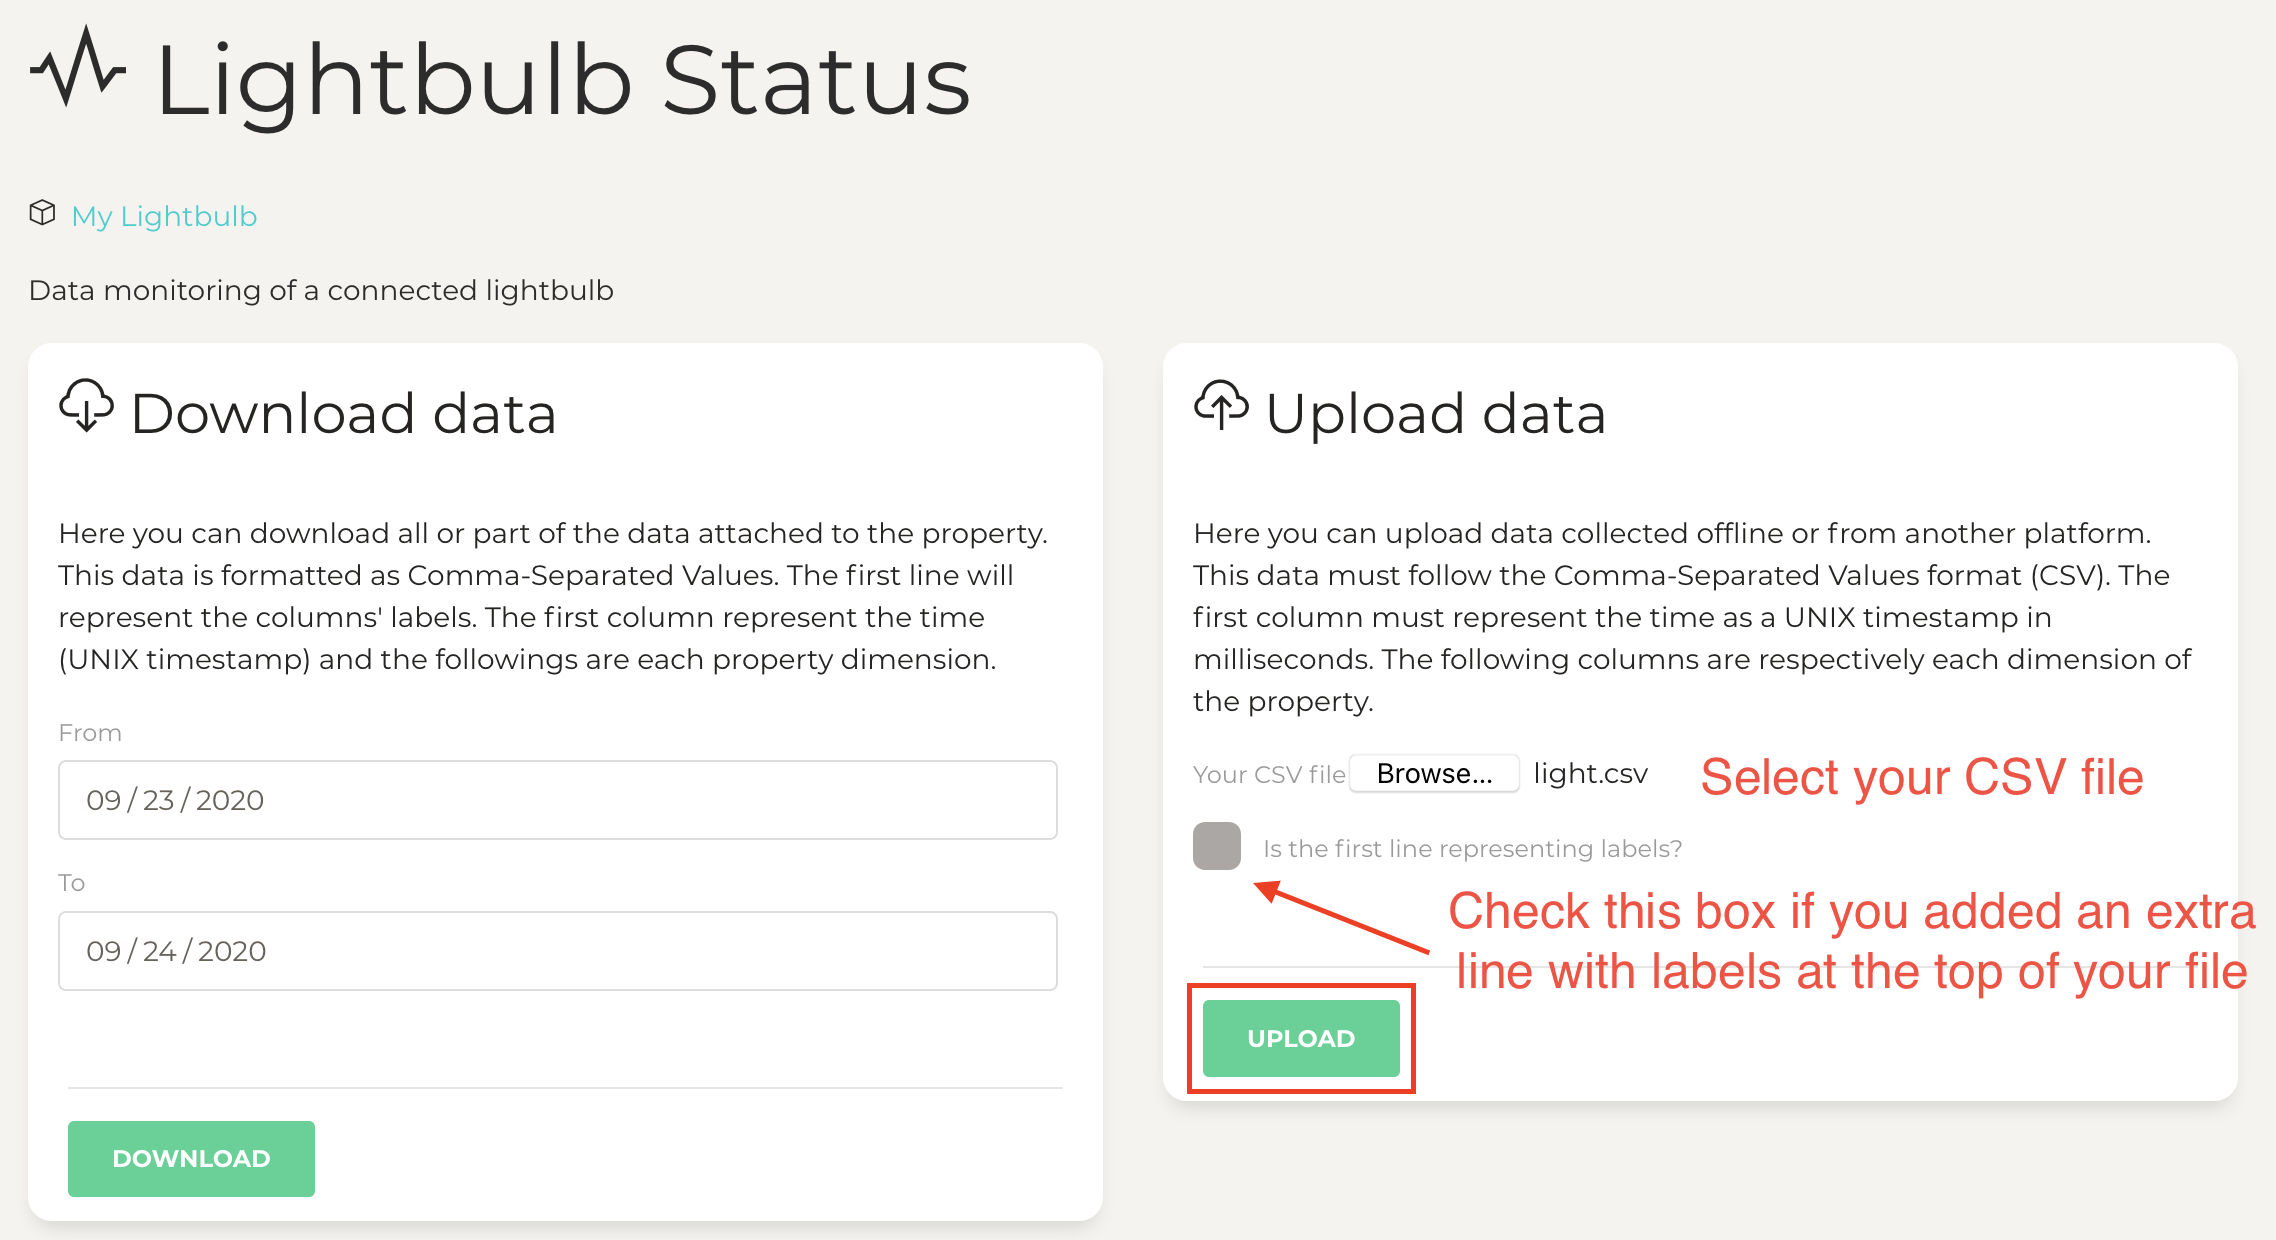
Before collecting live data, we will see how we can upload CSV files to Bucket via the web interface. For this, we need a Lightbulb Status property in our Lightbulb Thing.
On Bucket, go to your Lightbulb Thing. In the form ‘Create a new Property’, select the property type Lightbulb Status. You will notice that the dimensions of this property are the same as our CSV fields.
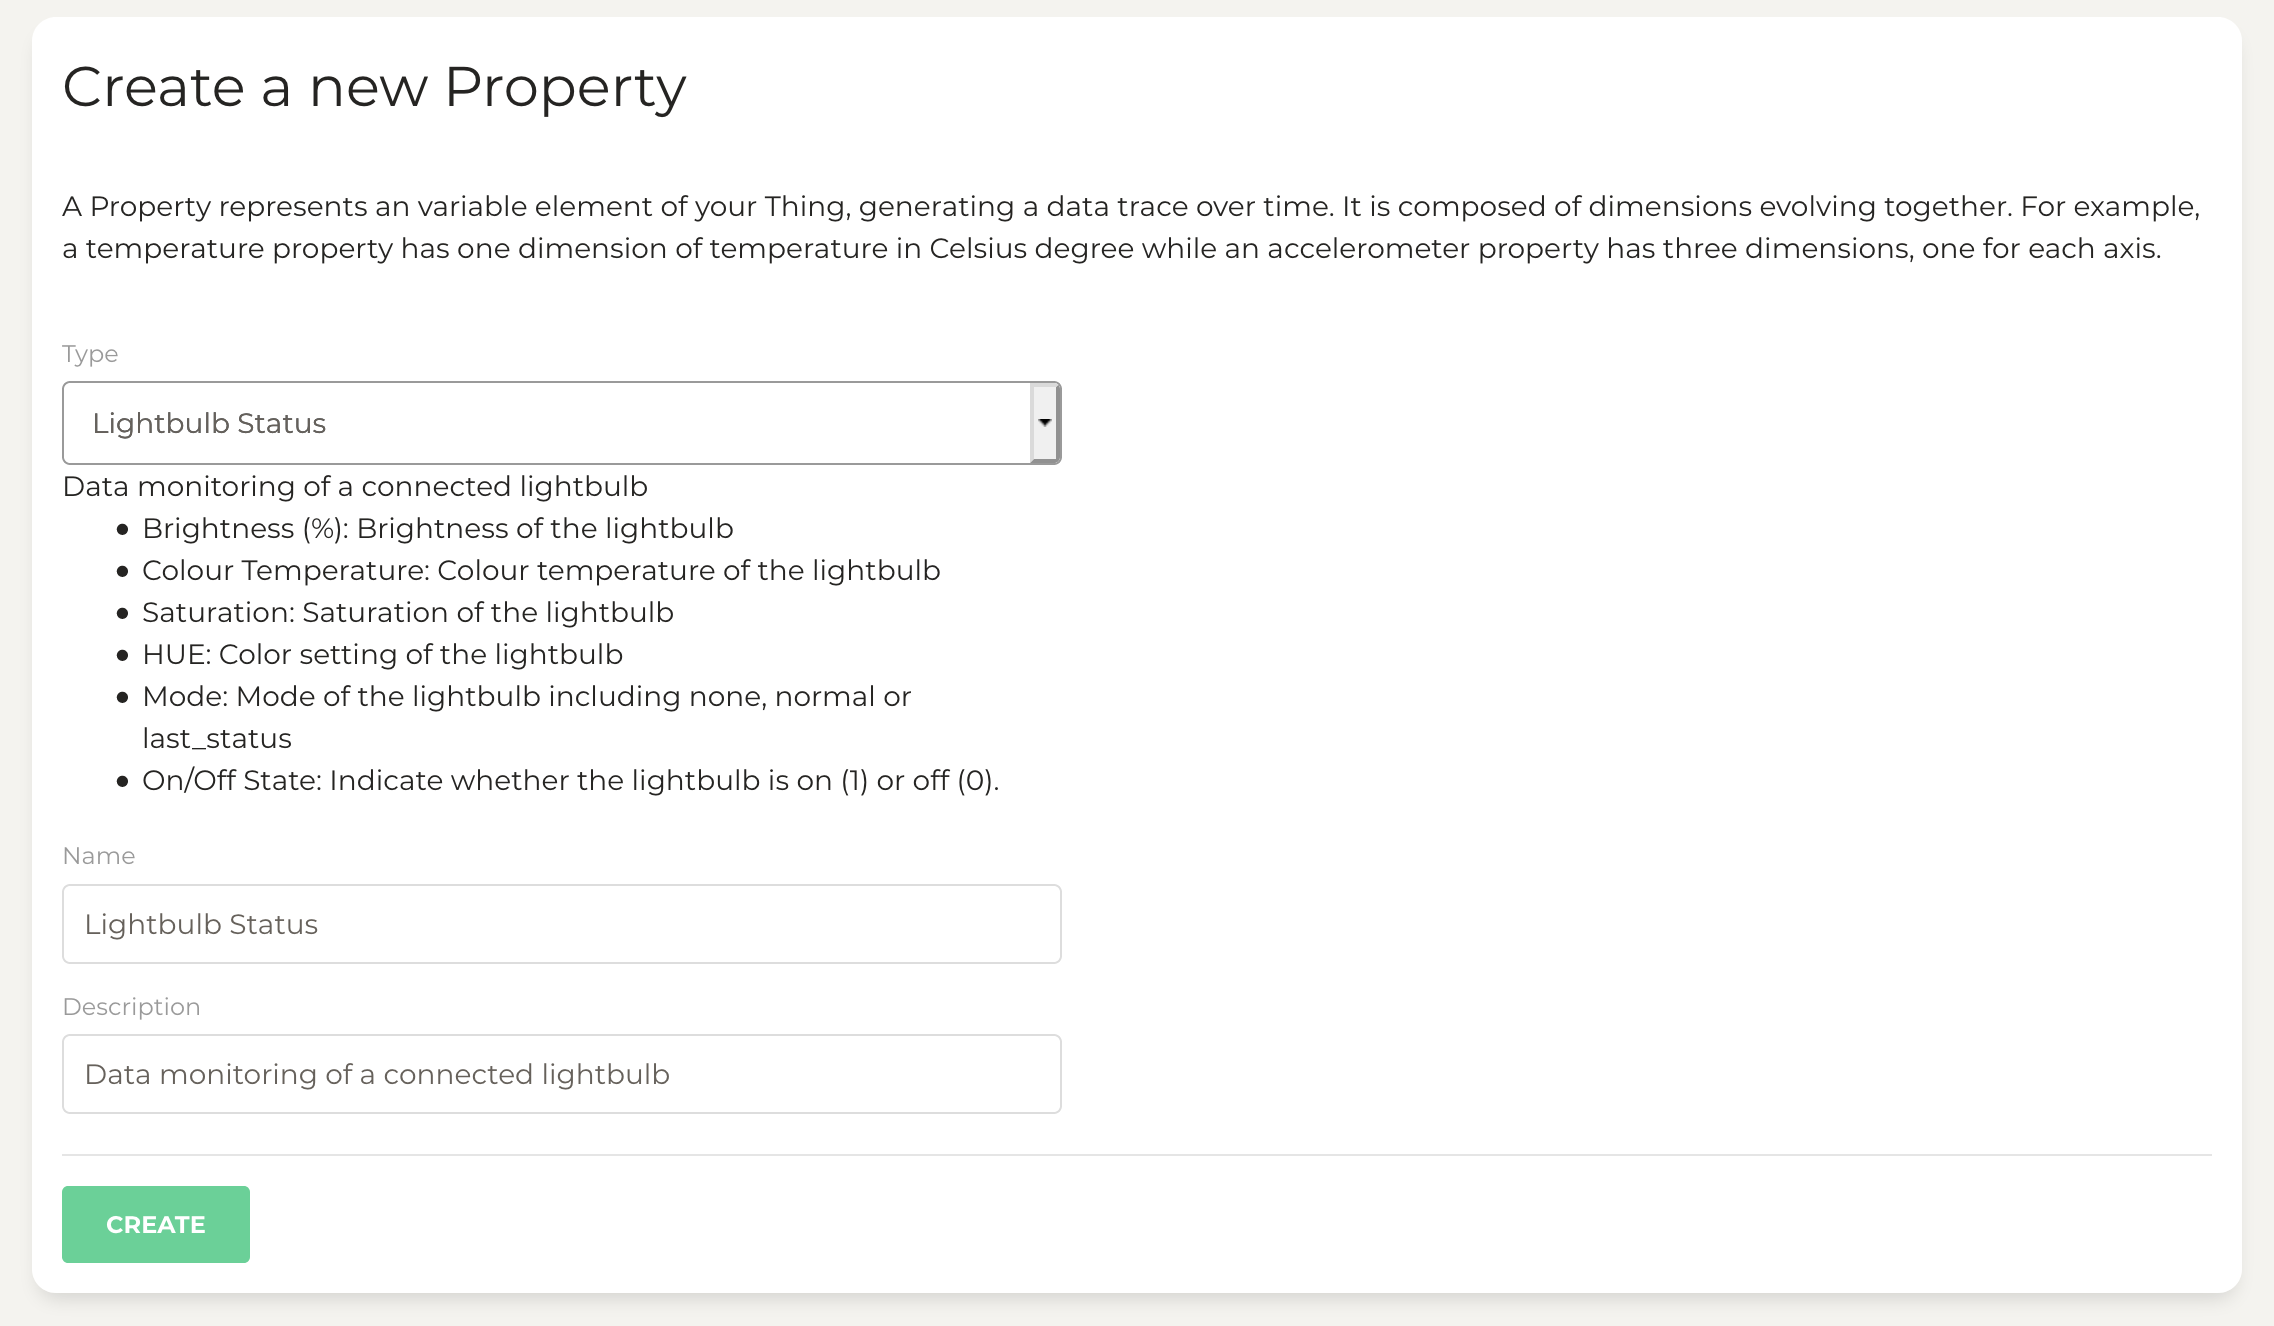
The name and description are filled in by default, feel free to adjust as you wish and press the green button ‘Create’. Inside your Thing, you now have a Lightbulb Status property. Click on it, and fill in the ‘Upload data’ form to send your CSV file to Bucket.
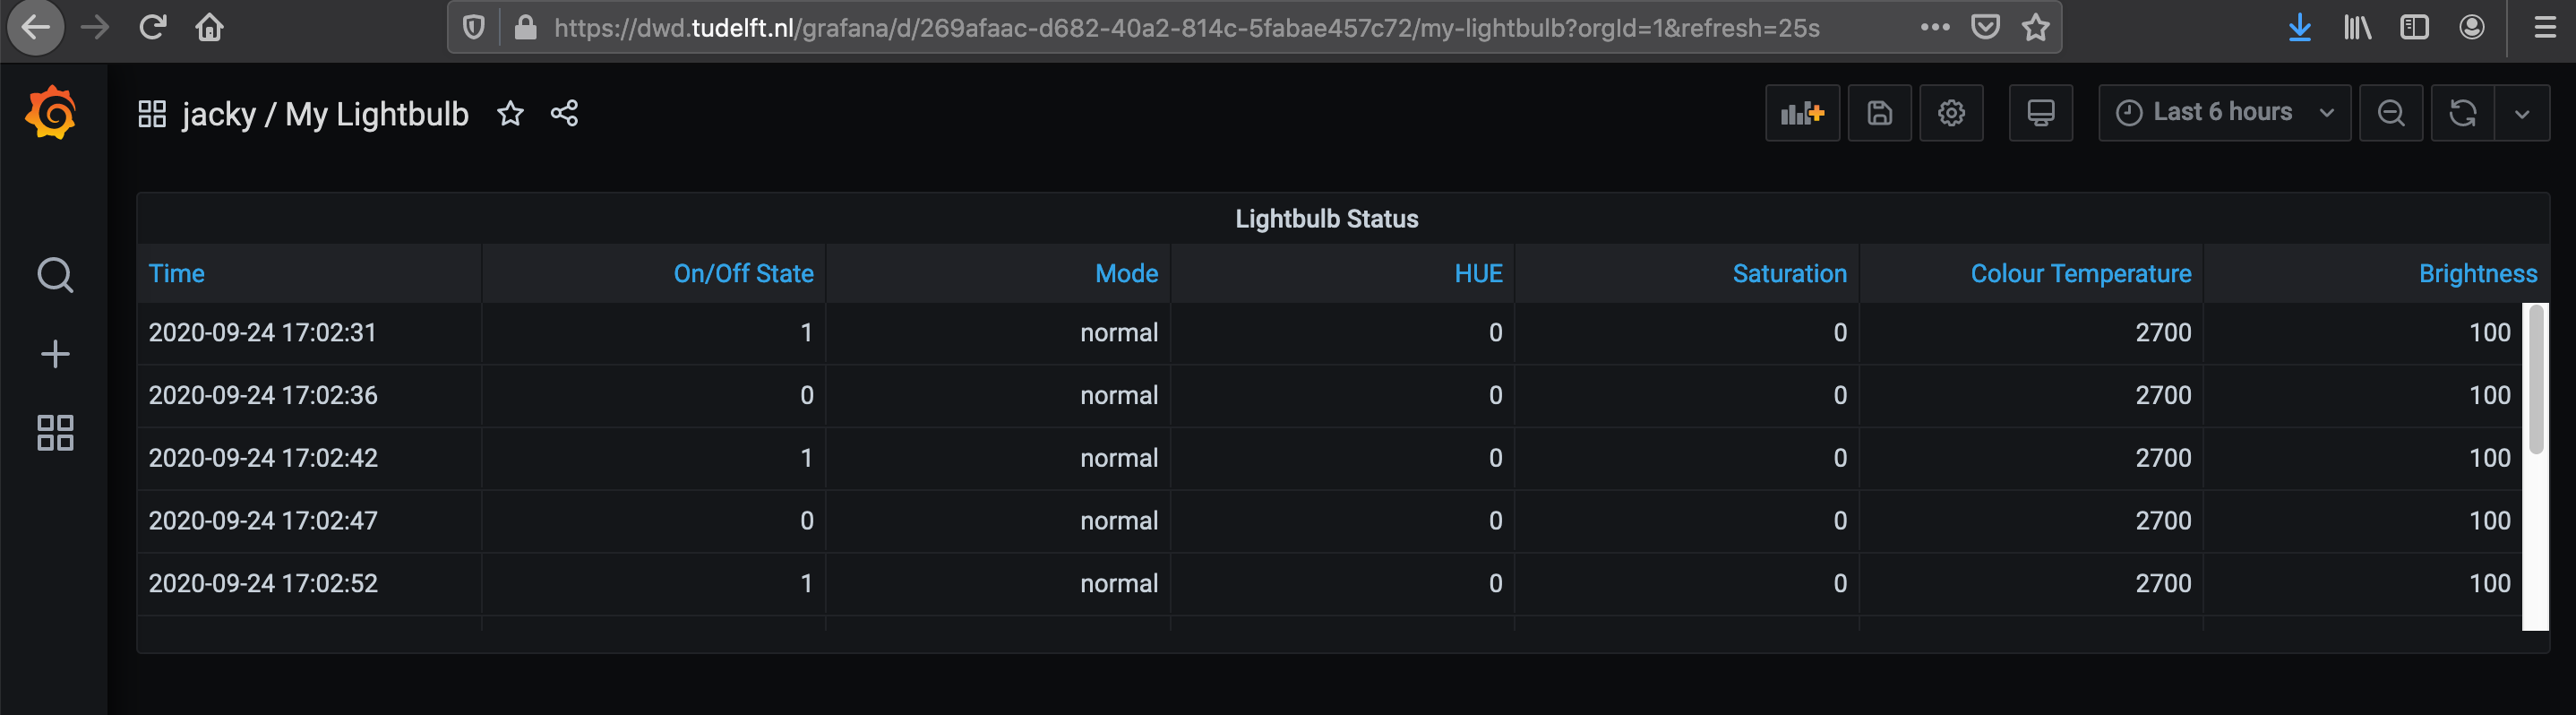
Back to your Thing, you can click on ‘Visualise on Grafana’. It should redirect you to Grafana and create a default visualisation of your property: a table because it mixes numerical and textual value. We will see how to improve this in Step 3.
Step 3 Collecting Live Data
With a lightbulb Thing, Bucket is ready to receive our live data. In this step we go back to our Python code to make a couple of adjustments.
Task 3.1 Personal Settings with Environment Variables
To send data to Bucket, we will need our code to provide authentification information: namely the thing id and the private key. We want to avoid this information to appear in the code. Beyond being personal, it would mean that every time the code is pushed on GitHub, the other teammates would need to change this information for their own. This also includes the IP address that we have currently in the code.
To address this issue, we use environment variables which we store in a file and load at the start of the Python script. The typical file name for this is .env, it is already in the .gitignore list of file for Git to ignore.
Let’s create a file .env at the root of the project and insert our environment variables as follows (replace the square brackets by your thing ID and the IP address of your lightbulb):
THING_ID=[dcd:things:...]
PRIVATE_KEY_PATH=private.pem
LIGHTBULB_IP_ADDRESS=[192.168.1.12]
To load these variables into our Python code, we use the package python-dotenv. As usual, we install this package with pip:
pip install python-dotenv
Back to our Python code in light.py, we import the package at the top of the file:
# Loading environment variables from the .env file
from dotenv import load_dotenv
import os
load_dotenv()

THING_ID = os.getenv("THING_ID", None)
PRIVATE_KEY_PATH = os.getenv("PRIVATE_KEY_PATH", None)
LIGHTBULB_IP_ADDRESS = os.getenv("LIGHTBULB_IP_ADDRESS", None)
This code makes environment variables available through os.getenv(). The first parameter is the name of the variable in the .env file, the second is the default value, in our case ‘None’ (we must provide this information). Note that the three variables are capitalised: this is a convention for ‘constant’: variables that are not changing throughout the programme execution.
To test whether the values are loaded properly, let’s replace the IP address in your code with the new constant, for instance:
async def main():
    await blink(LIGHTBULB_IP_ADDRESS, num_iterations=5, blink_duration=5)
The output of your code should be unchanged, controlling the lightbulb as before.
Task 3.2 Data-Centric Design Python Kit
It is typical for cloud platforms to provide a Software Development Kit (SDK). An SDK is a set of tools and resources that facilitates the work of developers who build interactions with the platform. The DCD Lab provide such kit for Python through the package dcd-sdk. Like the python-kasa package, dcd-sdk is available on pipy (dcd-sdk) and it has its own documentation on ReadTheDocs (doc)
To install the SDK, we use the pip command again.
pip install dcd-sdk
This SDK will start generating logs in the folder logs and requires the University DigiCertCA.crt: a file and a directory to add at the bottom of the .gitignore so that we do not upload them on Git.
Let’s go back to our light.py and import a Thing from the package dcd-sdk (at the top of the file).
from dcd.bucket.thing import Thing
Then, we create a function that will establish the connection to Bucket and look for the property ‘Lightbulb Status’. Warning: if you used a different name than ‘Lightbulb Status’ for your property, change the code accordingly. Otherwise, it will create another property of this type.
def init_thing_and_get_property():
    """
    Establish the connection with the Thing on Bucket
    Look for the lightbulb property and create one if none exists

    Returns:
       (Property) : A connection to the lightbulb property
    """
    # Establish the connection to the Thing
    thing_bulb = Thing(thing_id=THING_ID, private_key_path=PRIVATE_KEY_PATH)
    thing_bulb.describe()
    # Find or create the Lightbulb Status
    prop_status = thing_bulb.find_or_create_property("Lightbulb Status", "LIGHTBULB_STATUS")
    prop_status.describe()
    return prop_status
Finally, we use this initialisation function in blink(). Once we have the lightbulb property, we can use it to send data to Bucket (directly our list of values).
async def blink(bulb_address, num_iterations=10, blink_duration=1):
    # Initialise connection with Bucket and retrieve the property
    lightbulb_property = init_thing_and_get_property()
    bulb = SmartBulb(bulb_address)
    await bulb.update()

    for x in range(num_iterations):
        result = await bulb.turn_on()
        values = bulb_result_to_list(result)
        store_csv_data(values)
        # send values to Bucket
        lightbulb_property.update_values(values)
        sleep(blink_duration)
        result = await bulb.turn_off()
        values = bulb_result_to_list(result)
        store_csv_data(values)
        # send values to Bucket
        lightbulb_property.update_values(values)
        sleep(blink_duration)
Note:
- The Python script is not stoping by itself anymore. The connection to Bucket is continuously waiting for interactions. Thus, we need to exit manually with
CTRL-C. - The DCD SDK set the logs for debugging, which generates many more messages in the Terminal. You can reduce the log by setting the environment variable (in the .env file).
LOG_LEVEL=INFO
Task 3.3 Grafana Dashboard
You can now visualise your data live with Grafana while testing your different Python function and explore the resulting data. Try out the different visualisation panels. The default one is a table because the lightbulb status mixes numbers and text data points, but there are many more types of panels.
Report On GitHub, in your lab experiment report, document what you achieved or tried to achieve through screenshots and descriptions. Do not hesitate to share what you would have like to be able to do.
Report Although your prototype did not gain functionalities, the live data capabilities are certainly worth reporting in the CHANGELOG.md.
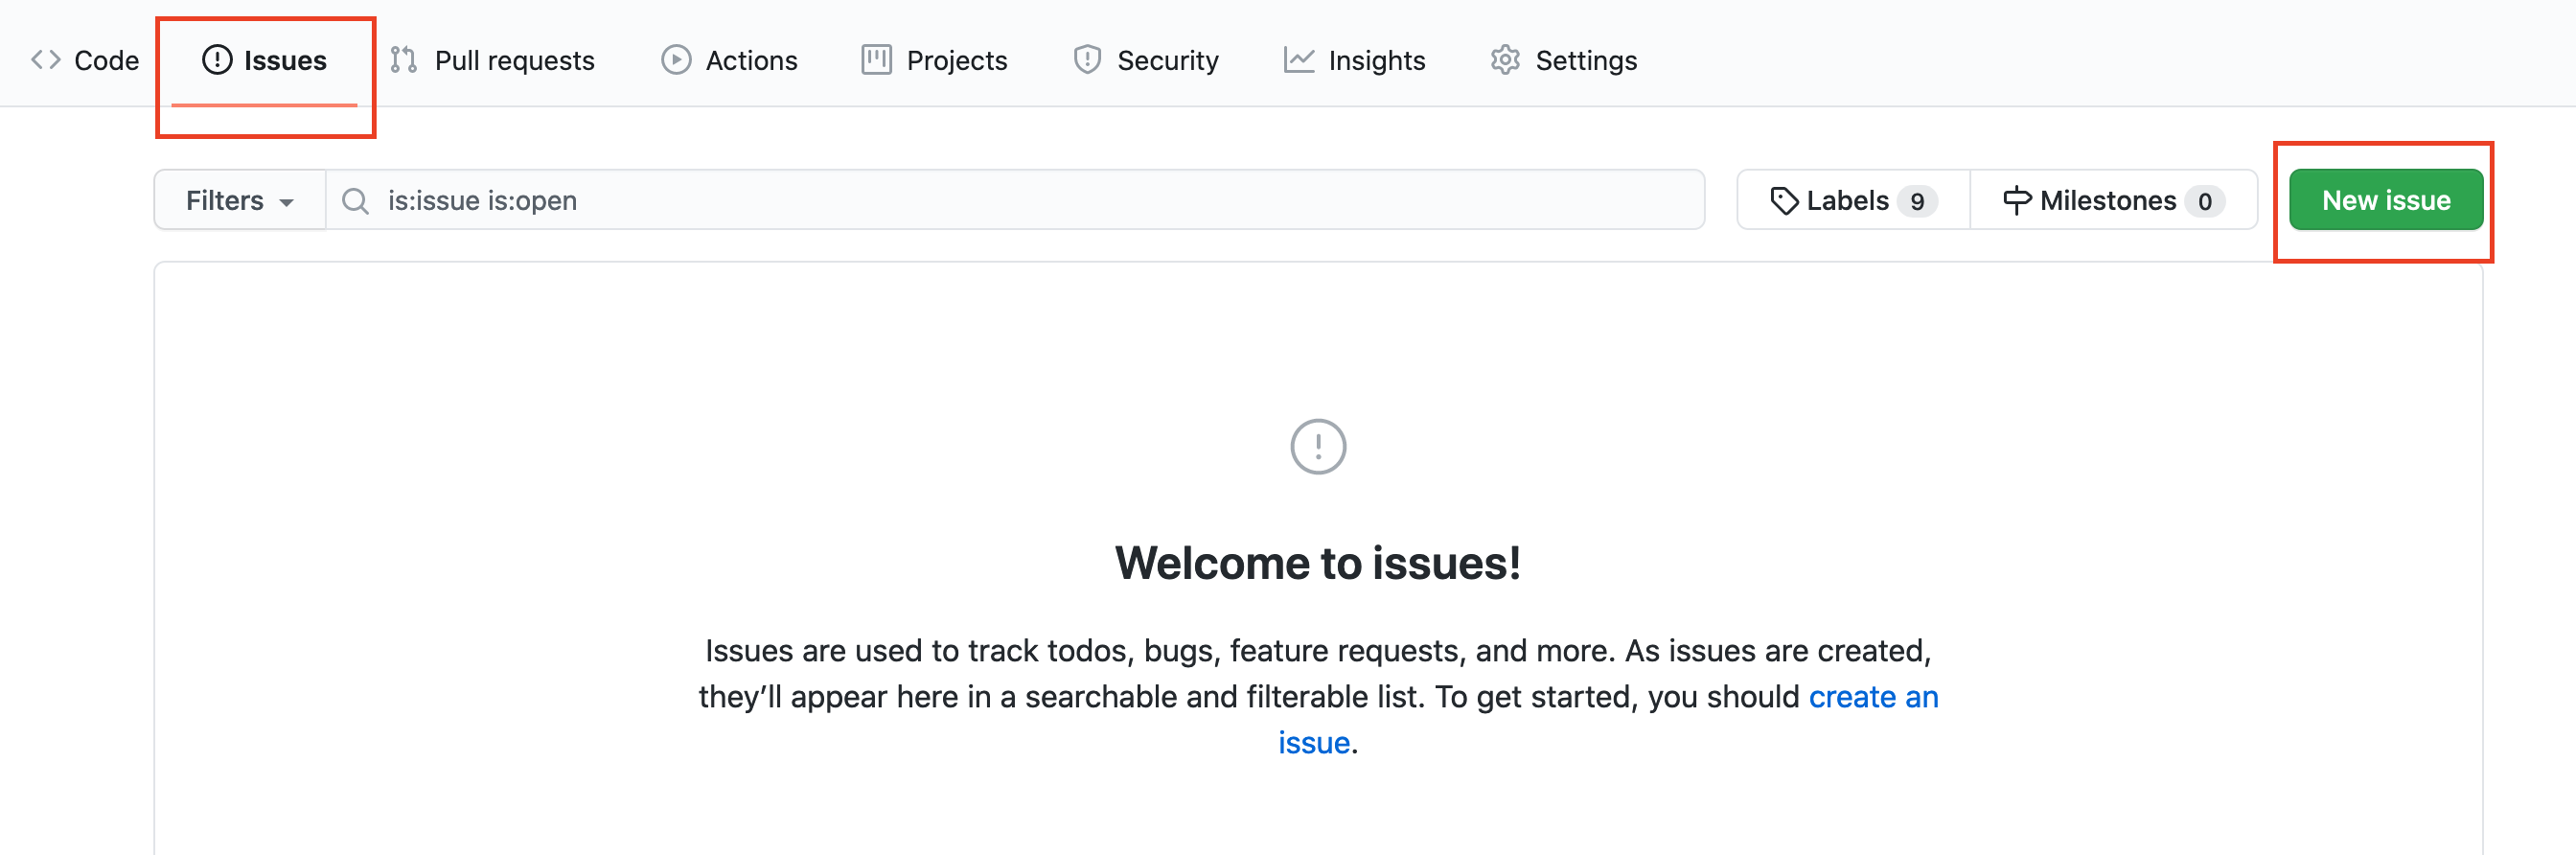
To conclude your lab experiment, open an issue. On GitHub, an issue is a discussion thread. In our case, we want to open a discussion space related to the first lab XP. This will be a sign to coaches that you consider being done with it so that they can go through it for feedback.
On GitHub, open an issue by clicking on the tab Issue.
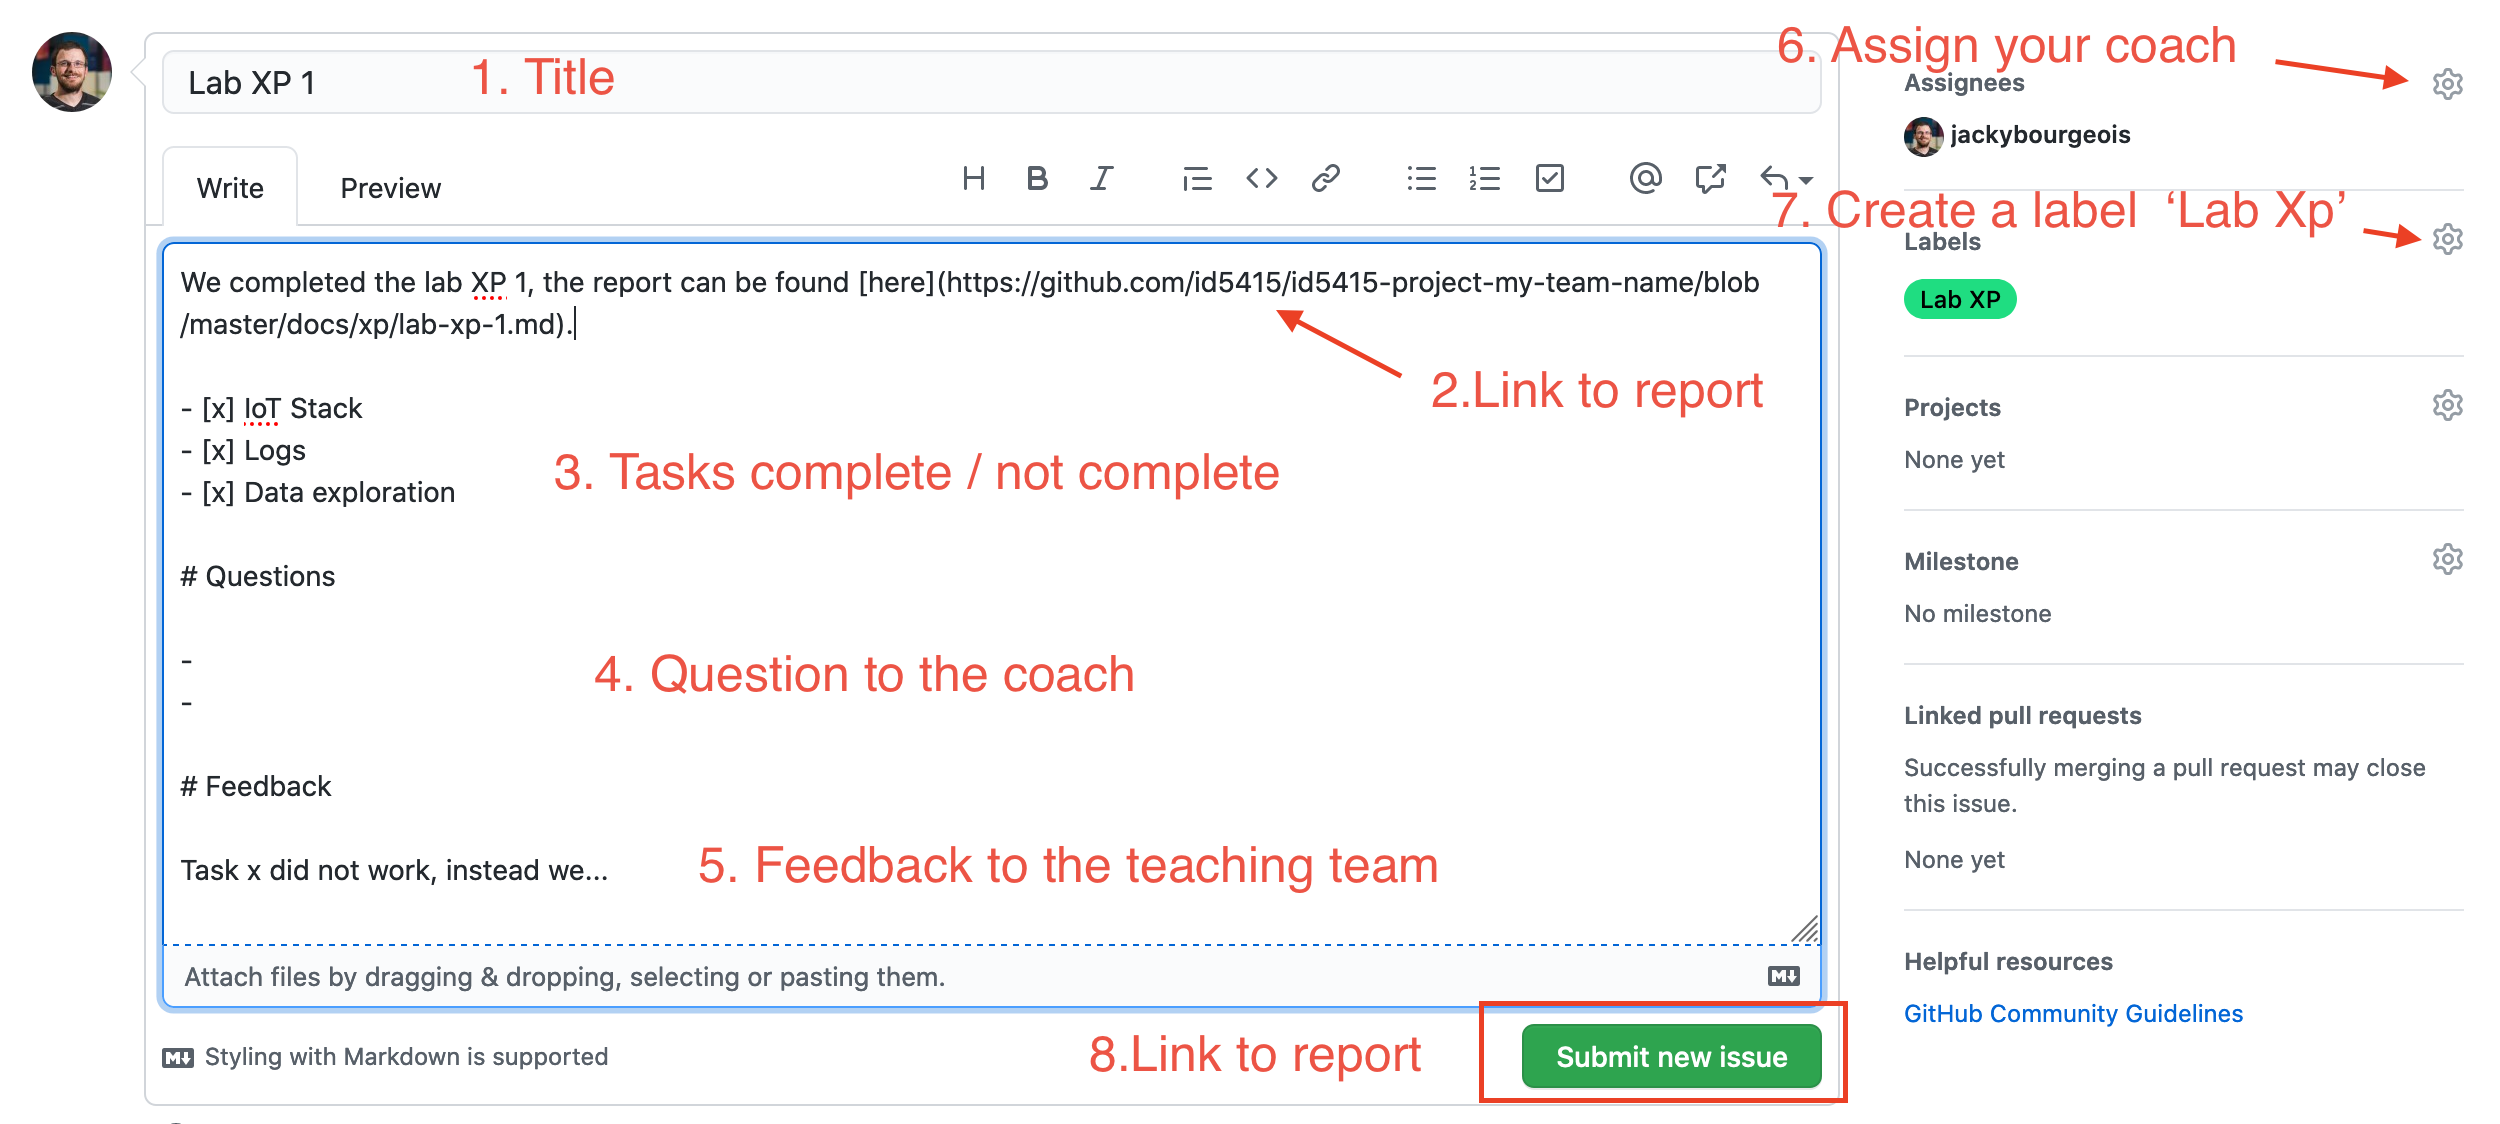
Like your lab XP report, you can use all Markdown tags to format your text with headings, links, lists and so on. In your issue, we expect the following elements:
- a title
- a link
- a list of tasks. In markdown you can use
- [ ]or- [x]for tick boxes - a question section
- a feedback session
- Assign your issue to your coach, to make it more visible to them
- Create a label ‘Lab Xp’, categorising this issue
Then, you can press the green button ‘Submit new issue’.
![]()
![]()
![]()
The European Commission's support for the production of this publication does not constitute an endorsement of the contents, which reflect the views only of the authors, and the Commission cannot be held responsible for any use which may be made of the information contained therein.