In this assignment, you will enrich your connected lightbulb with an external web services of current weather and open it up for external access from your smartphone.
Step 1 Weather Web Service
In this first step, we will get a feeling of what a web service is by consuming the Open Server web service.
Task 1.1 Open Weather API
Open the Open Weather home page in your web browser: https://openweathermap.org/
Then, sign up in the top right corner.

Once you confirmed your email, you can find your API key here: https://home.openweathermap.org/api_keys.
In this step, we will focus on the ‘current weather’ API of the Open Wether web service.
Task 1.2 Get Current Weather
It’s time to open VS Code and load the virtual environment in the Terminal.
Let’s create a new file weather.py with the following code.
# Python package to excute an HTTP request
import requests

# Loading environment variables from the .env file
from dotenv import load_dotenv
import os
load_dotenv()

OPEN_WEATHER_API_KEY = os.getenv("OPEN_WEATHER_API_KEY", None)

# the url of the weather API we want to request
url = "https://api.openweathermap.org/data/2.5/weather"
#
querystring = {"appid": OPEN_WEATHER_API_KEY,"q":"Delft,nl"}
response = requests.request("GET", url, params=querystring)
print(response.text)
In this code, we import the requests package which we use to execute an HTTP request. We will need first to install the package request. You can learn more about HTTP Request here
pip install requests
Then, we load the API key from the .env file. For this to work, we need to add our Open Weather API key in the .env file.
OPEN_WEATHER_API_KEY=[REPLACE WITH YOUR KEY]
In our newly created weather script, we have set the variable url with the URL of the weather service, as specified in the API documentation
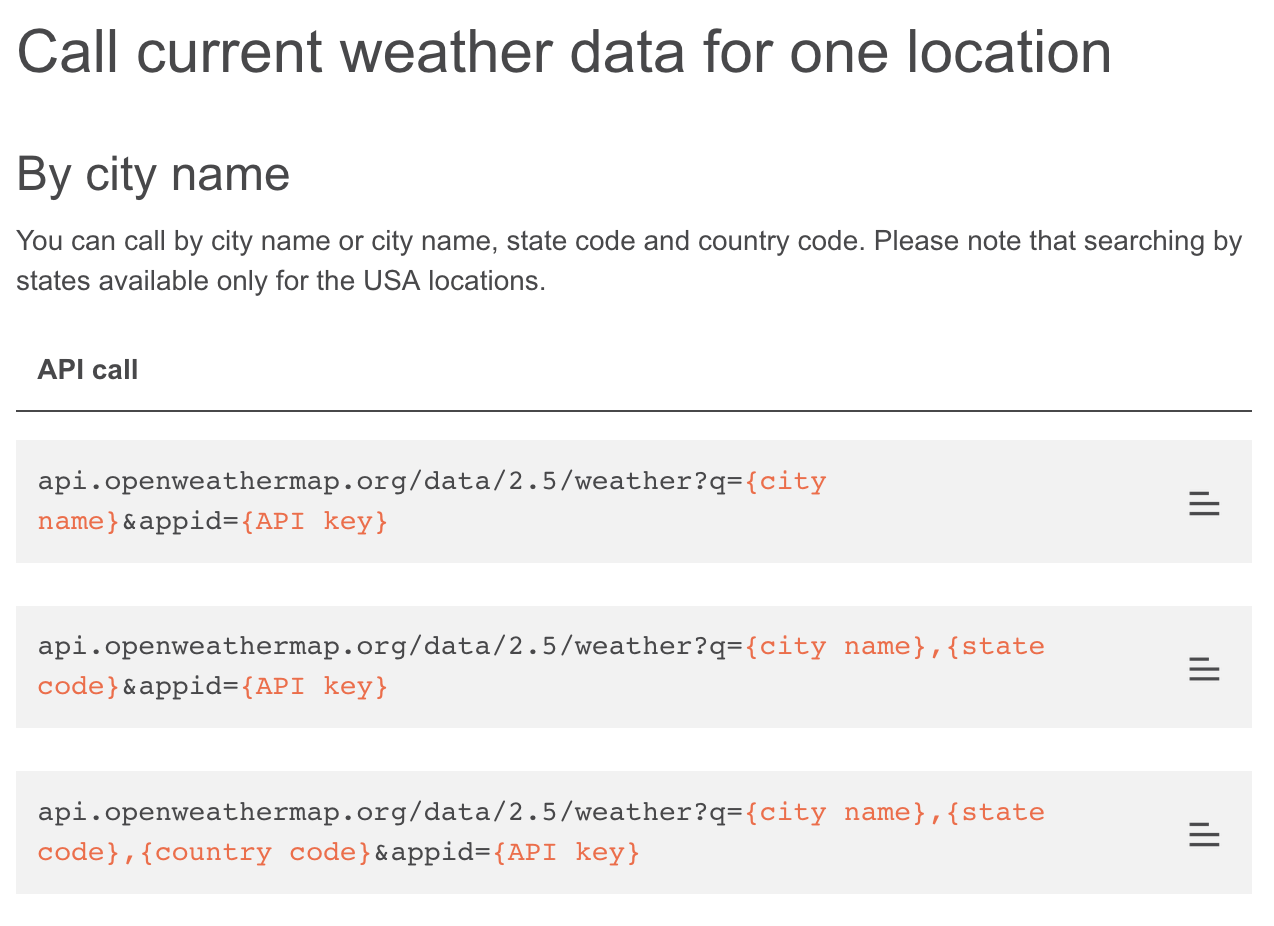
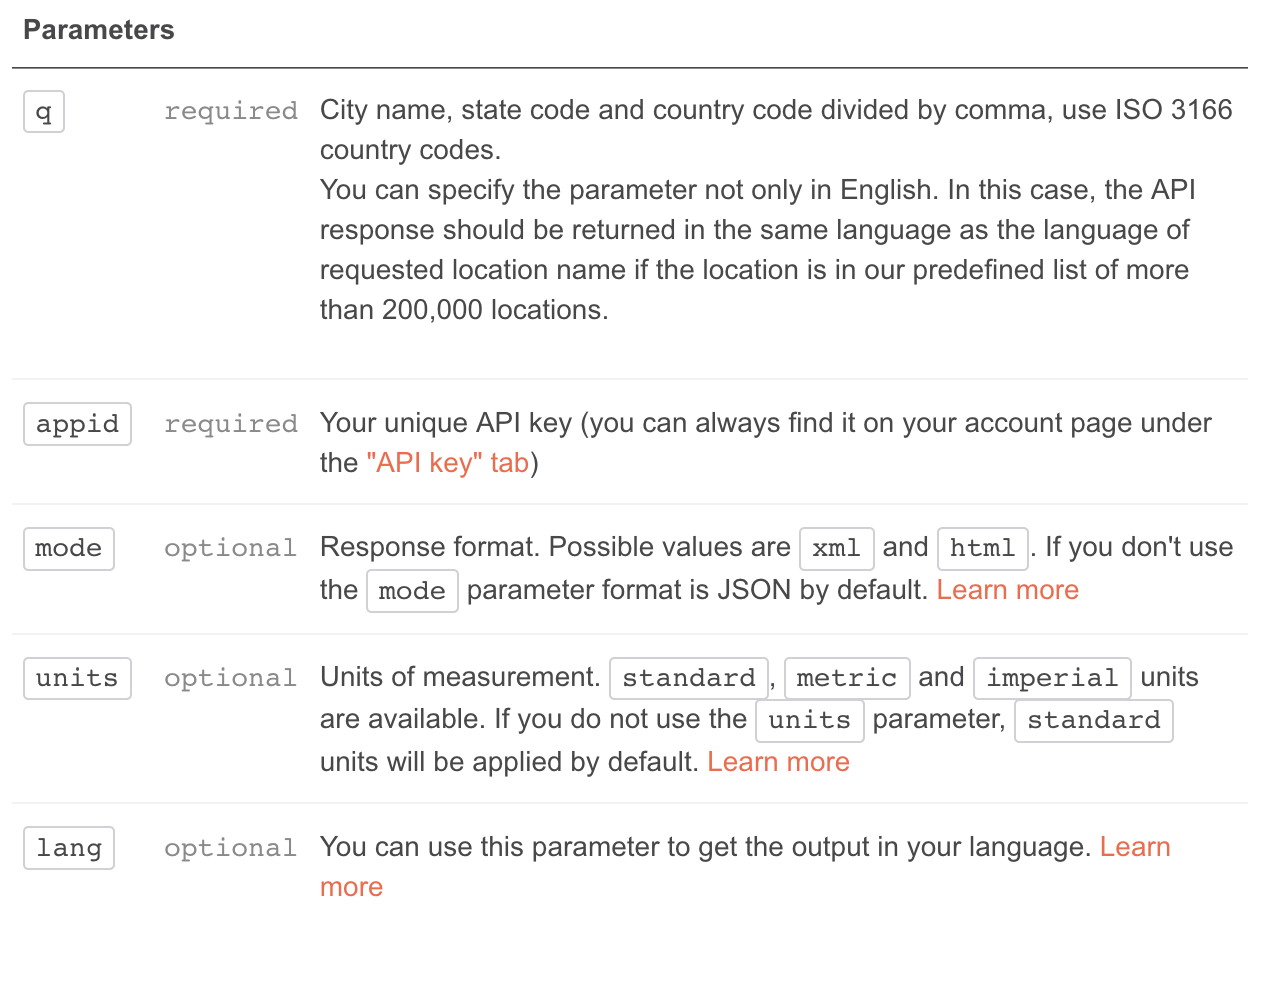
We can see in the documentation that a few parameters are required: appid (our api key) and q (location we are interested in). We use the variable querystring to put this information in a dictionary. Finally, send the request with the URL and the querystring as ‘params’. Not the ‘verb’ of the HTTP request GET, as we want to ‘get’ data from the web service.
We can now execute the code to get the current weather.
python src/weather.py
The above python code will print the result in terminal, which should look like this:

Task 1.3 Format JSON
The weather web service sends us data as JSON format. We can make this json format result more readable with the JSON package (to import at the to of the file). We use json.loads() to read the response as a JSON structure, then json.dumps() to print this structure. Note the indent parameter which makes the whole structure more readable by indenting each sub key/value set.
import json

# Add this at the end of the weather.py

json_result = json.loads(response.text)
print(json.dumps(json_result, indent=4))
You will see that this time the result will be an dictionary of key:value in an Json-array fromat.
Tip Read more about [JSON Array] (https://www.javatpoint.com/json-array)
Task 1.4 Request parameters
From this result, we can now read through the keys and values of the result. The temperature temp, temp_max and temp_min. Here note that the unit is not degrees. The weather report is in English. Looking back at the API documentation, there are parameters units and lang to tune this information. You can add these option to your querystring dictionary and observe the change in the request result.
Task 1.5 Extract values
Similarly to the lightbulb result in Module 2, we need to extract values from this structure to use them as a control of the lightbulb.
For example, extracting the infromation about cloudiness would look like this:
cloudiness = json_result["clouds"]["all"]
print(cloudiness)
In above python code, we are first reading the value of the key ‘clouds’ from the json result, then inside this value (e.g. cloud), we are looking for the key ‘all’. This will print the current information about cloudiness in specified location.
Task 1.6 Control the lightbulb
You can use this approach to extract values out of the weather result and control the lightbulb. For example, these values could be used for controlling the brightness or the number/duration of the blink function.
Step 2 Blink from a smartphone
In the first step, we ‘consumed’ a web service by sending an HTTP request to the Open Weather server and extracting values from the response. In this step, we will offer our web service by running a web server. Like we get the weather, we will be able to control our lightbulb from the web browser of any device on the local network. This will allow us to look ‘behind the curtain’, and see how a Python program can expose its functions as a web service.
Task 2.1 Install Flask package
In Python, Flask is a popular package to create a web server in a few lines. Documentation of this project is available here. Like other Python packages, we need to install Flask using pip. In your VS Code Terminal, activate the virtual environment and type in:
python -m pip install Flask
Task 2.2 Hello, World!
Now that we have installed Flask, let’s implement a REST API that responds ‘Hello, World!’.
To do that, we create a file server.py inside our src directory and insert the following Python code:
# import the class Flask from the flask package
from flask import Flask
# create a Flask object: a web application
app = Flask(__name__)

# Flask use annotations (starting with the at '@') to connect a URL to a function.
# Here we tells Python to execute hello_world() each time the URL / is called.
@app.route('/')
def hello_world():
    return 'Hello, World!'

# This if condition is equivalent to the main() function.
# We tells Python to start our web application.
if __name__ == '__main__':
    app.run()
This code imports the flask package and creates a web application app, an instance of the class Flask. app is a typical name to refer to the web application.
Note: there is no difference between ‘web service’ and ‘web application’ in this context.
The line starting with @ is an annotation, used to complement the code. In this context, we specify a web path, the root ‘/’, to trigger the function hello_world() right below.
Finally, the script defines the main, where the programme starts. In this case run our app, meaning we start the webserver.
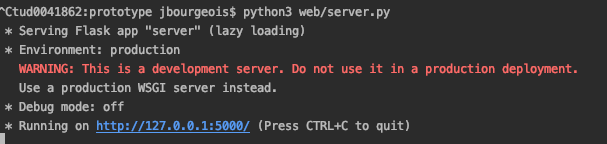
In the Terminal, we can now execute the Python file to start the webserver:
python src/server.py
The result should look as follows, indicating that the webserver started and ‘listen’ on the port ‘5000’. It means that it is ready to serve the request on the port.
Let’s verify this. We can open a web browser and type in: http://localhost:5000/. Note in this URL:
- the hostname is
localhost(or local IP address127.0.0.1), only accessible from the machine our machine (on which we run the webserver) - the port is
5000, as indicated in the Terminal - the path is
/, this is the path associated with our hello_world function
In the web browser, we should see appear a ‘Hello world’ on the web page. This is the result of the hello_world function. In VS Code, in the hello_world() function, we can change the message. As we changed the code, we need to stop and restart our Python programme. In the Terminal, stop the server (Ctrl+C) and execute your script again (Arrow up + Enter). Back in the web browser, refreshing the page should display your new message.
Task 2.3 Access from the local network
For now, this web service is accessible only from our machine, using the hostname ‘localhost’. This is useful for development, but defeat the purpose of a ‘web service’ accessible from the network. In our server.py, at the bottom, we can provide a parameter host='0.0.0.0 to run(). This means that our webserver will accept incoming requests from any IP address on the network.
if __name__ == '__main__':
    app.run(host='0.0.0.0')
However, we need to know the IP address of the machine that is hosting this server. We can look up our IP address with the following commands, depending on the operating system:
Mac
ipconfig getifaddr en0
Windows
Type in the following command and look for IPv4 Address. . . . . . . . . . . : 192.*.*.*
ipconfig
Raspberry Pi
Type in the following command and look for inet 192.*.*.*
ifconfig wlan0
Once we have the local IP address of our machine, we can use a phone or other computer connected to the same network, open a web browser and type in http://IP_ADDRESS:5000/. We should see the message returned by our hello_world() function.
Note: On some platform you might also need to disable/create a rule for your Firewall.
For information, Fullstack provides some useful information to go further.
Task 2.4 Control the lightbulb
We are now ready to connect our lightbulb code to our webserver so that we can trigger the lightbulb function (e.g. blink()) directly from the web. Let’s first import the lightbulb code and the asyncio package in our server.py script.
from light import Lightbulb
import asyncio
After the import statements, we need to get our lightbulb IP address, thing id and private key path from the .env file.
# Loading environment variables from the .env file
from dotenv import load_dotenv
import os
load_dotenv()

LIGHTBULB_IP_ADDRESS = os.getenv("LIGHTBULB_IP_ADDRESS", None)
LIGHTBULB_THING_ID = os.getenv("LIGHTBULB_THING_ID", None)
LIGHTBULB_PRIVATE_KEY_PATH = os.getenv("LIGHTBULB_PRIVATE_KEY_PATH", None)
light = Lightbulb(LIGHTBULB_IP_ADDRESS, LIGHTBULB_THING_ID, LIGHTBULB_PRIVATE_KEY_PATH)
In main(), we need to connect to the lightbulb, before exposing the web service.
if __name__ == "__main__":
    asyncio.run(light.connect())
    app.run(host='0.0.0.0')
Finally, the whole purpose of this work is to expose the method blink() from the lightbulb. Below our ‘hello world’ endpoint, we create a new endpoint /blink which call the light.blink(), then respond to the client.
@app.route('/blink')
def blink():
    asyncio.run(light.blink())
    return {"message": "Done blinking."}
Note: instead of directly returning a string in the new end point here, we return a dictionary with a key message. This way, we can structure our response like the Open Weather web service, making it easier to read for machine consuming our service.
Task 2.5 Set Parameters
To set the optional parameters of our blink function, namely the number of iteration and the duration of each blink, we can use the request object provided with Flask. Let’s import it as we import Flask.
from flask import Flask, request
Then, we can transform our /blink endpoint as follows.
@app.route('/blink')
def blink():
    # get the dictionary of parameters
    args = request.args
    # we can print them, out of curiosity, for debugging purpose
    print(args)
    # set default parameters, in case there are not provided
    num_iterations = 10
    blink_duration = 1
    # check if 'iterations' was provided, if it is we need to convert the string value into a number (int)
    if "iterations" in args:
        num_iterations = int(args["iterations"])
        print(num_iterations)
    # check if 'duration' was provided, if it is we need to convert the string value into a number (int)
    if "duration" in args:
        blink_duration = int(args["duration"])
        print(blink_duration)
    # call blink() with the provided parameters
    asyncio.run(light.blink(num_iterations, blink_duration))
    return {"message": "Done blinking."}
Re-run the server.py script.
In the web browser, we can now try: http://localhost:5000/blink?iterations=6&duration=1
Note You can tune the blink_duration & num_iterations parameters in the http request to tune the duration and interation of blinking
Try to open the same link from your phone and you will see that the server will also accept the request and run the blink methond.
Commit and Push! You’ve written a new piece of code, let’s make sure that Git keeps a version of it.
Updating the CHANGELOG file In this assignment you have made significant additions to your prototype. Edit the file
CHANGELOG.mdand add what you have achieved in this assignment.
![]()
![]()
![]()
The European Commission's support for the production of this publication does not constitute an endorsement of the contents, which reflect the views only of the authors, and the Commission cannot be held responsible for any use which may be made of the information contained therein.