In this Lab Experiment, Step 1 will walk you through the specification of a REST API for your connected product. In step 2, we will see how to listen to the data updates of someone else's THING in your team via MQTT, realising the concept of the Good Night Lamp.
Step 1 Design a REST API
In Assignment 5, we have created a web service with a webserver running on the Raspberry Pi. We implemented an endpoint /blink to expose the blink() method of the Lightbulb class. This demonstrates how to control our lightbulb via the HTTP from the network.
This process has two main purposes:
- it exposes the functionalities of your connected product to the network. You can then envision web or mobile apps and other devices of your concept to interact with each other.
- it opens opportunities for developers to implement interaction with your connected product. In the home context, smart speakers and thermostats are typical devices that offer APIs to get information from them or send information to them.
In this first step, we will specify the why, what, who and how of our connected product. We will use the OpenAPI specification. As an example of REST API specification, you can look at the Swagger Editor demo which gives an example of a Petstore API.
You will notice in the Swagger Editor the buttons in the top menu ‘Generate Server’ and ‘Generate Client’. Indeed, based on a precise specification, it is possible to automatically generate the code of a server (running on the Raspberry Pi) and examples of clients code connecting to this server. It shows that as a designer you can play a major role in the exposure of your connected product through the specification.
Let’s create a file api_specification.yaml in your documentation directory and start with the overall description. A YAML file is a structured file which uses key:values (like JSON) and indentation as structure. The paths section will specify each endpoint and the components > schemas section will specify the data structures.
openapi: 3.0.1
info:
  title: The title of your web service
  description: >-
    Here it should describes your web service and its purpose.
  version: 0.0.1

paths:
# ...
components:
    schemas:
# ...
From there, we suggest to work on one path per team member:
/lights: exposing functionalities of the lightbulbs/sensors: exposing functionalities of the sensors/netdevices: exposing functionalities of the network scanner
Throughout the document, like in Python, make use of the hash # character to add comments.
NOTE You do not have to implement the endpoint you specify throughout this exercise. The focus is on carefully specifying and explaining design choices.
This step is self-contained in the file
api_specification.yaml. You do not need to report this step in the lab XP report.
Task 1.2 What to expose
This is the main step of your API design, what do you want to expose. List each relevant endpoint and HTTP methods (get, post, put, delete). We usually use plurals for collections. The operationId is the name of the function it should call in your Python code. Explain the purpose of each endpoint, the choice of path and parameters as well as the choice of method.
/lights:
    post:
        summary: What is the purpose of this endpoint?
        operationId: createLightbulb
The following example could be used as a starting point to get data from your Rasberry Pi. The optional parameters are specify after the path with a question mark. The following example would look like ?from=1602828167.
/sensors/{sensorId}/data:
    get:
        summary: What is the purpose of this endpoint?
        operationId: actions
        parameters:
        - name: sensorId
            in: path
            description: ID of sensor to look at
            required: true
            schema:
                type: integer
                format: int64
        - name: from
            in: path
            description: UNIX timestamp of the start time
            required: false
            schema:
                type: integer
                format: int64
Task 1.2 What to exchange?
What will be exchanged between the client and the server? To understand each other, the server and the client need to know what they should send and what they should expect to receive. It is often all or part of the classes you define in your code. For example, for the /netdevices you might want to exchange a structure that includes the properties of the class NetworkDevice. Add your data structures (or schemas) in components > schemas
NetworkDevice:
      type: object
      properties:
        name:
          type: string
          example: TP-Link
# ...
Task 1.3 What to respond?
For each method (get, post…) of your path, what should your endpoint respond? Here is an example for the sensors. It is ordered by HTTP status code. Specify the ones that are relevant to your case. You can find the complete list here. Notice the reference to the schema defined in Task 1.2.
      responses:
        200:
          description: successful operation
          content:
            application/json:
              schema:
                type: array
                items:
                  $ref: '#/components/schemas/Sensor'
        404:
          description: Sensor not found
          content: {}
As mentioned, you do not have to implement these API. However, if you are curious about how the code could look like, you can paste your specification in the Swagger Editor and generate the server code for ‘python-flask’.
Step 2 Connect Homes via MQTT
In this step, we use the MQTT protocol to listen to the lightbulb status of the other team member. This enables each lightbulb to react based on the behaviour of other lightbulbs, realising the mechanism of the Good Night lamp.
Task 2.1 Create a group (once per team)
Bucket includes an MQTT server allowing Things to publish the updated values of their Properties. This is how our Python code has been sending data to Bucket throughout the course. Similar to the HTTP REST API, the server receive values of a Thing on the topic:
/things/[THING ID]/properties/[PROPERTY ID]
However, for both security and privacy reasons, we can only publish and subscribe on this topic if we are the Thing (with the private key) or if we are the owner of the Thing (with our user credentials). If we want others to see the data of our Properties, we need to explicitly grant them access. We will do this in two stages:
- we create a group and add the things of all team members in this group
- we grant access of each LIGHTBULB_STATUS property to all members of the group
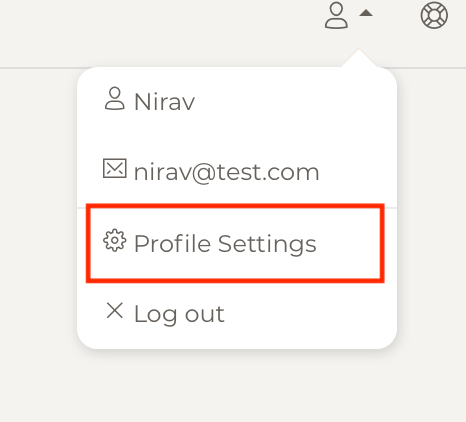
On Bucket, in the top-right corner, click on the user icon > Profile Settings.
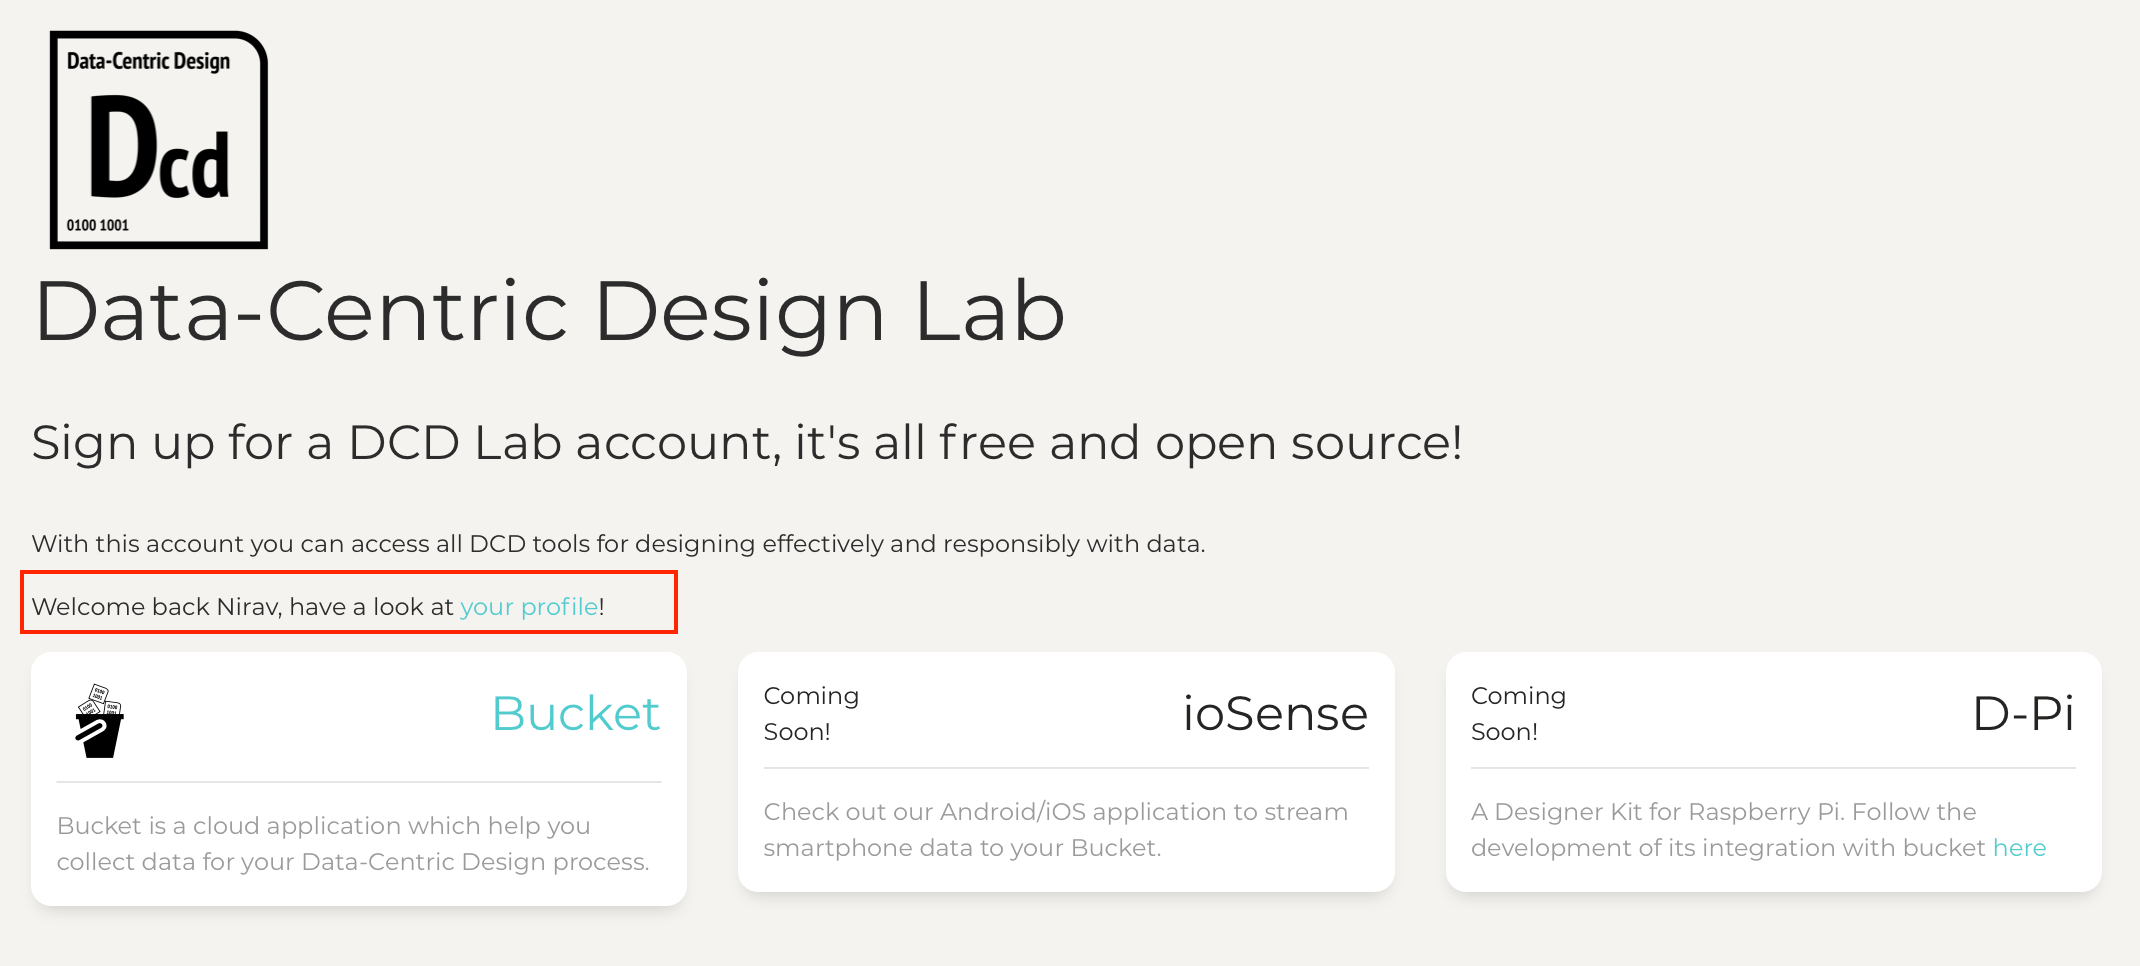
You will be prompted to sign in for the management page of your DCD account. As we have already a bucket account, page will give you the link to go to the account management page.
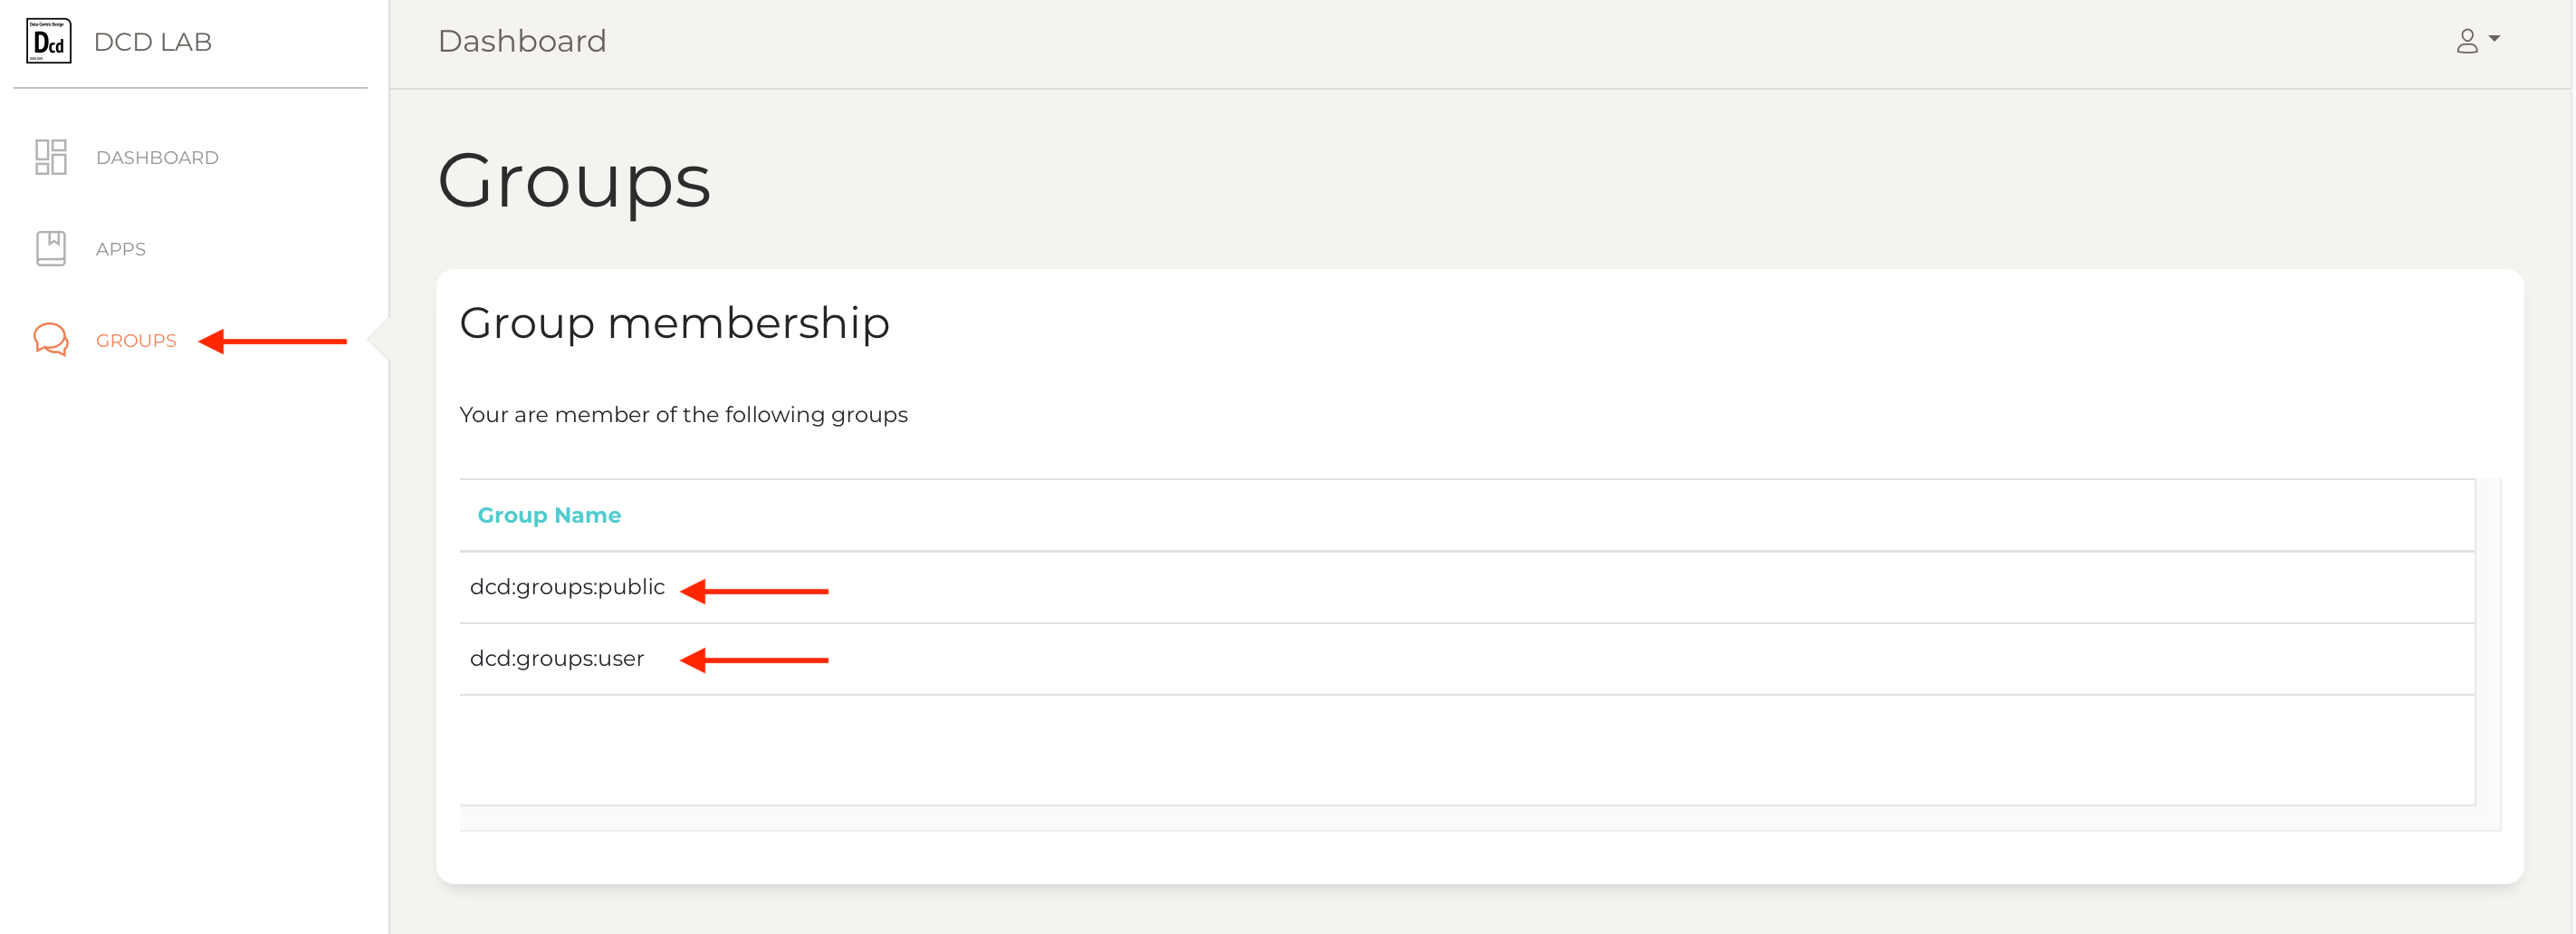
In the left panel, select ‘Groups’. On the page, you should see a list of groups that you are in, namely ‘public’ and ‘user’, giving you access to all things that are shared publicly or to regular users (as opposed to ‘administrator’).
Below this list, in the group management field, enter the name of a new group (avoid spaces or special characters). Then, click the green button ‘Create a new group’. 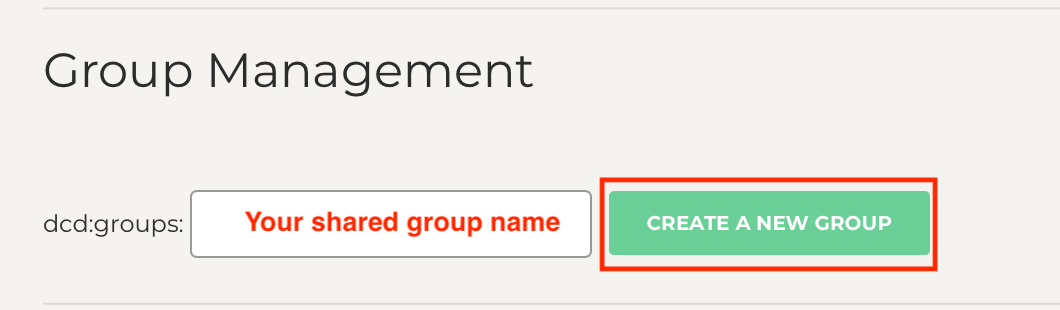
The group should appear in the list of groups you are in, as well as a setting card with the option to add members to this group. The creator of the group is automatically added to this group and the only one who can see the setting card for this group. 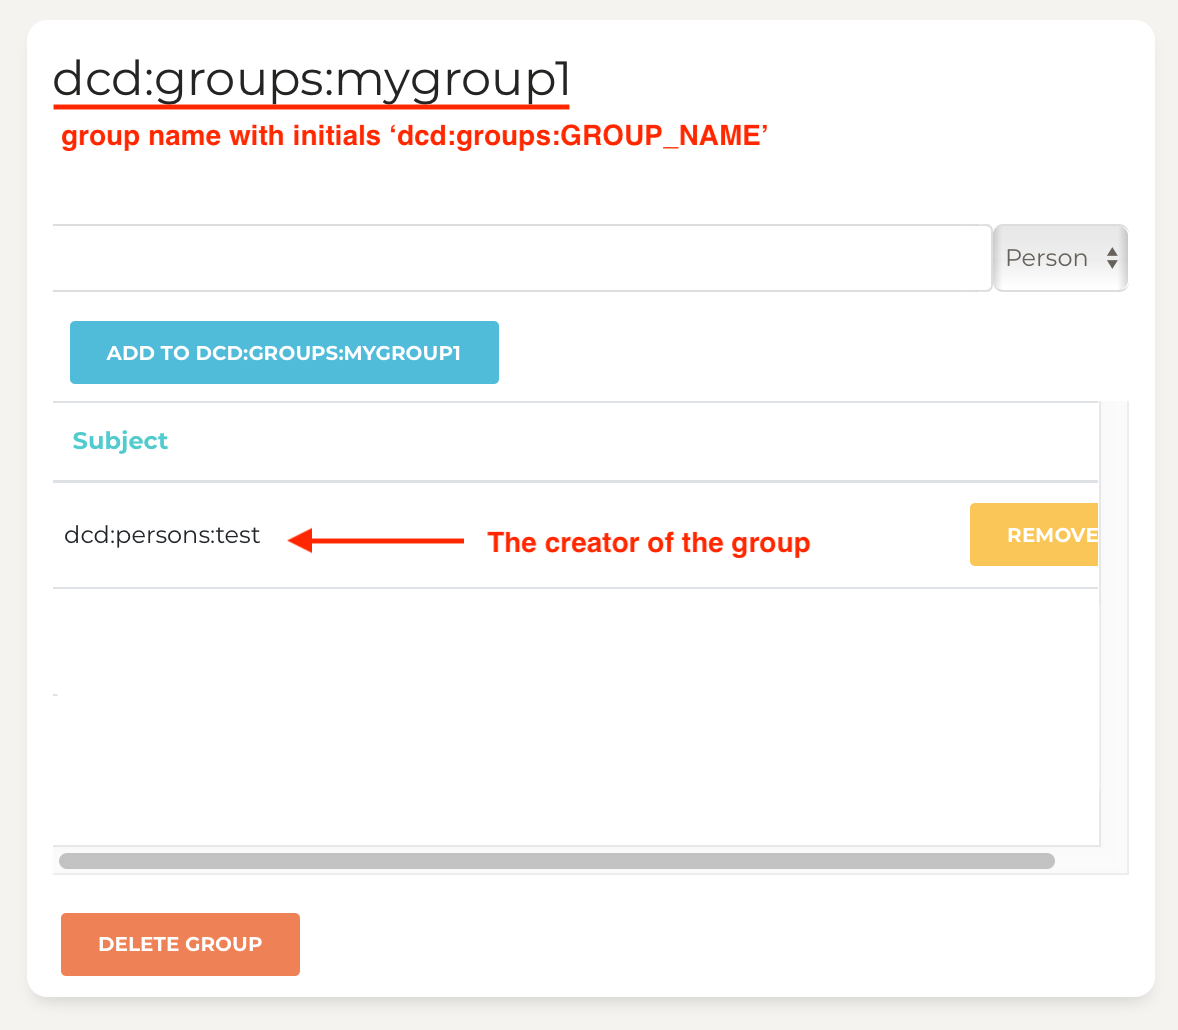 On this setting card, select ‘Thing’ in the dropdown menu, and paste the thing ID of your lightbulb. Click on the blue button ‘Add to group’. Repeat this process with the Thing ID of your teammates’ lightbulb.
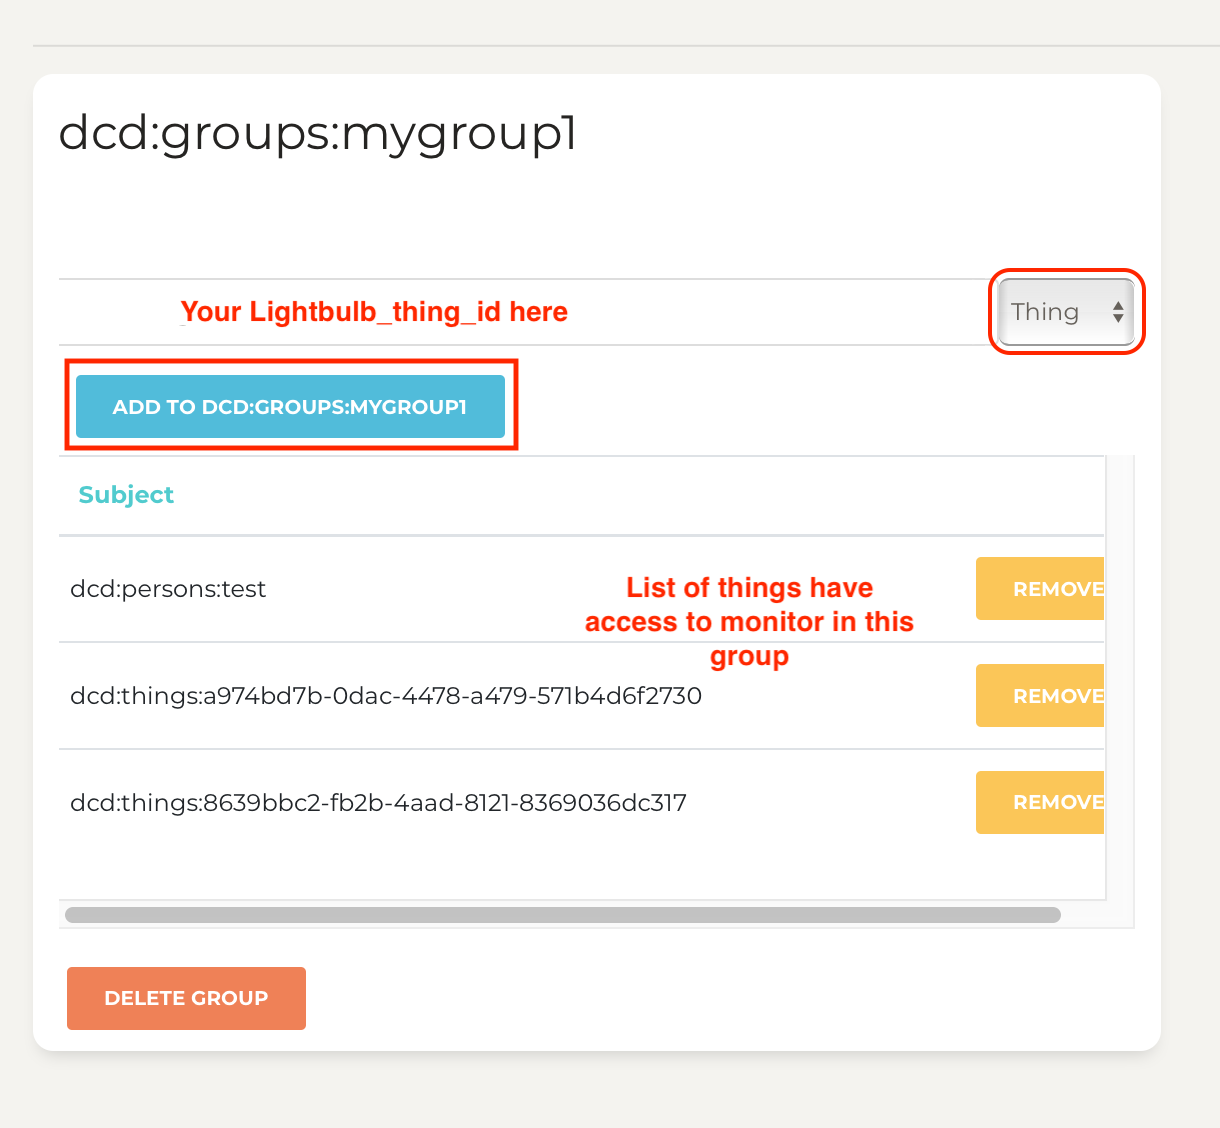
At this stage, we still do not share any properties. We have a group of Things, making it easier to share properties with all members of that group.
Task 2.2 Share properties with the group
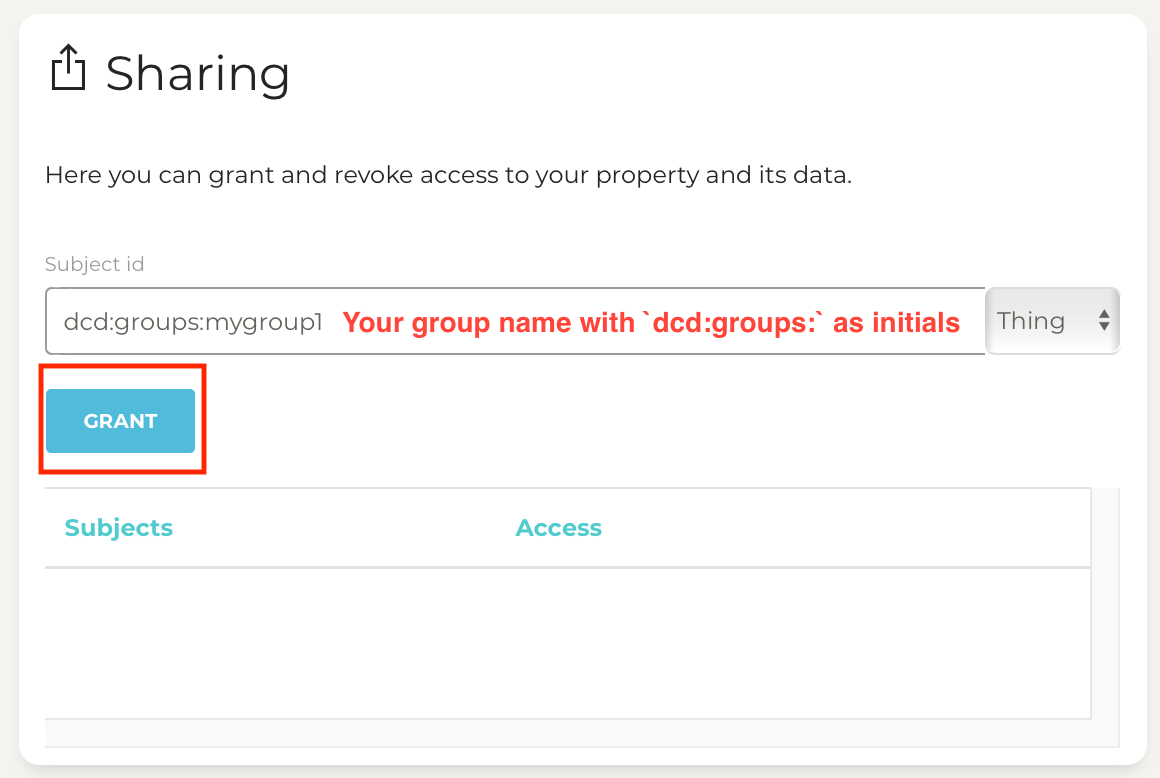
Now, each team member can go back to Bucket and the Lightbulb Thing they associated to the newly created group. Click on the property of type LIGHTBULB_STATUS.
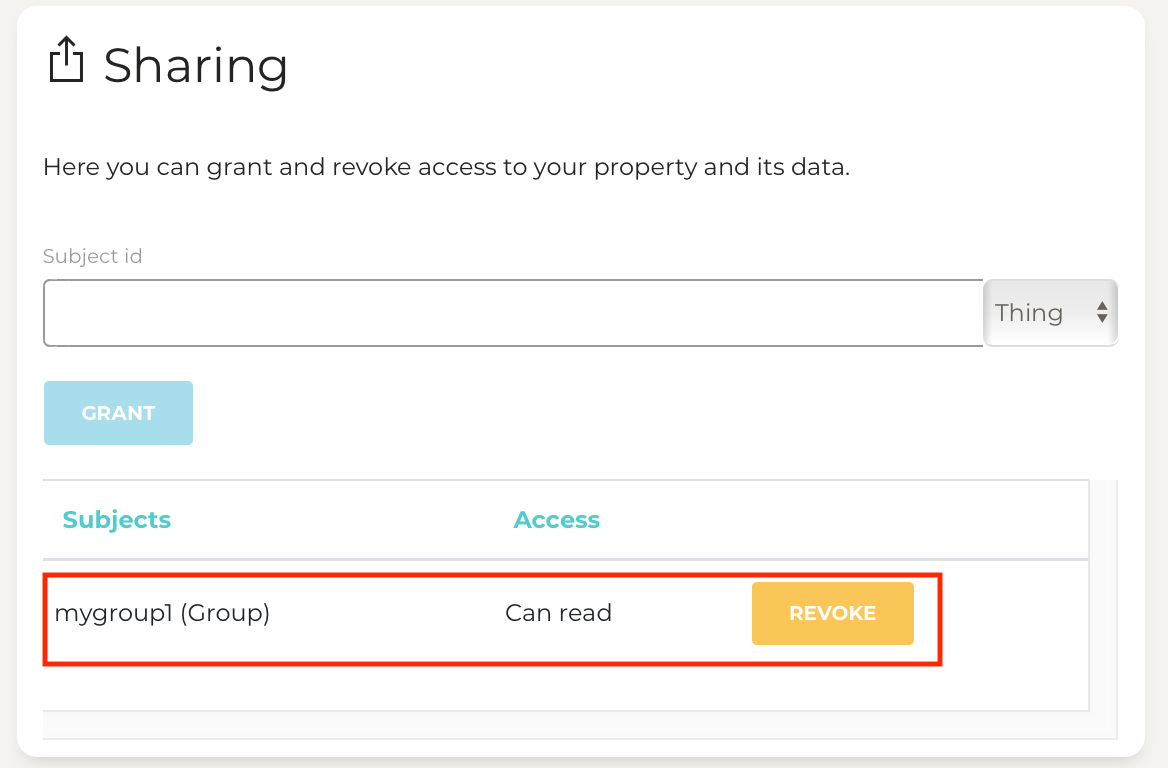
In the sharing settings of this property, enter the name of your group, select ‘group’ in the dropdown menu and click ‘Grant’. This should add the group to the list of granted subjects with ‘read’ access.
All things in the group should be able to access the data of this property now.
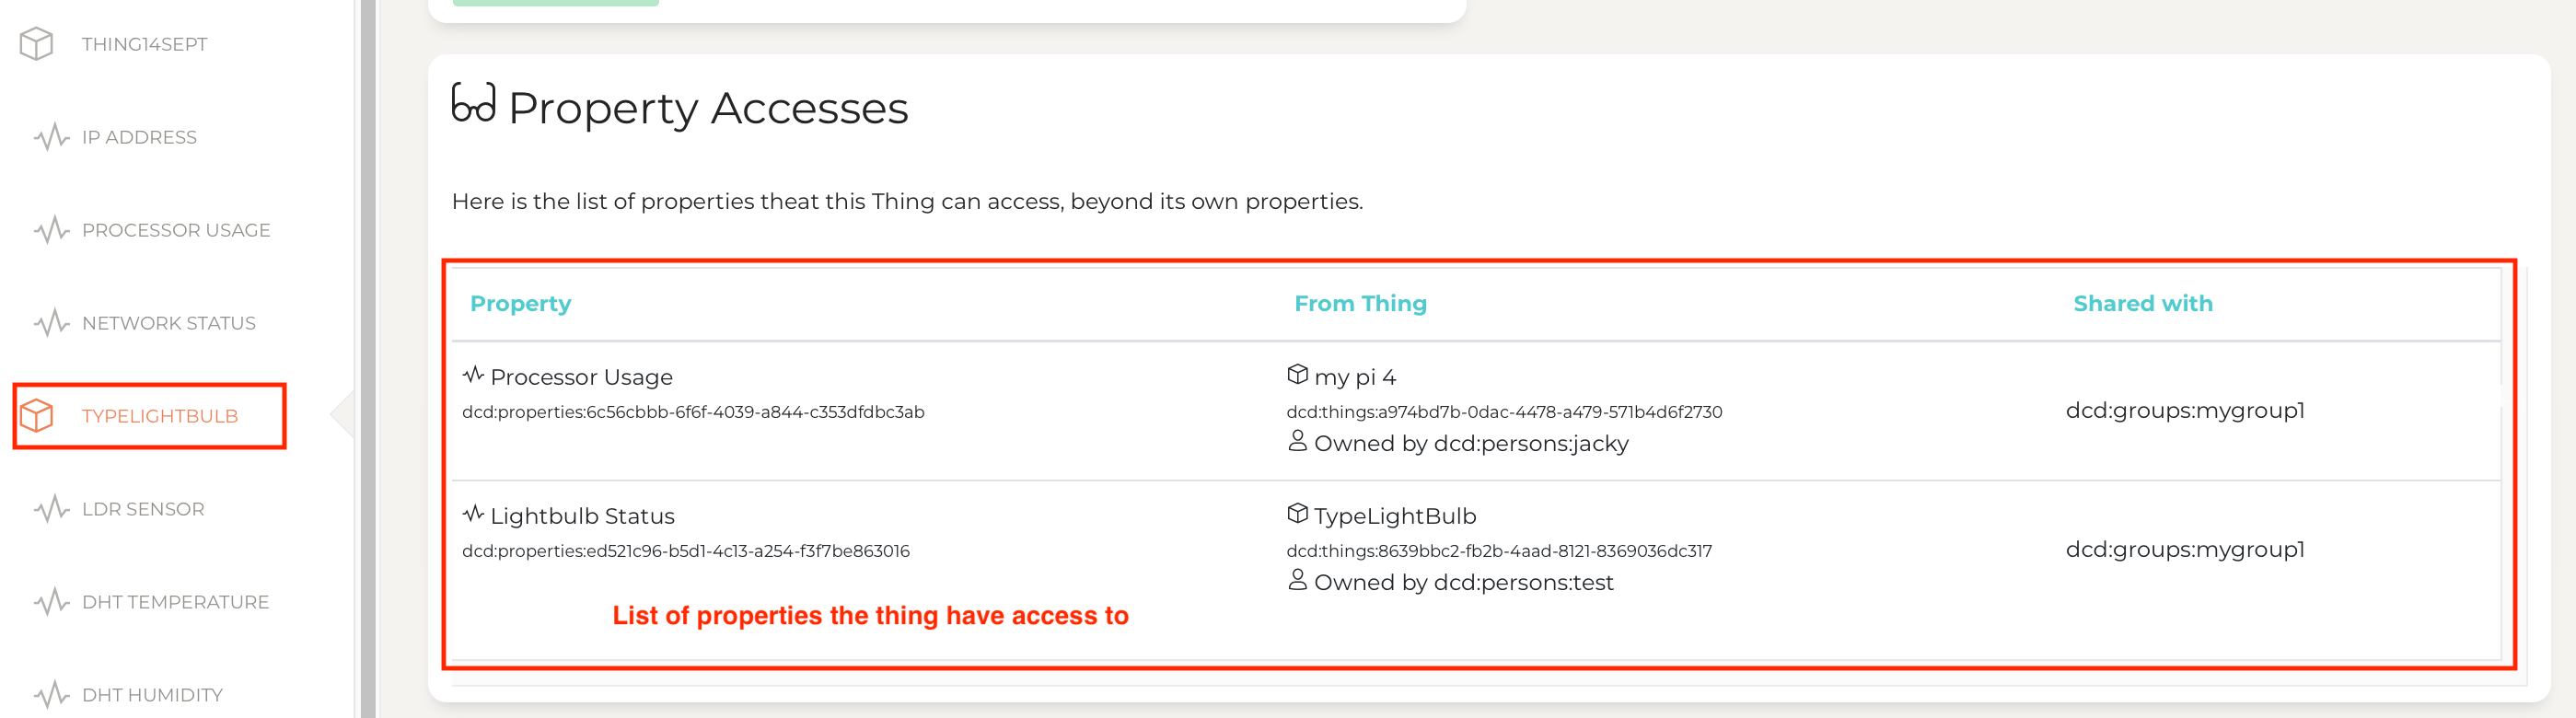
In the settings of your thing, check if you can see all three properties listed in the card ‘Property Accesses’.
Task 2.3 Search for shared properties
Back to VS Code and Python, let’s load the virtual environment.
As we updated our SDK, you will also need to uninstall and reinstall it in your machine and Pi venv folder both.
pip uninstall dcd-sdk
pip install dcd-sdk
For this lab experiment, we can create a file shared_property_handler.py with the following code:
from dotenv import load_dotenv
import os
load_dotenv()

from dcd.bucket.thing import Thing  # our thing object

# Thing in for for the lightbulb, taken from the .env file
LIGHTBULB_THING_ID = os.getenv("LIGHTBULB_THING_ID", None)
LIGHTBULB_PRIVATE_KEY_PATH = os.getenv("LIGHTBULB_PRIVATE_KEY_PATH", None)

def main():
    # Instantiate a thing with its credential
    # By default, looking into .env for THING_ID and PRIVATE_KEY_PATH (default "./private.pem")
    global my_thing
    my_thing = Thing()
    shared_properties = my_thing.find_shared_properties()
    # Show a message if we did no find any shared properties
    if len(shared_properties) == 0:
        print("No shared property found.")

    for prop in shared_properties:
        # Show each property found
        prop.describe()

if __name__ == "__main__":
    main()
In this code, we create our Thing object and use its methods find_shared_properties().
Execute this code to check if the property sharing worked as intended. You should see a list of three properties.
Task 2.4 Subscribe to updates
Now that we have (read) access to the properties of our teammates, we can subscribe to their value updates. Let’s first move this initial code in a separate function subscribe_to_other_lightbulbs().
def main():
    my_thing = Thing()
    subscribe_to_other_lightbulbs()
Our function should look like this:
def subscribe_to_other_lightbulbs():
    """Search for all properties shared with our Thing and subscribe to MQTT messages from those of type LIGHTBULB_STATUS
    """
    # search for shared properties, leave empty for all
    # add "dcd:group:..." to target shared properties within a specific group.
    shared_properties = my_thing.find_shared_properties()
    # Show a message if we did no find any shared properties
    if len(shared_properties) == 0:
        print("No shared property found.")
    # Select only the properties of type LIGHTBULB_STATUS and not from our Thing
    for prop in shared_properties:
        # Show each property found
        prop.describe()
From here, there are three tasks to be done:
- Filter out our own properties and properties that are not of type LIGTHBULB_STATUS. We do not want to listen to our own updates, even though our property is shared in this group.
- Build the MQTT topic as described in the first Task, composed of /things/[thing id]/properties/[property id]
- Set a handler, with the same principle as our sensor or network handler, we want to define what to do when we receive an update from the team members’ lightbulb.
- Subscribe to the MQTT topic so that we start receiving updates.
These translate in the following lines of code to add to our for-loop (to be done for each shared property)
        if prop.type_id == "LIGHTBULB_STATUS" and my_thing.thing_id != prop.thing.id:
            # Prepare the MQTT topic to subscribe
            topic = "/things/" + prop.thing.id + "/properties/" + prop.property_id
            # Set the handler on this topic
            my_thing.mqtt.mqtt_client.message_callback_add(topic, other_lightbulb_handler)
            # Subscribe to the topic
            my_thing.mqtt.mqtt_client.subscribe([(topic, 1)])
Task 2.5 Handle value updates
Before executing the code, we need to define the function we specified as the handler, namely other_lightbulb_handler.
We need to add import json at the top of the file so that we can manipulate JSON object easily. Here is an example of handler function It prints the MQTT topic on which the message was received, which tells us about the thing and the property it comes from. It also loads the message as a JSON structure and prints it.
def other_lightbulb_handler(client, userdata, msg):
    """Handle events from other lightbulbs
    Args:
        client: the MQTT client instance for this callback
        userdata: the private user data
        msg (MQTTMessage): an instance of MQTTMessage.
    """
    print("Event from an other lightbulb!")
    print("Topic: " + msg.topic)
    jsonMsg = json.loads(msg.payload)
    print("JSON message: " +str(jsonMsg))
Executing the code, not much should happen until someone in the team updates its lightbulb status.
You can replace the print() statement with a call to your lightbulb and start controlling your lightbulb based on the status of others’.
Report On GitHub, in your lab experiment report, draw a diagram to capture the interaction between the three lightbulb Thing through MQTT. Describe what you tried and what opportunities you can envision with this mechanism.
![]()
![]()
![]()
The European Commission's support for the production of this publication does not constitute an endorsement of the contents, which reflect the views only of the authors, and the Commission cannot be held responsible for any use which may be made of the information contained therein.